Hashicorp Vault - Installation 2023

Vault takes the security burden away from developers by providing a secure, centralized secret store for an application’s sensitive data: credentials, certificates, encryption keys, and more.
Installation
Add PGP for the package signing key (can be skipped if you already installed other Hashicorp products):
sudo apt update && sudo apt install gpg
Add the HashiCorp GPG key (can be skipped if you already installed other Hashicorp products):
wget -O- https://apt.releases.hashicorp.com/gpg | gpg --dearmor | sudo tee /usr/share/keyrings/hashicorp-archive-keyring.gpg >/dev/null
Add the official HashiCorp Linux repository (can be skipped if you already installed other Hashicorp products):
echo "deb [signed-by=/usr/share/keyrings/hashicorp-archive-keyring.gpg] https://apt.releases.hashicorp.com $(lsb_release -cs) main" | sudo tee /etc/apt/sources.list.d/hashicorp.list
Update and install:
sudo apt update && sudo apt install vault

vault -v
Vault v1.12.2 (415e1fe3118eebd5df6cb60d13defdc01aa17b03), built 2022-11-23T12:53:46Z
ls -la /etc/vault.d
-rw-r--r--  1 vault vault    0 Nov 23 21:55 vault.env
-rw-r--r--  1 vault vault  975 Nov 23 21:55 vault.hcl
ls -la /opt/vault/tls
-rw------- 1 vault vault 1850 Dec  4 05:37 tls.crt
-rw------- 1 vault vault 3272 Dec  4 05:37 tls.key
Configuring Vault Storage
Vault can either store it's data internally:
/etc/vault.d/vault.hcl
storage "raft" {
  path    = "./vault/data"
  node_id = "node1"
}

storage "file" {
  path = "/opt/vault/data"
}
Or use Consul:
/etc/vault.d/vault.hcl
storage "consul" {
 address = "127.0.0.1:8500"
 path    = "vault"
}
If you want to use Consul make sure that the HTTP port is configured in accordingly:
/etc/consul.d/server.hcl
ports {
  grpc  = 8503
  grpc_tls = 8502
  dns = -1
  http = 8500
  https = 8501
  serf_lan = 8301
  serf_wan = 8302
  server = 8300
}
Configuring HTTP Access
/etc/vault.d/vault.hcl
# HTTP listener
listener "tcp" {
 address = "127.0.0.1:8200"
 tls_disable = 1
}
One or more listeners determine how Vault listens for API requests. The example above listens on localhost port 8200 without TLS. We can add another listener for the HTTPS connection
/etc/vault.d/vault.hcl
# HTTPS listener
listener "tcp" {
  address       = "my.server.ip.or.domain:8201"
  tls_cert_file = "/opt/vault/tls/tls.crt"
  tls_key_file  = "/opt/vault/tls/tls.key"
}
Enable the Vault service:
systemctl enable vault
systemctl start vault
Initialize Vault server
Run the following command to initialize Vault server and receive an unseal key and initial root token:
vault operator init
Error Message:
http: server gave HTTP response to HTTPS client
In your environment set the Vault address so the Vault client will connect without TLS. Add the following to your shell config:
export VAULT_ADDR=http://127.0.0.1:8200
Now it works:
vault operator init
Unseal Key 1: 4jYbl2CBIv6SpkKj6Hos9iD32k5RfGkLzlosrrq/JgOm
Unseal Key 2: B05G1DRtfYckFV5BbdBvXq0wkK5HFqB9g2jcDmNfTQiS
Unseal Key 3: Arig0N9rN9ezkTRo7qTB7gsIZDaonOcc53EHo83F5chA
Unseal Key 4: 0cZE0C/gEk3YHaKjIWxhyyfs8REhqkRW/CSXTnmTilv+
Unseal Key 5: fYhZOseRgzxmJCmIqUdxEm9C3jB5Q27AowER9w4FC2Ck

Initial Root Token: s.KkNJYWF5g0pomcCLEmDdOVCW

Vault initialized with 5 key shares and a key threshold of 3. Please securely
distribute the key shares printed above. When the Vault is re-sealed,
restarted, or stopped, you must supply at least 3 of these keys to unseal it
before it can start servicing requests.

Vault does not store the generated root key. Without at least 3 keys to
reconstruct the root key, Vault will remain permanently sealed!

It is possible to generate new unseal keys, provided you have a quorum of
existing unseal keys shares. See "vault operator rekey" for more information.
Seal/Unseal
Every initialized Vault server starts in the sealed state. From the configuration, Vault can access the physical storage, but it can't read any of it because it doesn't know how to decrypt it. Unsealing has to happen every time Vault starts. It can be done via the API and via the command line. To unseal the Vault, you must have 3 unseal keys. Run the following command 3 times with different keys until the Unseal Progress reaches 3/3:
vault operator unseal
Unseal Key (will be hidden):
Key                    Value
---                    -----
Seal Type              shamir
Initialized            true
Sealed                 false
Total Shares           5
Threshold              3
Version                1.12.2
Build Date             2022-11-23T12:53:46Z
Storage Type           consul
Cluster Name           vault-cluster-0ba62cae
Cluster ID             7d49e5fd-a1a4-c1d1-55e2-7962e43006a1
HA Enabled             true
HA Cluster             n/a
HA Mode                standby
Active Node Address    <none>
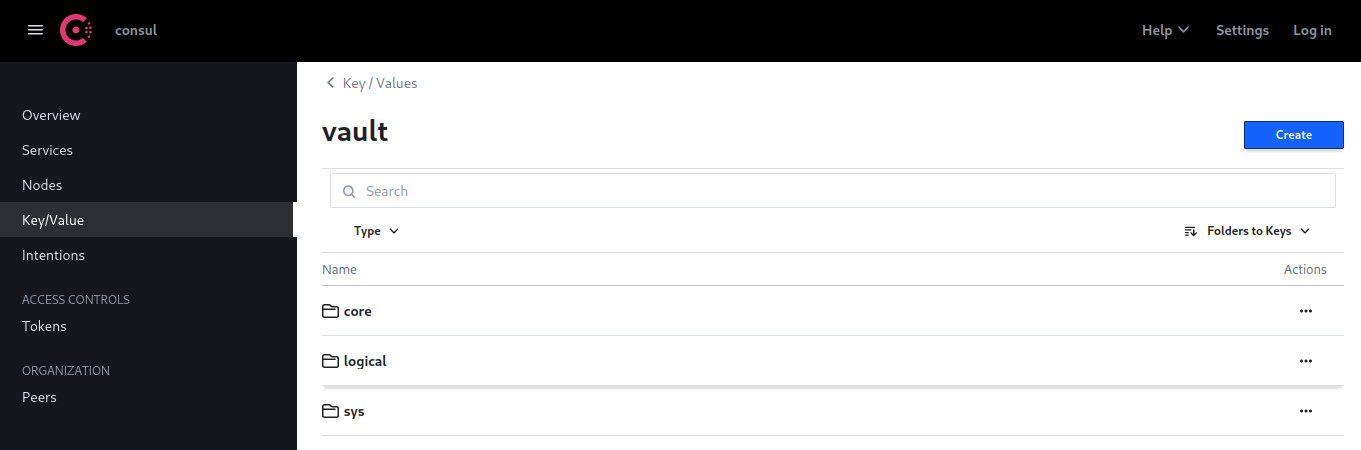
The Storage Type is set to consul and I am able to see the K/V entries in Consul:
Vault Login
Use the Initial Root Token: s.KkNJYWF5g0pomcCLEmDdOVCW you were given to log into Vault:
vault login

Success! You are now authenticated. The token information displayed below
is already stored in the token helper. You do NOT need to run "vault login"
again. Future Vault requests will automatically use this token.

Key                  Value
---                  -----
token                s.spAZOi7SlpdFTNed50sYYCIU
token_accessor       OevFmMXjbmOCQ8rSubY84vVp
token_duration       ∞
token_renewable      false
token_policies       ["root"]
identity_policies    []
policies             ["root"]
The token can also be set as a global variable during development
export VAULT_TOKEN="s.KkNJYWF5g0pomcCLEmDdOVCW"
You can check the Vault status and should now see that the service is active and ready for operation:
vault status
Key             Value
---             -----
Seal Type       shamir
Initialized     true
Sealed          false
Total Shares    5
Threshold       3
Version         1.12.2
Build Date      2022-11-23T12:53:46Z
Storage Type    consul
Cluster Name    vault-cluster-0ba62cae
Cluster ID      7d49e5fd-a1a4-c1d1-55e2-7962e43006a1
HA Enabled      true
HA Cluster      https://127.0.0.1:8201
HA Mode         active
Active Since    2022-12-04T06:37:54.871984008Z
As a root user, you can reseal the Vault with:
vault operator seal
Success! Vault is sealed.
A single operator is allowed to do this. This lets a single operator lock down the Vault in an emergency without consulting other operators.
vault status
Key                Value
---                -----
Seal Type          shamir
Initialized        true
Sealed             true
Total Shares       5
Threshold          3
Unseal Progress    0/3
Unseal Nonce       n/a
Version            1.12.2
Build Date         2022-11-23T12:53:46Z
Storage Type       consul
HA Enabled         true
Start using Vault
Adding information to the Vault key-value store:
vault kv put -mount=secret hello foo=world

Error making API request.
* preflight capability check returned 403, please ensure client's policies grant access to path "secret/"
Sorting out the missing permissions:
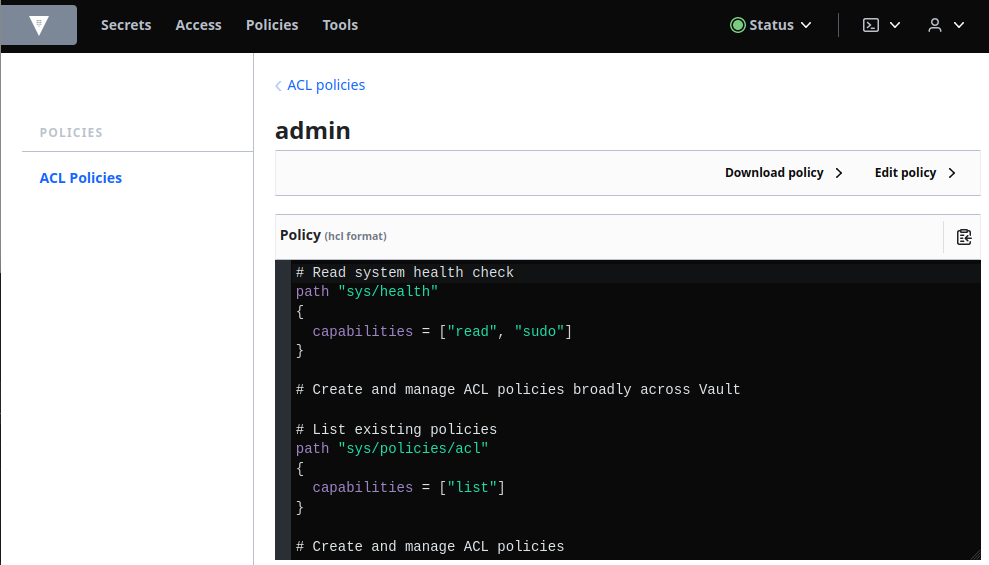
mkdir /etc/vault.d/policies && nano /etc/vault.d/policies/admin-policy.hcl
/etc/vault.d/policies/admin-policy.hcl
# Read system health check
path "sys/health"
{
  capabilities = ["read", "sudo"]
}

# Create and manage ACL policies broadly across Vault

# List existing policies
path "sys/policies/acl"
{
  capabilities = ["list"]
}

# Create and manage ACL policies
path "sys/policies/acl/*"
{
  capabilities = ["create", "read", "update", "delete", "list", "sudo"]
}

# Enable and manage authentication methods broadly across Vault

# Manage auth methods broadly across Vault
path "auth/*"
{
  capabilities = ["create", "read", "update", "delete", "list", "sudo"]
}

# Create, update, and delete auth methods
path "sys/auth/*"
{
  capabilities = ["create", "update", "delete", "sudo"]
}

# List auth methods
path "sys/auth"
{
  capabilities = ["read"]
}

# Enable and manage the key/value secrets engine at `secret/` path

# List, create, update, and delete key/value secrets
path "secret/*"
{
  capabilities = ["create", "read", "update", "delete", "list", "sudo"]
}

# List, create, update, and delete key/value pki entries
path "pki/*"
{
  capabilities = ["create", "read", "update", "delete", "list", "sudo"]
}

# List, create, update, and delete key/value intermediate pki entries
path "pki_int/*"
{
  capabilities = ["create", "read", "update", "delete", "list", "sudo"]
}

# Manage secrets engines
path "sys/mounts/*"
{
  capabilities = ["create", "read", "update", "delete", "list", "sudo"]
}

# List existing secrets engines.
path "sys/mounts"
{
  capabilities = ["read"]
}
Create a policy named admin with the policy defined in admin-policy.hcl.
vault policy write admin /etc/vault.d/policies/admin-policy.hcl
Success! Uploaded policy: admin
vault policy list
vault policy read admin
Create a token with the admin policy attached and store the token in the variable ADMIN_TOKEN:
ADMIN_TOKEN=$(vault token create -format=json -policy="admin" | jq -r ".auth.client_token")
echo $ADMIN_TOKEN
s.MdNlboI0nff3Xpo97d1TfIxd
Check if we actually have the rights now:
vault token capabilities $ADMIN_TOKEN secret/
create, delete, list, read, sudo, update
:thumbsup:
Hmm but I was still running into issues here. It seems that I first had to activate the secrets engine:
vault secrets enable -path=secret/ kv
And now it works!
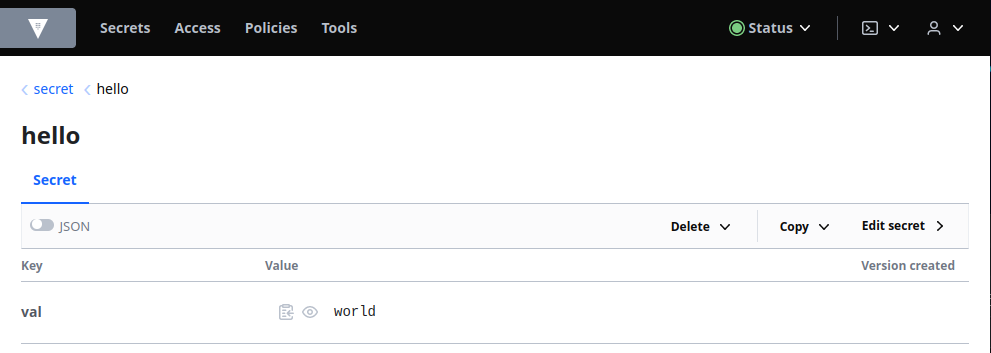
vault kv put secret/hello val=world
vault kv get -format=json secret/hello
{
  "request_id": "e13372c4-9026-44c5-c912-d25469b8d7e8",
  "lease_id": "",
  "lease_duration": 2764800,
  "renewable": false,
  "data": {
    "val": "world"
  },
  "warnings": null
}
Advanced Use-cases
- Generate mTLS Certificates for Nomad using Vault Part1
- Generate mTLS Certificates for Consul with Vault Part2
- Generate mTLS Certificates for Consul with Vault Part3
- Generate mTLS Certificates for Nomad with Vault
- Build Your Own Certificate Authority (CA)