ROS2 Graph Concepts

Excerpt from ROS 2 Documentation (IRON): The Robot Operating System (ROS) is a set of software libraries and tools for building robot applications. From drivers and state-of-the-art algorithms to powerful developer tools, ROS has the open source tools you need for your next robotics project.
The ROS 2 Graph
Start by verifying your installation:
printenv | grep -i ROS

ROS_VERSION=2
ROS_PYTHON_VERSION=3
ROS_DISTRO=iron
ROS_DOMAIN_ID=88
...
The ROS graph is a network of ROS 2 elements processing data together at the same time. It encompasses all executables in nodes and the connections between them. Each node in ROS should be responsible for a single, modular purpose, e.g. controlling the wheel motors or publishing the sensor data from a laser range-finder. Each node can send and receive data from other nodes via topics, services, actions, or parameters.
A full robotic system is comprised of many nodes working in concert. In ROS 2, a single executable (C++ program, Python program, etc.) can contain one or more nodes.
Nodes
Run
The command ros2 run launches an executable from a package.
ros2 run <package_name> <executable_name>
For example for the turtlesim enter the following command:
ros2 run turtlesim turtlesim_node
ros2 run turtlesim turtle_teleop_key
List
Open a new terminal while turtlesim is still running in the other one, and enter the following command:
ros2 node list
The terminal will return the Node Name:
/turtlesim
/teleop_turtle
Remap
Remapping allows you to reassign default node properties, like node name, topic names, service names, etc., to custom values.
E.g. you can reassign the name of our /turtlesim node. In a new terminal, run the following command:
ros2 run turtlesim turtlesim_node --ros-args --remap __node:=heroturtlesim
Since you’re calling ros2 run on turtlesim again, another turtlesim window will open. However, now if you return to the terminal where you ran ros2 node list, and run it again, you will see three node names:
/heroturtlesim
/turtlesim
/teleop_turtle
Info
Now that you know the names of your nodes, you can access more information about them with:
ros2 node info <node_name>
To examine your latest node, heroturtlesim, run the following command:
ros2 node info /heroturtlesim4074sgs/msg/Twist
  Publishers:
    /parameter_events: rcl_interfaces/msg/ParameterEvent
    /rosout: rcl_interfaces/msg/Log
    /turtle1/color_sensor: turtlesim/msg/Color
    /turtle1/pose: turtlesim/msg/Pose
  Service Servers:
    /clear: std_srvs/srv/Empty
    /kill: turtlesim/srv/Kill
    /heroturtlesim/describe_parameters: rcl_interfaces/srv/DescribeParameters
    /heroturtlesim/get_parameter_types: rcl_interfaces/srv/GetParameterTypes
    /heroturtlesim/get_parameters: rcl_interfaces/srv/GetParameters
    /heroturtlesim/list_parameters: rcl_interfaces/srv/ListParameters
    /heroturtlesim/set_parameters: rcl_interfaces/srv/SetParameters
    /heroturtlesim/set_parameters_atomically: rcl_interfaces/srv/SetParametersAtomically
    /reset: std_srvs/srv/Empty
    /spawn: turtlesim/srv/Spawn
    /turtle1/set_pen: turtlesim/srv/SetPen
    /turtle1/teleport_absolute: turtlesim/srv/TeleportAbsolute
    /turtle1/teleport_relative: turtlesim/srv/TeleportRelative
  Service Clients:

  Action Servers:
    /turtle1/rotate_absolute: turtlesim/action/RotateAbsolute
  Action Clients:
Topics
ROS 2 breaks complex systems down into many modular nodes. Topics are a vital element of the ROS graph that act as a bus for nodes to exchange messages. A node may publish data to any number of topics and simultaneously have subscriptions to any number of topics.
First make sure that turtlesim is still running:
ros2 run turtlesim turtlesim_node
ros2 run turtlesim turtle_teleop_key
List
We now have two Nodes:
ros2 node list

/turtlesim
/teleop_turtle
With 4 active Topics:
ros2 topic list -t

/parameter_events [rcl_interfaces/msg/ParameterEvent]
/rosout [rcl_interfaces/msg/Log]
/turtle1/cmd_vel [geometry_msgs/msg/Twist]
/turtle1/color_sensor [turtlesim/msg/Color]
/turtle1/pose [turtlesim/msg/Pose]
Now open rqt_graph by opening `rqt`` and selecting Plugins > Introspection > Node Graph:
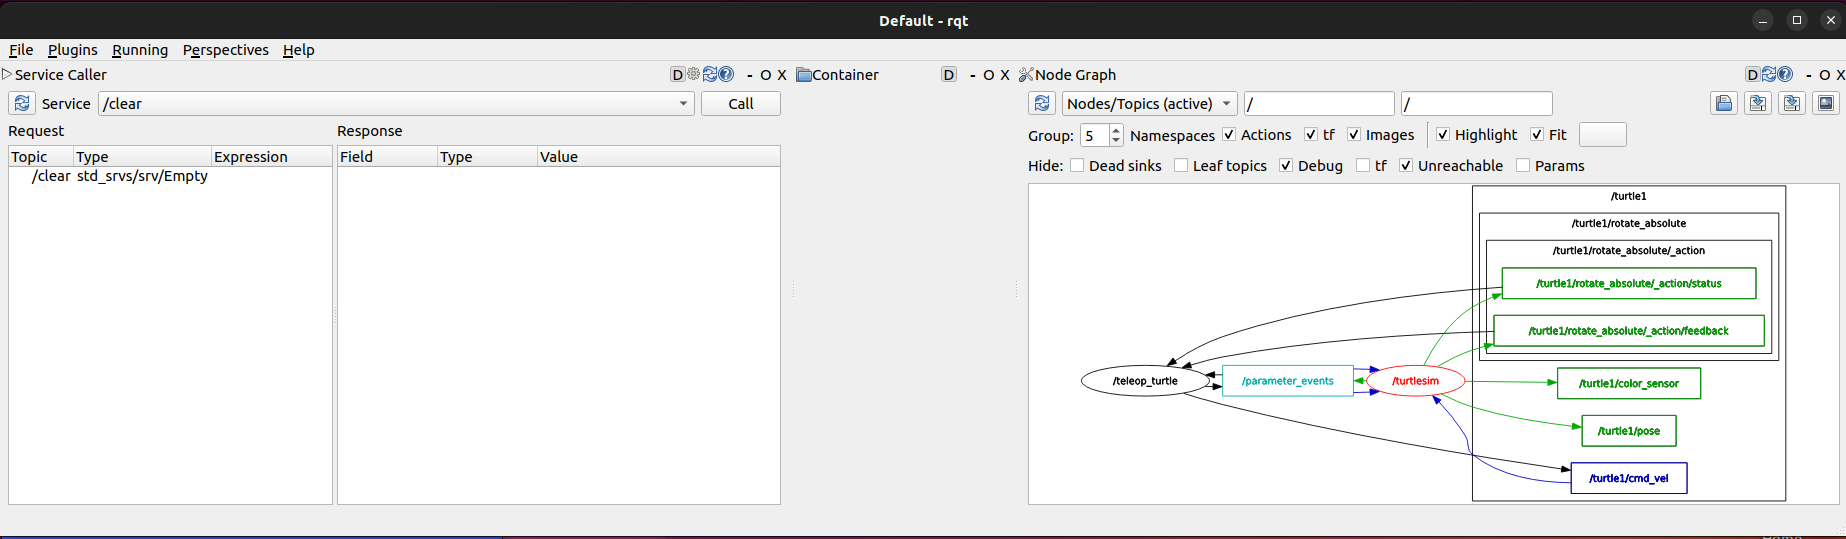
The graph is depicting how the /turtlesim node and the /teleop_turtle node are communicating with each other over a topic. The /teleop_turtle node is publishing data (the keystrokes you enter to move the turtle around) to the /turtle1/cmd_vel topic, and the /turtlesim node is subscribed to that topic to receive the data.
Echo
To inspect incoming messages on a topic run the echo command and send a test message - e.g. on the cmd_vel topic and use the teleop_turtle node to send commands to your turtlesim node:
ros2 topic echo /turtle1/cmd_vel
The position data being published for every movement you make:
linear:
  x: 0.0
  y: 0.0
  z: 0.0
angular:
  x: 0.0
  y: 0.0
  z: 2.0
  ---
You can update the graph (make sure that debug nodes/topics are not hidden) and see that there is a new ros2cli node subscribed to the /turtle1/cmd_vel.
Info
We can also verify the subscription using the info command:
ros2 topic info /turtle1/cmd_vel

Type: geometry_msgs/msg/Twist
Publisher count: 1
Subscription count: 2
That is telling us that only one node is publishing to this topic but we now have 2 subscriber. We also see the type here that allows us to check the required formatting of messages send through this topic:
ros2 interface show geometry_msgs/msg/Twist

This expresses velocity in free space broken into its linear and angular parts.

    Vector3  linear
            float64 x
            float64 y
            float64 z
    Vector3  angular
            float64 x
            float64 y
            float64 z
Pub
Now knowing the topic and the expected message structure we can publish our own messages directly though the ROS2 CLI. It’s important to note that this argument needs to be input in YAML syntax. Input the full command like so:
ros2 topic pub --once /turtle1/cmd_vel geometry_msgs/msg/Twist "{linear: {x: 5.0, y: 0.0, z: 0.0}, angular: {x: 0.0, y: 0.0, z: 1.8}}"


publisher: beginning loop
publishing #1: geometry_msgs.msg.Twist(linear=geometry_msgs.msg.Vector3(x=5.0, y=0.0, z=0.0), angular=geometry_msgs.msg.Vector3(x=0.0, y=0.0, z=1.8))
--once is an optional argument meaning publish one message then exit. Since robots require a steady stream of commands to operate continuously we can replace the --once option with the --rate 1 option, which tells ros2 topic pub to publish the command in a steady stream at 1 Hz:
ros2 topic pub --rate 1 /turtle1/cmd_vel geometry_msgs/msg/Twist "{linear: {x: 2.0, y: 0.0, z: 0.0}, angular: {x: 0.0, y: 0.0, z: 1.8}}"


publisher: beginning loop
publishing #1: geometry_msgs.msg.Twist(linear=geometry_msgs.msg.Vector3(x=5.0, y=0.0, z=0.0), angular=geometry_msgs.msg.Vector3(x=0.0, y=0.0, z=1.8))


publishing #2: geometry_msgs.msg.Twist(linear=geometry_msgs.msg.Vector3(x=5.0, y=0.0, z=0.0), angular=geometry_msgs.msg.Vector3(x=0.0, y=0.0, z=1.8))
...
Services
Services are another method of communication for nodes in the ROS graph. Services are based on a call-and-response model versus the publisher-subscriber model of topics. While topics allow nodes to subscribe to data streams and get continual updates, services only provide data when they are specifically called by a client.
Lists
Running the following command in a new terminal will return a list of all the services currently active in the system:
ros2 service list


/clear
/kill
/reset
/spawn
/teleop_turtle/describe_parameters
/teleop_turtle/get_parameter_types
/teleop_turtle/get_parameters
/teleop_turtle/list_parameters
/teleop_turtle/set_parameters
/teleop_turtle/set_parameters_atomically
/turtle1/set_pen
/turtle1/teleport_absolute
/turtle1/teleport_relative
/turtlesim/describe_parameters
/turtlesim/get_parameter_types
/turtlesim/get_parameters
/turtlesim/list_parameters
/turtlesim/set_parameters
/turtlesim/set_parameters_atomically
Types
Services have types that describe how the request and response data of a service is structured. Service types are defined similarly to topic types, except service types have two parts: one message for the request and another for the response:
ros2 service type /clear

std_srvs/srv/Empty
Find
The Empty type means the service call sends no data when making a request and receives no data when receiving a response. To find all the services of a specific type, you can use the command:
ros2 service find std_srvs/srv/Empty

/clear
/reset
Interfaces
To get the structure of a service that expects structured data you can use the interface command:
ros2 service list -t

...
/spawn [turtlesim/srv/Spawn]
...
ros2 interface show turtlesim/srv/Spawn

float32 x
float32 y
float32 theta
string name # Optional.  A unique name will be created and returned if this is empty
---
string name
The output tells us that to spawn another turtle bot we need to provide x,y coordinates plus a direction angle. We can also provide a name - but this will be autogenerated if empty. The service then expects a response with the name of the spawned bot.
Call
To call a service from the ROS2 CLI we can use the call command - which is similar to the pub command used above to update topics:
ros2 service call <service_name> <service_type> <arguments>
For example the /clear service does not require any arguments and simply deletes the lines drawn when moving the turtle bot and does not return any data:
ros2 service call /clear std_srvs/srv/Empty

waiting for service to become available...
requester: making request: std_srvs.srv.Empty_Request()

response:
std_srvs.srv.Empty_Response()
As seen above the /spawn service requires the following arguments to work:
ros2 service call /spawn turtlesim/srv/Spawn "{x: 2, y: 2, theta: 0.2, name: 'heroturtle'}"

requester: making request: turtlesim.srv.Spawn_Request(x=2.0, y=2.0, theta=0.2, name='heroturtle')

response:
turtlesim.srv.Spawn_Response(name='heroturtle')
Parameters
A parameter is a configuration value of a node. A node can store parameters as integers, floats, booleans, strings, and lists.
List
To see the parameters belonging to your nodes, open a new terminal and enter the command:
ros2 param list
You will see the node namespaces, /teleop_turtle and /turtlesim, followed by each node’s parameters:
/teleop_turtle:
  qos_overrides./parameter_events.publisher.depth
  qos_overrides./parameter_events.publisher.durability
  qos_overrides./parameter_events.publisher.history
  qos_overrides./parameter_events.publisher.reliability
  scale_angular
  scale_linear
  use_sim_time
/turtlesim:
  background_b
  background_g
  background_r
  qos_overrides./parameter_events.publisher.depth
  qos_overrides./parameter_events.publisher.durability
  qos_overrides./parameter_events.publisher.history
  qos_overrides./parameter_events.publisher.reliability
  use_sim_time
Get
Now that we have the list of active parameter for our two nodes we can read their values using:
ros2 param get /turtlesim background_b

Integer value is: 255
As to be expected for the blue background colour the b in rgb has the value 255.
Set
We can use the set command to make changes to the node parameter. The following command will turn the background of the turtlesim window magenta:
ros2 param set /turtlesim background_r 255
Param Dump
To save all parameter of your current session you can print them using the dump command and save them into a yaml file:
ros2 param dump /turtlesim > turtlesim.yml
cat turtlesim.yml

/turtlesim:
  ros__parameters:
    background_b: 255
    background_g: 86
    background_r: 255
    holonomic: false
    qos_overrides:
      /parameter_events:
        publisher:
          depth: 1000
          durability: volatile
          history: keep_last
          reliability: reliable
    start_type_description_service: true
    use_sim_time: false
Param Load
You can edit the file and restore the sims state from it, e.g. changing background_g: 0 to make the background screaming pink:
ros2 param load /turtlesim turtlesim.yml
Or restart the simulation with the restored parameter:
ros2 run turtlesim turtlesim_node --ros-args --params-file turtlesim.yaml
Actions
Actions are one of the communication types in ROS 2 and are intended for long running tasks. They consist of three parts: a goal, feedback, and a result.
Actions are built on topics and services. Their functionality is similar to services, except actions can be canceled. They also provide steady feedback, as opposed to services which return a single response. An “action client” node sends a goal to an “action server” node that acknowledges the goal and returns a stream of feedback and a result.
When you launch the /teleop_turtle node, you will see the following message in your terminal:
Use arrow keys to move the turtle.
Use G|B|V|C|D|E|R|T keys to rotate to absolute orientations. 'F' to cancel a rotation.
Pay attention to the terminal where the /turtlesim node is running. Each time you press one of these keys, you are sending a goal to an action server that is part of the /turtlesim node. The goal is to rotate the turtle to face a particular direction. A message relaying the result of the goal should display once the turtle completes its rotation:
[INFO] [turtlesim]: Rotation goal completed successfully
Node Info
To see the list of actions a node provides, /turtlesim in this case, open a new terminal and run the command:
ros2 node info /turtlesim
Which will return a list of /turtlesim’s Subscribers, Publishers, Services, Action Servers and Action Clients:
/turtlesim
  Subscribers:
    /parameter_events: rcl_interfaces/msg/ParameterEvent
    /turtle1/cmd_vel: geometry_msgs/msg/Twist
  Publishers:
    /parameter_events: rcl_interfaces/msg/ParameterEvent
    /rosout: rcl_interfaces/msg/Log
    /turtle1/color_sensor: turtlesim/msg/Color
    /turtle1/pose: turtlesim/msg/Pose
  Service Servers:
    /clear: std_srvs/srv/Empty
    /kill: turtlesim/srv/Kill
    /reset: std_srvs/srv/Empty
    /spawn: turtlesim/srv/Spawn
    /turtle1/set_pen: turtlesim/srv/SetPen
    /turtle1/teleport_absolute: turtlesim/srv/TeleportAbsolute
    /turtle1/teleport_relative: turtlesim/srv/TeleportRelative
    /turtlesim/describe_parameters: rcl_interfaces/srv/DescribeParameters
    /turtlesim/get_parameter_types: rcl_interfaces/srv/GetParameterTypes
    /turtlesim/get_parameters: rcl_interfaces/srv/GetParameters
    /turtlesim/list_parameters: rcl_interfaces/srv/ListParameters
    /turtlesim/set_parameters: rcl_interfaces/srv/SetParameters
    /turtlesim/set_parameters_atomically: rcl_interfaces/srv/SetParametersAtomically
  Service Clients:

  Action Servers:
    /turtle1/rotate_absolute: turtlesim/action/RotateAbsolute
  Action Clients:
Action List
To identify all the actions in the ROS graph, run the command:
ros2 action list
Which will return:
/turtle1/rotate_absolute
This is the only action in the ROS graph right now controling the turtle’s rotation. There is one Action Client (part of /teleop_turtle) and one Action Server (part of /turtlesim) for this action - see ros2 node info <node_name> command above.
Action Types
ros2 action list -t

/turtle1/rotate_absolute [turtlesim/action/RotateAbsolute]
The type, e.g. turtlesim/action/RotateAbsolute when executing an action from the command line or from code.
Action Info
You can further introspect the /turtle1/rotate_absolute action with the command:
ros2 action info /turtle1/rotate_absolute
Which will return:
Action: /turtle1/rotate_absolute
Action clients: 1
    /teleop_turtle
Action servers: 1
    /turtlesim
The /teleop_turtle node has an action client and the /turtlesim node has an action server for the /turtle1/rotate_absolute action.
Interface
To get the corresponding data formatting for an action type run the following command
ros2 interface show turtlesim/action/RotateAbsolute
Which will return:
The desired heading in radians
float32 theta
---

The angular displacement in radians to the starting position
float32 delta
---

The remaining rotation in radians
float32 remaining
The section of this message above the first --- is the structure (data type and name) of the Goal request. The next section is the structure of the Result. The last section is the structure of the Feedback.
Action Send Goal
ros2 action send_goal /turtle1/rotate_absolute turtlesim/action/RotateAbsolute "{theta: 1.37}"


Waiting for an action server to become available...
Sending goal:
     theta: 1.37

Goal accepted with ID: 8bd5cf1c1d5f4f5a9047469113c681f6

Result:
    delta: -1.343999981880188

Goal finished with status: SUCCEEDED
Creating a Workspace
A workspace is a directory containing ROS 2 packages. You also have the option of sourcing an “overlay” - a secondary workspace where you can add new packages without interfering with the existing ROS 2 workspace that you’re extending, or “underlay”. Your underlay must contain the dependencies of all the packages in your overlay. Packages in your overlay will override packages in the underlay.
This is a brief tutorial on how to create and build a ROS 2 workspace with colcon.
Prerequisites
sudo apt install python3-colcon-common-extensions
Create a new Directory
mkdir -p ~/ros2_ws/src
cd ~/ros2_ws/src
Clone a Sample Repo
ROS provides a repository with ready-to-use examples - also containing the turtlesim - that we can use:
git clone https://github.com/ros/ros_tutorials.git -b iron
From the root of your workspace (~/ros2_ws1), run the following command to resolve the package dependencies (cd if you're still in the src directory with the ros_tutorials clone):
sudo apt install python3-rosdep2
rosdep install -i --from-path src --rosdistro iron -y

#All required rosdeps installed successfully
Build the Workspace with Colcon
colcon build
And you will see that colcon`` has created new directories: build install log src`. The install directory is where your workspace’s setup files are, which you can use to source your overlay.
Source the Overlay
Before sourcing the overlay, it is very important that you open a new terminal, separate from the one where you built the workspace. Sourcing an overlay in the same terminal where you built, or likewise building where an overlay is sourced, may create complex issues. what is that supposed to mean?? hmm
In the new terminal, source your main ROS 2 environment as the “underlay”, so you can build the overlay “on top of” it:
cd ~/ros2_ws
source install/local_setup.bash
Run the Build Package
Now you can run the turtlesim package from the overlay:
ros2 run turtlesim turtlesim_node
Modify the Overlay
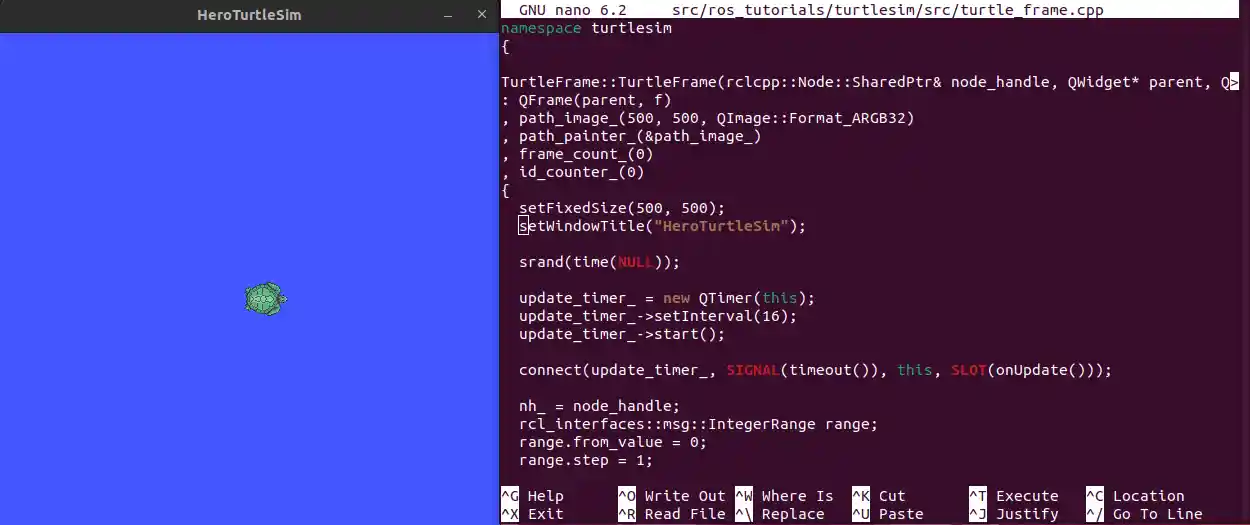
To verify that the simulation is this time executed from the overlay we can modify its source code. You can modify turtlesim in your overlay by editing the title bar on the turtlesim window. To do this, locate the turtle_frame.cpp file in ~/ros2_ws/src/ros_tutorials/turtlesim/src. Open turtle_frame.cpp with your preferred text editor.
On line 52 you will see the function setWindowTitle("TurtleSim");. Change the value "TurtleSim" to "HeroTurtleSim", and save the file.
Return to the first terminal where you ran colcon build earlier and run it again. Return to the second terminal (where the overlay is sourced) and run turtlesim again:
ros2 run turtlesim turtlesim_node
To see that your underlay is still intact, open a brand new terminal and source only your ROS 2 installation. Run turtlesim again:
ros2 run turtlesim turtlesim_node
Creating a Package
A package is an organizational unit for your ROS2 code. Package creation in ROS2 uses ament as its build system and colcon as its build tool. You can create a package using either CMake or Python. The min requirements for a Python package are:
package.xmlfile containing meta information about the packageresource/<package_name>marker file for the packagesetup.cfgis required when a package has executables, so ros2 run can find themsetup.pycontaining instructions for how to install the package<package_name>- a directory with the same name as your package, used by ROS 2 tools to find your package, contains__init__.py
The simplest possible package may have a file structure that looks like:
my_package/
      package.xml
      resource/my_package
      setup.cfg
      setup.py
      my_package/
A single workspace can contain as many packages as you want, each in their own folder. You can also have packages of different build types in one workspace (CMake, Python, etc.). You cannot have nested packages.
The command syntax for creating a new package in ROS2 is:
cd ~/ros2_ws/src
ros2 pkg create --build-type ament_python --node-name my_node my_package --license Apache-2.0


package name: my_package
destination directory: ~/ros2_ws/src
package format: 3
version: 0.0.0
description: TODO: Package description
maintainer: ['me <me@todo.todo>']
licenses: ['Apache-2.0']
build type: ament_python
dependencies: []
node_name: my_node
creating folder ./my_package
creating ./my_package/package.xml
creating source folder
creating folder ./my_package/my_package
creating ./my_package/setup.py
creating ./my_package/setup.cfg
creating folder ./my_package/resource
creating ./my_package/resource/my_package
creating ./my_package/my_package/__init__.py
creating folder ./my_package/test
creating ./my_package/test/test_copyright.py
creating ./my_package/test/test_flake8.py
creating ./my_package/test/test_pep257.py
creating ./my_package/my_package/my_node.py
Build a Package
cd ~/ros2_ws
colcon build
This will build all packages inside the scr dir - you can also specify exactly which one you want to be build with the following command:
colcon build --packages-select my_package
Source the Setup File
Switch to another terminal and from inside the ros2_ws directory, run the following command to source your workspace:
cd ~/ros2_ws
source install/local_setup.bash
To run the executable you created using the --node-name argument during package creation, enter the command:
ros2 run my_package my_node
Which will return a message to your terminal: Hi from my_package.
Customize package.xml
You may have noticed in the return message after creating your package that the fields description and license contain TODO notes. That’s because the package description and license declaration are not automatically set, but are required if you ever want to release your package. The maintainer field may also need to be filled in:
nano ~/ros2_ws/src/my_package/package.xml