Installing Ansible Tower (AWX in Docker) on RHEL8

- Installing Ansible Tower (AWX)
- Install Ansible AWX 17.1.0
- Changing the Logo
- Install Ansible AWX 19.2.2 (DOES NOT WORK)
Installing Ansible Tower (AWX)
The AWX Project (AWX) is an open source community project. In addition, it’s the OpenSource version of the Ansible Tower software sponsored by Red Hat, that enables users to better control their Ansible project use in IT environments.
Prepare your RHEL 8 Server
Make sure that both the EPEL Repository and Docker is already installed on your Red Hat Server - see setup guide.
dnf install git gcc gcc-c++ nodejs gettext device-mapper-persistent-data lvm2 bzip2 python3-pip ansible
First, set python3 as the default one by running the below command:
sudo alternatives --set python /usr/bin/python3
Next, use pip3 command to install the docker-compose tool:
sudo curl -L "https://github.com/docker/compose/releases/download/1.29.2/docker-compose-$(uname -s)-$(uname -m)" -o /usr/local/bin/docker-compose
sudo chmod +x /usr/local/bin/docker-compose
sudo ln -s /usr/local/bin/docker-compose /usr/bin/docker-compose
docker-compose --version

sudo pip3 install docker-compose
Install Ansible AWX 17.1.0
Clone the latest v17 release with the command (Note that AWX underwent changes in version 18! I first tried to install Ansible AWX v19.2.2 following this instructions and it DID NOT WORK):
git clone -b "17.1.0" https://github.com/ansible/awx.git
Generate a secret encryption key with the command:
openssl rand -base64 30
iR0MXri042xWjgqztRXFK1eLERtU+9g2OhYRVWld
Navigate to the awx/installer directory and locate the inventory file:
cd awx/installer/
nano inventory
localhost ansible_connection=local ansible_python_interpreter="/usr/bin/env python3"

[all:vars]

# Remove these lines if you want to run a local image build
# Otherwise the setup playbook will install the official Ansible images. Versions may
# be selected based on: latest, 1, 1.0, 1.0.0, 1.0.0.123
# by default the base will be used to search for ansible/awx
dockerhub_base=ansible

# Openshift Install
# Will need to set -e openshift_password=developer -e docker_registry_password=$(oc whoami -t)
#           or set -e openshift_token=TOKEN
# openshift_host=127.0.0.1:8443
# openshift_project=awx
# openshift_user=developer
# openshift_skip_tls_verify=False
# openshift_pg_emptydir=True

# Kubernetes Install
# kubernetes_context=test-cluster
# kubernetes_namespace=awx
# kubernetes_web_svc_type=NodePort
# Optional Kubernetes Variables
# pg_image_registry=docker.io
# pg_serviceaccount=awx
# pg_volume_capacity=5
# pg_persistence_storageClass=StorageClassName
# pg_persistence_existingclaim=postgres_pvc
# pg_cpu_limit=1000
# pg_mem_limit=2

# Kubernetes Ingress Configuration
# You can use the variables below to configure Kubernetes Ingress
# Set hostname
# kubernetes_ingress_hostname=awx.example.org
# Add annotations. The example below shows an annotation to be used with Traefik but other Ingress controllers are also supported
# kubernetes_ingress_annotations={'kubernetes.io/ingress.class': 'traefik', 'traefik.ingress.kubernetes.io/redirect-entry-point': 'https'}
# Specify a secret for TLS termination
# kubernetes_ingress_tls_secret=awx-cert

# Kubernetes and Openshift Install Resource Requests
# These are the request and limit values for a pod's container for task/web/redis/management.
# The total amount of requested resources for a pod is the sum of all
# resources requested by all containers in the pod
# A cpu_request of 1500 is 1.5 cores for the container to start out with.
# A cpu_limit defines the maximum cores that that container can reserve.
# A mem_request of 2 is for 2 gigabytes of memory for the container
# A mem_limit defines the maximum memory that that container can reserve.
# Default values for these entries can be found in ./roles/kubernetes/defaults/main.yml
# task_cpu_request=1500
# task_mem_request=2
# task_cpu_limit=2000
# task_mem_limit=4
# web_cpu_limit=1000
# web_mem_limit=2
# redis_cpu_limit=1000
# redis_mem_limit=3
# management_cpu_limit=2000
# management_mem_limit=2

# Common Docker parameters
awx_task_hostname=awx
awx_web_hostname=awxweb
# Local directory that is mounted in the awx_postgres docker container to place the db in
postgres_data_dir="/opt/awx/pgdocker"
host_port=80
host_port_ssl=443
#ssl_certificate=
# Optional key file
#ssl_certificate_key=
docker_compose_dir="/opt/awx/awxcompose"

# Required for Openshift when building the image on your own
# Optional for Openshift if using Dockerhub or another prebuilt registry
# Required for Docker Compose Install if building the image on your own
# Optional for Docker Compose Install if using Dockerhub or another prebuilt registry
# Define if you want the image pushed to a registry. The container definition will also use these images
# docker_registry=172.30.1.1:5000
# docker_registry_repository=awx
# docker_registry_username=developer


# Set pg_hostname if you have an external postgres server, otherwise
# a new postgres service will be created
# pg_hostname=postgresql
pg_username=awx
# pg_password should be random 10 character alphanumeric string, when postgresql is running on kubernetes
# NB: it's a limitation of the "official" postgres helm chart
pg_password=awxpassword
pg_database=awx
pg_port=5432
#pg_sslmode=require

# If requiring SSL communication (e.g. pg_sslmode='verify-full') with Postgres
# and using a self-signed certificate or a certificate signed by a custom CA
# set pg_root_ca_file to a file containing the self-signed certificate or the
# root CA certificate chain.
# pg_root_ca_file='example_root_ca.crt'

# The following variable is only required when using the provided
# containerized postgres deployment on OpenShift
# pg_admin_password=postgrespass

# This will create or update a default admin (superuser) account in AWX, if not provided
# then these default values are used
admin_user=admin
admin_password=password

# Whether or not to create preload data for demonstration purposes
create_preload_data=True

# AWX Secret key
# It's *very* important that this stay the same between upgrades or you will lose the ability to decrypt
# your credentials >> Use the key you created with `openssl rand -base64 30`
secret_key=iR0MXri042xWjgqztRXFK1eLERtU+9g2OhYRVWld

# By default a broadcast websocket secret will be generated.
# If you would like to *rerun the playbook*, you need to set a unique password.
# Otherwise it would generate a new one every playbook run.
# broadcast_websocket_secret=

# Build AWX with official logos
# Requires cloning awx-logos repo as a sibling of this project.
# Review the trademark guidelines at https://github.com/ansible/awx-logos/blob/master/TRADEMARKS.md
awx_official=false

# Proxy
#http_proxy=http://proxy:3128
#https_proxy=http://proxy:3128
#no_proxy=mycorp.org

# Container networking configuration
# Set the awx_task and awx_web containers' search domain(s)
#awx_container_search_domains=example.com,ansible.com
# Alternate DNS servers
#awx_alternate_dns_servers="10.1.2.3,10.2.3.4"

# AWX project data folder. If you need access to the location where AWX stores the projects
# it manages from the docker host, you can set this to turn it into a volume for the container.
#project_data_dir=/var/lib/awx/projects

# AWX custom virtual environment folder. Only usable for local install.
#custom_venv_dir=/opt/my-envs/

# CA Trust directory. If you need to provide custom CA certificates, supplying
# this variable causes this directory on the host to be bind mounted over
# /etc/pki/ca-trust in the awx_task and awx_web containers.
# If you are deploying on openshift or kubernetes, set the variable to /etc/pki/ca-trust instead,
# as the awx_web and awx_task containers will not run the `update-ca-trust` command.
#ca_trust_dir=/etc/pki/ca-trust/source/anchors

# Include /etc/nginx/awx_extra.conf
# Note the use of glob pattern for nginx
# which makes include "optional" - i.e. not fail
# if file is absent
#extra_nginx_include="/etc/nginx/awx_extra[.]conf"

# Docker compose explicit subnet. Set to avoid overlapping your existing LAN networks.
#docker_compose_subnet="172.17.0.1/16"
#
# Allow for different docker logging drivers
# By Default; the logger will be json-file, however you can override
# that by uncommenting the docker_logger below.
# Be aware that journald may rate limit your log messages if you choose it.
# See: https://docs.docker.com/config/containers/logging/configure/
# docker_logger=journald
#

# Add extra hosts to docker compose file. This might be necessary to
# sneak in servernames. For example for DMZ self-signed CA certificates.
# Equivialent to using the --add-host parameter with "docker run".
#docker_compose_extra_hosts="otherserver.local:192.168.0.1,ldap-server.local:192.168.0.2"
In the inventory file above I choose the folder /opt/awx to hold the PostgresSQL Data - whatever you choose there, make sure that the directory exists and can be written to by your Docker user:
sudo mkdir /opt/awx
Now we can install Ansible AWX with following the Ansible command from inside the awx/installer/:
sudo ansible-playbook -i inventory install.yml
If you get the following Error Message : "could not find an available, non-overlapping IPv4 address pool among the defaults to assign to the network" -> deactivate your VNP connection!
fatal: [localhost]: FAILED! => {"changed": true, "cmd": "docker-compose run --rm --service-ports task awx-manage migrate --no-input", "delta": "0:00:00.472026", "end": "2021-07-13 13:33:22.085111", "msg": "non-zero return code", "rc": 1, "start": "2021-07-13 13:33:21.613085", "stderr": "Creating network \"awxcompose_default\" with the default driver\ncould not find an available, non-overlapping IPv4 address pool among the defaults to assign to the network", "stderr_lines": ["Creating network \"awxcompose_default\" with the default driver", "could not find an available, non-overlapping IPv4 address pool among the defaults to assign to the network"], "stdout": "", "stdout_lines": []}
Once the installation process finishes you should see the following docker container running:
sudo docker ps

CONTAINER ID   IMAGE                PORTS                                   NAMES
b9b98dbb397e   ansible/awx:17.1.0   8052/tcp                                awx_task
975b09b0249f   ansible/awx:17.1.0   0.0.0.0:80->8052/tcp, :::80->8052/tcp   awx_web
f44e1359855e   postgres:12          5432/tcp                                awx_postgres
4936bcef8a8c   redis                6379/tcp                                awx_redis
Accessing the Web Interface
I needed to open the HTTP/S port in my firewall:
sudo firewall-cmd --permanent --zone=public --add-service=http --add-service=https
And there was an advice to configure SELinux - but it seems that it is not enabled by default on RHEL8... did not need it:
semanage port -a -t http_port_t -p tcp 8052
setsebool -P httpd_can_network_connect 1
Finally I am able to access the WebUI on my server IP:
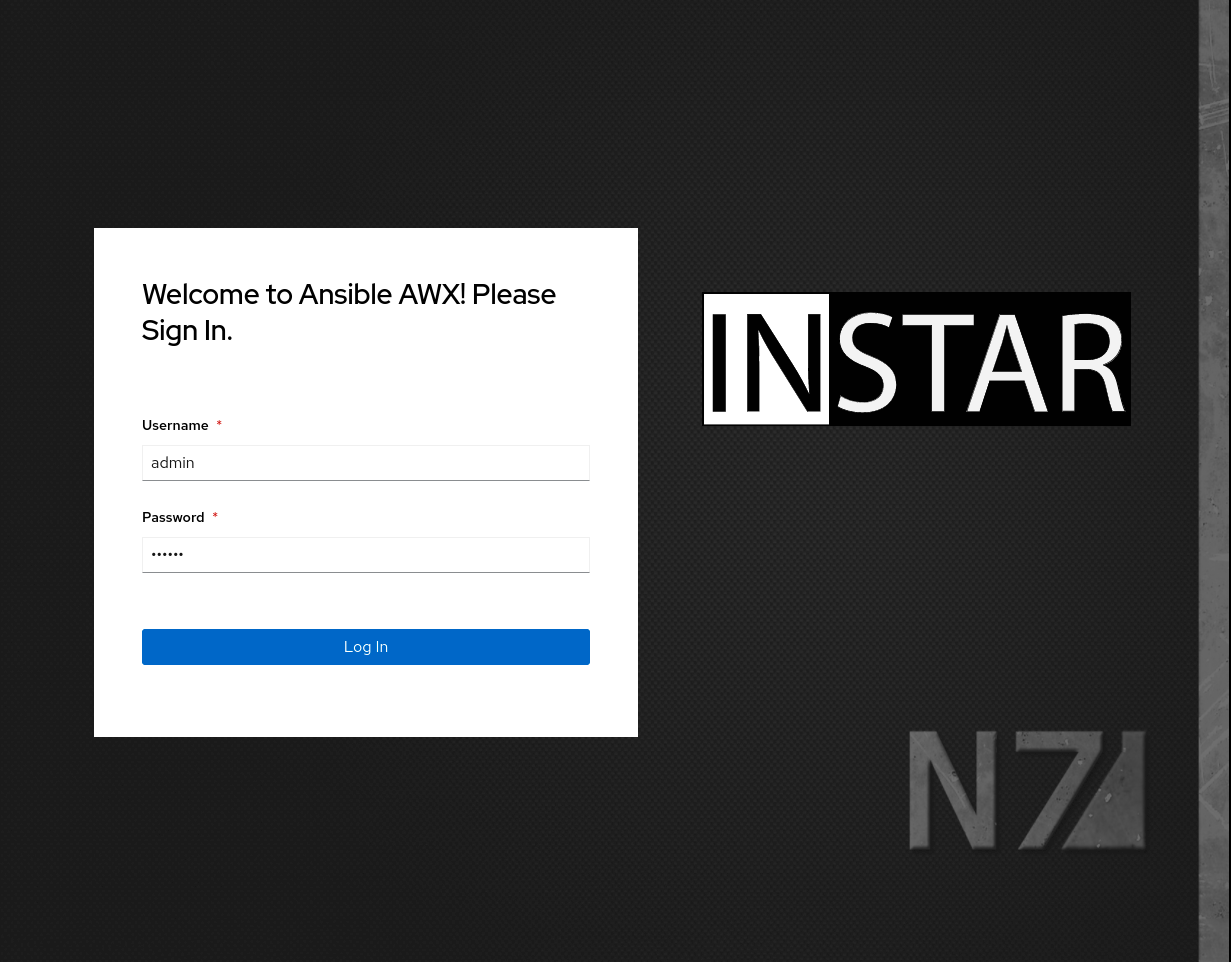
Login using the Admin pass you set inside the inventory file:
admin_user=admin
admin_password=password
Ta da! The Ansible Tower (AWX) web interface is at your service:

Changing the Logo
The logo and login background seems to be stored in:
awx/awx/ui_next/public/static/media
I will try changing the content of this directory and rebuild the app later :)
EDIT: Changing the Logo inside your already build container:
- Back up the original files:
sudo docker exec -ti awx_web /bin/bash

bash-4.4# cd /var/lib/awx/public/static/media/
bash-4.4# mv logo-header.svg logo-header.svg.bsk
bash-4.4# mv logo-header.svg.bsk logo-header.svg.bak
bash-4.4# mv pfbg_576.jpg pfbg_576.jpg.bak
bash-4.4# mv pfbg_576@2x.jpg pfbg_576@2x.jpg.bak
bash-4.4# mv pfbg_768.jpg pfbg_768.jpg.bak
bash-4.4# mv pfbg_768@2x.jpg pfbg_768@2x.jpg.bak
bash-4.4# mv pfbg_2000.jpg pfbg_2000.jpg.bak
- Create your own versions and copy them into the
awx_webcontainer:
sudo docker cp ~/Pictures/logo-login.svg awx_web:/var/lib/awx/public/static/media/logo-login.svg
sudo docker cp ~/Pictures/logo-header.svg awx_web:/var/lib/awx/public/static/media/logo-header.svg
sudo docker cp ~/Pictures/pfbg_2000.jpg awx_web:/var/lib/awx/public/static/media/pfbg_2000.4f598944.jpg
sudo docker cp ~/Pictures/pfbg_576@2x.jpg awx_web:/var/lib/awx/public/static/media/pfbg_576@2x.b48e77bc.jpg
sudo docker cp ~/Pictures/pfbg_576.jpg awx_web:/var/lib/awx/public/static/media/pfbg_576.85341a9c.jpg
sudo docker cp ~/Pictures/pfbg_768@2x.jpg awx_web:/var/lib/awx/public/static/media/pfbg_768@2x.0099dea3.jpg
sudo docker cp ~/Pictures/pfbg_768.jpg awx_web:/var/lib/awx/public/static/media/pfbg_768.c9839717.jpg
sudo docker cp ~/Downloads/logo-login.svg awx_task:/var/lib/awx/venv/awx/lib/python3.6/site-packages/awx/ui_next/build/static/media/logo-login.svg
sudo docker cp ~/Downloads/logo-header.svg awx_task:/var/lib/awx/venv/awx/lib/python3.6/site-packages/awx/ui_next/build/static/media/logo-header.svg
sudo docker cp ~/Downloads/pfbg_2000.jpg awx_task:/var/lib/awx/venv/awx/lib/python3.6/site-packages/awx/ui_next/build/static/media/pfbg_2000.jpg
sudo docker cp ~/Downloads/pfbg_576@2x.jpg awx_task:/var/lib/awx/venv/awx/lib/python3.6/site-packages/awx/ui_next/build/static/media/pfbg_576@2x.jpg
sudo docker cp ~/Downloads/pfbg_576.jpg awx_task:/var/lib/awx/venv/awx/lib/python3.6/site-packages/awx/ui_next/build/static/media/pfbg_576.jpg
sudo docker cp ~/Downloads/pfbg_768@2x.jpg awx_task:/var/lib/awx/venv/awx/lib/python3.6/site-packages/awx/ui_next/build/static/media/pfbg_768@2x.jpg
sudo docker cp ~/Downloads/pfbg_768.jpg awx_task:/var/lib/awx/venv/awx/lib/python3.6/site-packages/awx/ui_next/build/static/media/pfbg_768.jpg
Install Ansible AWX 19.2.2 (DOES NOT WORK)
Clone the latest release with the command:
git clone -b "19.2.2" https://github.com/ansible/awx.git
Generate a secret encryption key with the command:
openssl rand -base64 30
iR0MXri042xWjgqztRXFK1eLERtU+9g2OhYRVWld
Navigate to the awx/installer directory and locate the inventory file:
nano awx/tools/docker-compose/inventory
localhost ansible_connection=local ansible_python_interpreter="/usr/bin/env python3"

[all:vars]

# AWX-Managed Database Settings
# If left blank, these will be generated upon install.
# Values are written out to tools/docker-compose/_sources/secrets/
# pg_password=""
# broadcast_websocket_secret=""
# secret_key=""
secret_key=iR0MXri042xWjgqztRXFK1eLERtU+9g2OhYRVWld

# External Database Settings
# pg_host=""
# pg_password=""
# pg_username=""
# pg_hostname=""
pg_username=awx
pg_password=awxpassword
pg_database=awx
pg_port=5432

# awx_image="quay.io/awx/awx_devel"
# migrate_local_docker=false

dockerhub_base=ansible
awx_task_hostname=awx
awx_web_hostname=awxweb
postgres_data_dir="/opt/awx/pgdocker"
host_port=80
host_port_ssl=443
docker_compose_dir="/opt/awx/awxcompose"
admin_user=admin
admin_password=password
create_preload_data=True
awx_official=false
sudo mkdir /opt/awx
Build the image
The AWX base container image (defined in the Dockerfile templated from Dockerfile.j2) contains basic OS dependencies and symbolic links into the development environment that make running the services easy. Run the following to build the image:
sudo make docker-compose-build
Start the Containers
Run the awx, postgres and redis containers. This utilizes the image built in the previous step, and will automatically start all required services and dependent containers. Once the containers launch, your session will be attached to the awx container, and you'll be able to watch log messages and events in real time. You will see messages from Django and the front end build process.
sudo make docker-compose
Running
sudo docker imagesshows me that the build was tagged with HEAD - I will have to add this to the makesudo COMPOSE_TAG=HEAD make docker-compose
For running docker-compose detached mode, start the containers using the following command:
sudo make docker-compose COMPOSE_UP_OPTS=-d
ERROR: The docker run ended with an error message starting container awx1 caused: exec "/entrypoint.sh": permission denied: unknown:
sudo chown root:root tools/docker-compose/entrypoint.sh
sudo chmod +x tools/docker-compose/entrypoint.sh