Setting up Gitlab

- Transferring a Github Repo
- Adding your SSH Key
- Committing Code to Gitlab
- Gitlab run Build
- GitLab CI Runner Service
Transferring a Github Repo
Add the new gitlab remote to your existing repository and push:
git remote add gitlab url-to-gitlab-repo
git push gitlab master
Or open the Gitlab UI, start a new project and choose to import a repository from "Github". You first will be asked to create a personal Github token and copy it to Gitlab. Select the repo scope, so we can display a list of your public and private repositories which are available to import.
Gitlab will now be able to list your Github repositories. Select the one you want to clone and click on Import.
Adding your SSH Key
On Windows 10 make sure that the OpenSSH Client is installed.
Then type the following into your command line and hit Enter:
ssh-keygen
At this time, the system will ask you to save the default location. You can do it by pressing the Enter key.You can also change the path as per your requirement. However, by default, it offers the location in the following form:
C:\users\<yourusername>\.ssh\id_rsa
After that, the system asks you to set a password (passphrase). If you want, you can continue without setting a password. To do so, just hit Enter key otherwise, type the passphrase there. As you press the Enter key, the fingerprint for your key and SHA256 will appear. The default algorithm is RSA 2048. The public key will be saved to the id_rsa.pub file. By default, it is located in the following form:
C:\users\<yourusername>\.ssh\id_rsa.pub
Open the files inside your text editor and copy it. Past it into your Gitlab profile under http://[Your Gitlab Domain]/profile/keys. Klick on Add key and you are now able SSH keys to establish a secure connection between your computer and GitLab.
Committing Code to Gitlab
Enter your repository on Gitlab and click on the Clone button in the top right and copy the Clone with HTTP URL. Navigate to a suitable folder with your terminal and git clone the URL you just copied:
git clone http://my.gitlab.URL/gitlab.user/my.repository.git
Edit your source code and then stage your changes:
git add file.js     //staging a single file
git add myfolder    //staging a folder recursively
git add .           //staging everything that changed
To unstage code run:
git reset HEAD file.js
To delete code:
git rm file.js
git rm -r myfolder
Then commit your code with:
git commit -m "Message that describes what changed"
git commit --amend -m "Put your corrected message here"
git status
Now, we have the commit in our local Git repository, but to send it to the GitLab server, we have to enter another command:
git push -u origin master
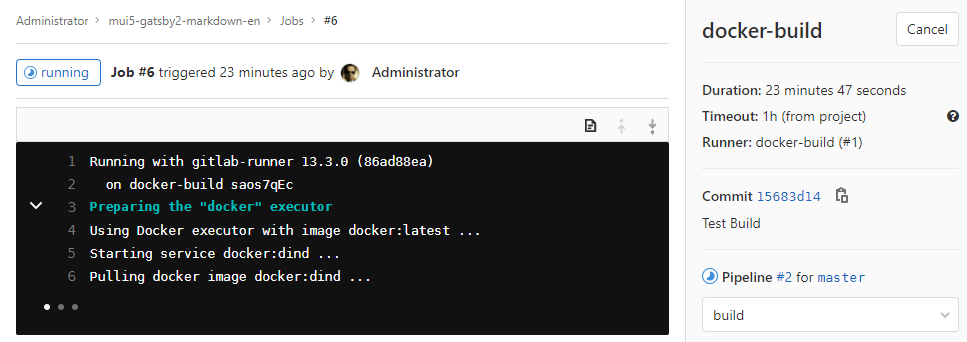
Gitlab run Build
You can run a Gatsby build on your source code by adding the following .gitlab-ci.yml to the root of your project:
image: node:latest

# This folder is cached between builds
# http://docs.gitlab.com/ce/ci/yaml/README.html#cache
cache:
  paths:
    - node_modules/
    # Enables git-lab CI caching. Both .cache and public must be cached, otherwise builds will fail.
    - .cache/
    - public/

gatsby-build:
  script:
    - rm -rf ./release/deploy/app/*
    - npm install
    - ./node_modules/.bin/gatsby build --prefix-paths
    - mv ./public/* ./release/deploy/app/
  artifacts:
    paths:
      - public
  only:
    - master
My project has a deploy directory that I use to build an Docker image from my code. This script will delete the old build inside the app folder, install the necessary modules for the Gatsby run, start gatsby build and copy the generated content from the public folder into the deploy/app folder.
GitLab CI Runner Service
We’re now ready to set up a GitLab CI runner. To do this, we need to install the GitLab CI runner package on the system and start the GitLab runner service. The service can run multiple runner instances for different projects. The Runner can be installed on the same server that runs Gitlab. But can also be exported to a separate server.
Installation of a Gitlab Runner from a Package Manager
Start by downloading the latest version of the GitLab CI runner repository configuration script to the /tmp directory:
curl -L https://packages.gitlab.com/install/repositories/runner/gitlab-runner/script.deb.sh -o /tmp/gl-runner.deb.sh
The script will set up your server to use the GitLab maintained repositories. This lets you manage GitLab runner packages with the same package management tools you use for your other system packages. Once this is complete, you can proceed with the installation using apt:
apt install gitlab-runner
Setting Up a Runner
Next, we need to set up a GitLab CI runner so that it can begin accepting work. To do this, we need a GitLab runner token so that the runner can authenticate with the GitLab server. The type of token we need depends on how we want to use this runner - Project Specific or Shared.
Project Specific Runner
If you would like the runner to be tied to a specific project, begin by navigating to the project’s page in the GitLab interface. From here, click the Settings item in the left-hand menu. Afterwards, click the CI/CD item in the submenu. Copy the registration token displayed in step 3 of the instructions:
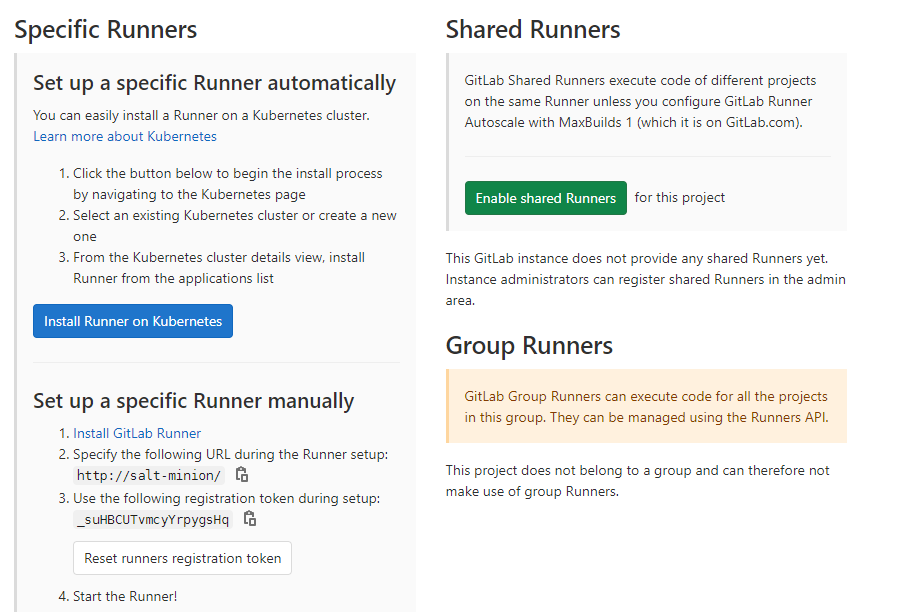
In the example above the toke is _suHBCUTvmcyYrpygsHq. We will have to use this token when we continue to set up our runner.
Shared Runner
To find the information required to register a shared runner, you will need to be logged in with an administrative account. Open the Admin Area and click on Runners in the Overview section. Copy the registration token in step 3:
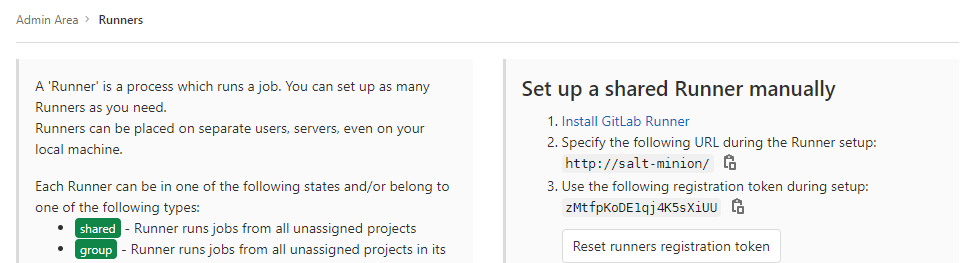
In the example above the toke is zMtfpKoDE1qj4K5sXiUU. We will have to use this token when we continue to set up our runner.
Registering a GitLab CI Runner
Now that you have a token, go back to the server where your GitLab CI runner service is installed. To register a new runner, type the following command:
gitlab-runner register
- Please enter the gitlab-ci coordinator URL e.g.
https://gitlab.example.com/ - gitlab-ci token e.g.
_suHBCUTvmcyYrpygsHq - gitlab-ci description e.g.
docker-build - gitlab-ci tags can be left blank
- Enter the executor e.g.
docker - Default Docker image e.g.
alpine:latest
gitlab-runner register -n \
  --url https://gitlab.example.com/ \
  --registration-token "R_suHBCUTvmcyYrpygsHq" \
  --executor docker \
  --description "wiki-group-runner" \
  --docker-image "docker:19.03.12" \
  --docker-volumes /var/run/docker.sock:/var/run/docker.sock
You can see the runners that the GitLab CI runner service currently has available by typing:
gitlab-runner list
Runtime platform                                    arch=amd64 os=linux pid=9771 revision=86ad88ea version=13.3.0
Listing configured runners                          ConfigFile=/etc/gitlab-runner/config.toml
docker-build                                        Executor=docker Token=saos7qEcigMWK_dAuYr9 URL=http://salt-minion/ci