MQTT Networks with homee

Node-RED Configuration
If you are using a Raspberry Pi to run Node-RED, you can use the official installation script to have the program set up automatically for you.
Connecting the homee Gateway
Using homee Environment Variables
First we are going to use the homee Webhook service to trigger a Node-RED Flow for us. As a trigger I want to use the homee system variables, like away, home, vacation. Let's start by creating a webhook in Node-RED that we can contact from the homee gateway:

You can import this flow to your Node-RED panel with the following JSON code:
[{"id":"181fefd6.961e6","type":"http in","z":"4ea30e4c.29d4","name":"homee env","url":"/homee/environment/","method":"post","upload":false,"swaggerDoc":"","x":80,"y":340,"wires":[["405534e7.66348c","bec44bcd.5eb548"]]},{"id":"405534e7.66348c","type":"http response","z":"4ea30e4c.29d4","name":"Webhook","statusCode":"","headers":{"content-type":"application/json"},"x":228,"y":340,"wires":[]},{"id":"bec44bcd.5eb548","type":"debug","z":"4ea30e4c.29d4","name":"","active":true,"tosidebar":true,"console":false,"tostatus":false,"complete":"false","x":240,"y":299,"wires":[]}]
The webhook we created will wait to receive a POST request on the URL /homee/environment/:
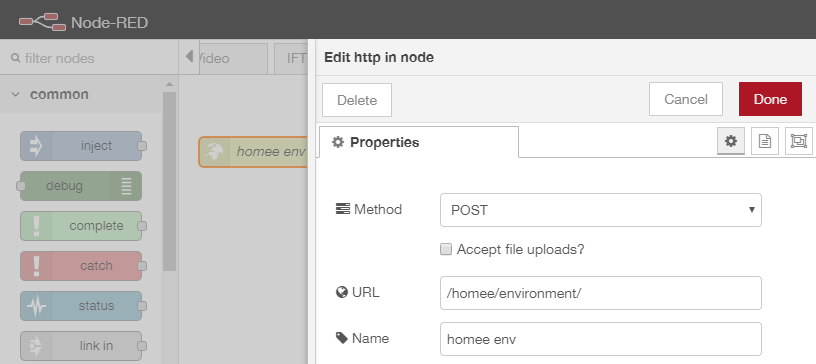
Great! Now we can switch to the home dashboard and create a automation that is able to utilize this webhook. Click to create a new Homeegram:
Click on When to set the condition that should be met for the action to be triggered and select Mode:

Select Mode is set to Home and click on done to save the condition:
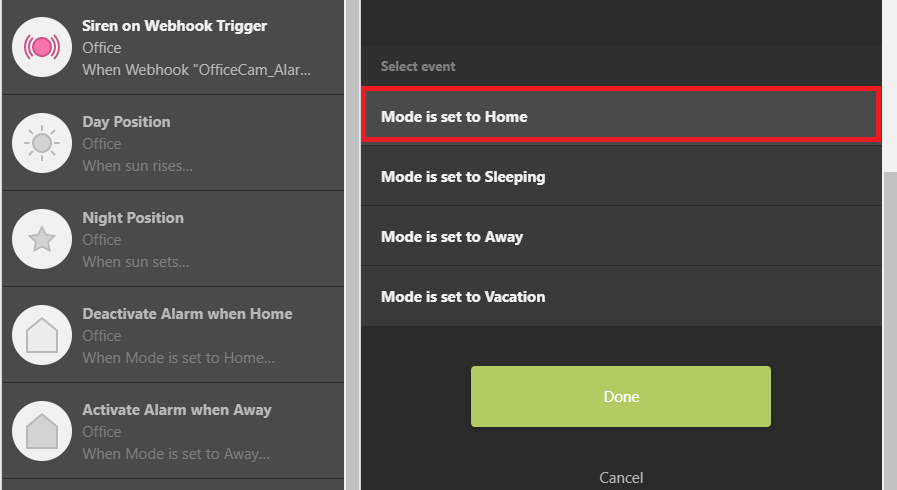
Now we need to add an Then action we want to be triggered when the condition is met:
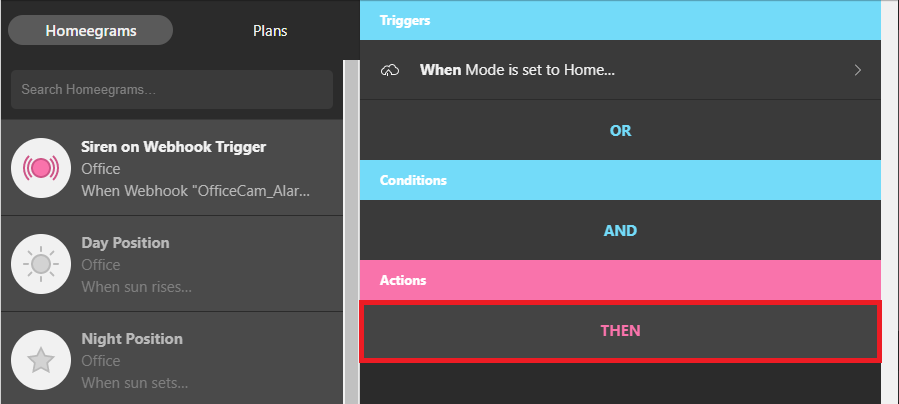
Here we will choose the Webhook and type in the URL of the hook we just created in Node-RED. We set this to be /homee/environment/. So if your Node-RED installation is running on a computer with the IP 192.168.2.48 and is using the default port 1880 the complete URL is:
http://192.168.2.48:1880/homee/environment/
Select the POST method and add a JSON body payload {"val":"home"}. This way we can reuse the webhook for all environment variables and add different actions in Node-RED depending on what value was posted - home, away, sleeping, vacation.
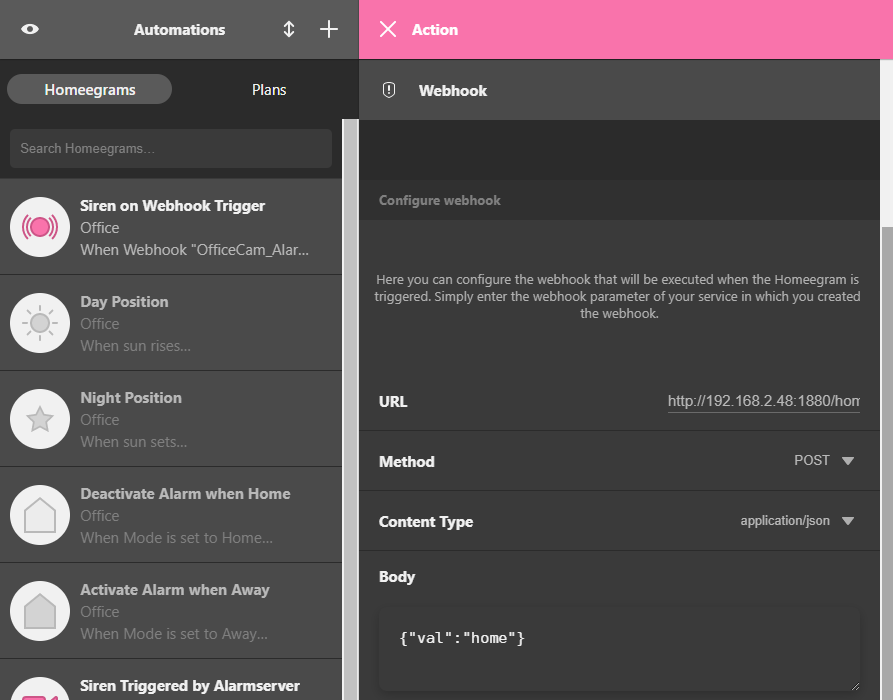
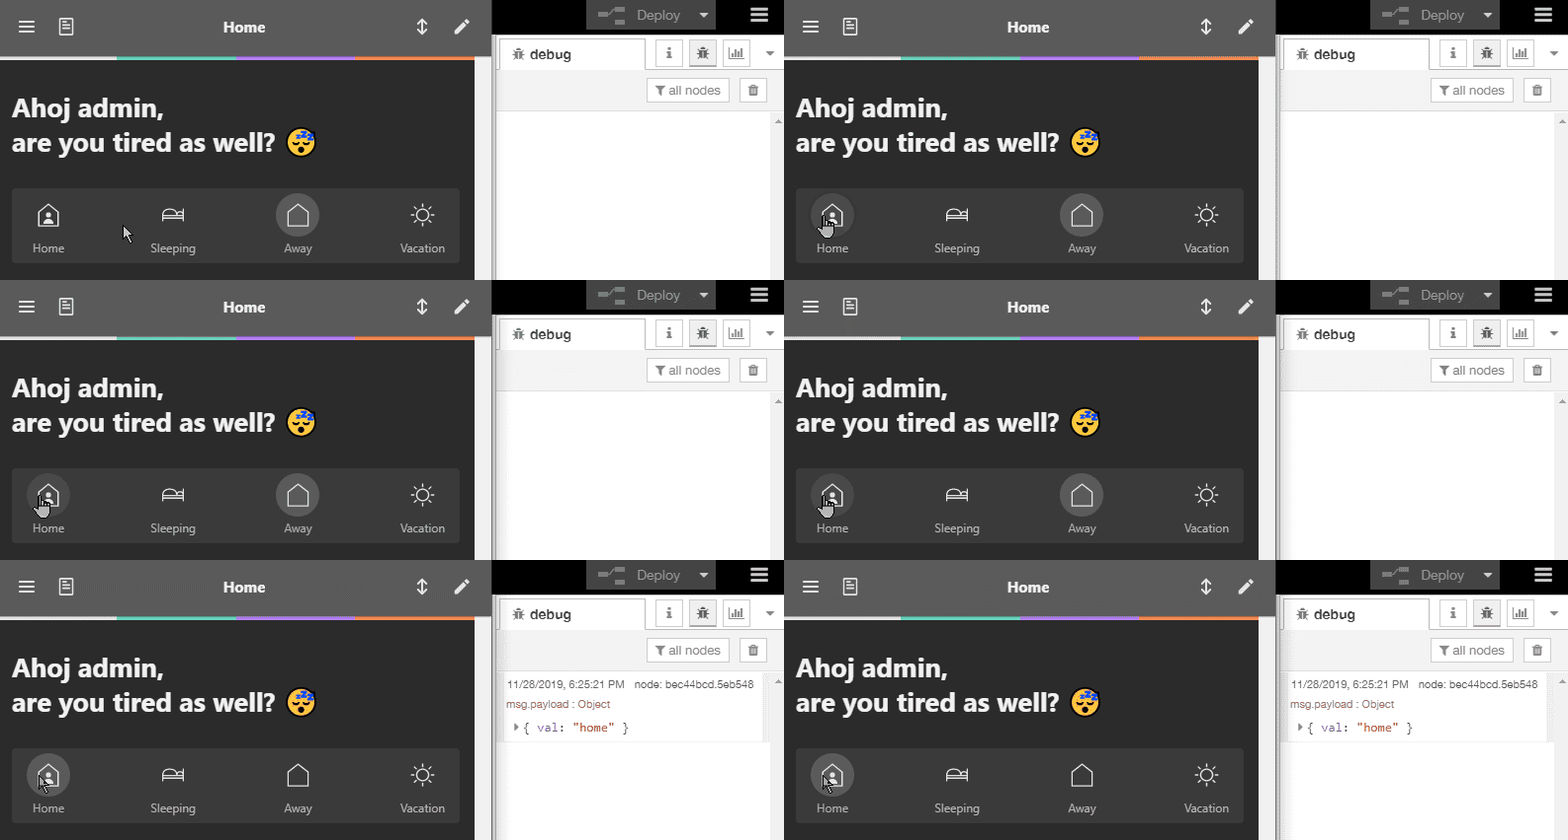
After saving our Homeegram we can now give it a test run. The webhook we created in Node-RED had a debug node connected. So if you switch on the debug panel in Node-RED (small bug icon in the top right) we should be able to our POST request come in when we change our homee variable to home:

Now we can repeat those steps to create Homeegrams for every environment variable we want to use in Node-RED. To differentiate between those cases we will use a switch node in Node-RED and attach it to our webhook node (the complete flow can be downloaded below and imported to Node-RED):
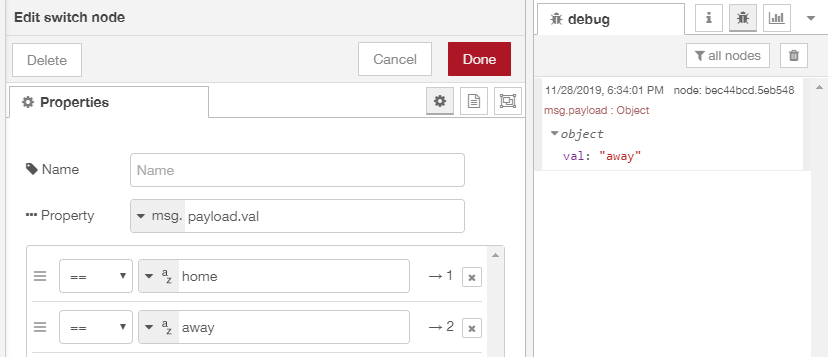
The switch node will check the message that was send and look for the value val. If it is home the message will be forwarded through exit 1 and every message that carries an away will leave the node through exit 2.
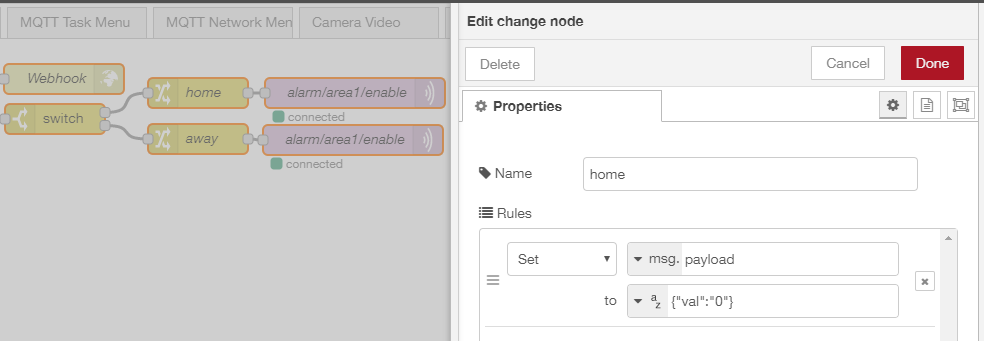
We need to set the message to the value that we need and connect it to a MQTT Out node for the command topic we want to update:

In this example we want to disable the motion detection area 1 when the home environment variable is activated. This is done by sending {"val":"0"} to the alarm/area1/enable topic.
Flow Download
[{"id":"181fefd6.961e6","type":"http in","z":"4ea30e4c.29d4","name":"homee env","url":"/homee/environment/","method":"post","upload":false,"swaggerDoc":"","x":80,"y":80,"wires":[["405534e7.66348c","97d88190.082db"]]},{"id":"405534e7.66348c","type":"http response","z":"4ea30e4c.29d4","name":"Webhook","statusCode":"","headers":{"content-type":"application/json"},"x":238,"y":40,"wires":[]},{"id":"97d88190.082db","type":"switch","z":"4ea30e4c.29d4","name":"","property":"payload.val","propertyType":"msg","rules":[{"t":"eq","v":"home","vt":"str"},{"t":"eq","v":"away","vt":"str"}],"checkall":"true","repair":false,"outputs":2,"x":229,"y":80,"wires":[["8a63a528.e6e3f8"],["80d7c418.063f58"]]},{"id":"8a63a528.e6e3f8","type":"change","z":"4ea30e4c.29d4","name":"home","rules":[{"t":"set","p":"payload","pt":"msg","to":"{\"val\":\"0\"}","tot":"str"}],"action":"","property":"","from":"","to":"","reg":false,"x":372,"y":54,"wires":[["e86399a7.4e76e8"]]},{"id":"80d7c418.063f58","type":"change","z":"4ea30e4c.29d4","name":"away","rules":[{"t":"set","p":"payload","pt":"msg","to":"{\"val\":\"1\"}","tot":"json"}],"action":"","property":"","from":"","to":"","reg":false,"x":372,"y":100,"wires":[["f96ffbe7.2eca78"]]},{"id":"e86399a7.4e76e8","type":"mqtt out","z":"4ea30e4c.29d4","name":"alarm/area1/enable","topic":"instar/000389888811/alarm/area1/enable","qos":"1","retain":"false","broker":"9e4e460d.640f18","x":529,"y":54,"wires":[]},{"id":"f96ffbe7.2eca78","type":"mqtt out","z":"4ea30e4c.29d4","name":"alarm/area1/enable","topic":"instar/000389888811/alarm/area1/enable","qos":"1","retain":"false","broker":"9e4e460d.640f18","x":527,"y":101,"wires":[]},{"id":"9e4e460d.640f18","type":"mqtt-broker","z":"","name":"IN-9010FHD","broker":"192.168.2.165","port":"8883","tls":"b55f9f2e.fe529","clientid":"","usetls":true,"compatmode":true,"keepalive":"60","cleansession":true,"birthTopic":"","birthQos":"0","birthPayload":"","closeTopic":"","closeQos":"0","closePayload":"","willTopic":"","willQos":"0","willPayload":""},{"id":"b55f9f2e.fe529","type":"tls-config","z":"","name":"","cert":"","key":"","ca":"","certname":"instar-cert.cert","keyname":"","caname":"","servername":"","verifyservercert":false}]
- Note that this flow uses the MQTT topic
instar/000389888811/alarm/area1/enable- you will have to swap 000389888811 with the MAC address of your camera to make this work. See the MQTT Introduction for more details.
Connecting a Sensor to your Camera
Start by creating a new Homeegram and defining the When condition:

This time we have to choose a Device as the trigger for our action:
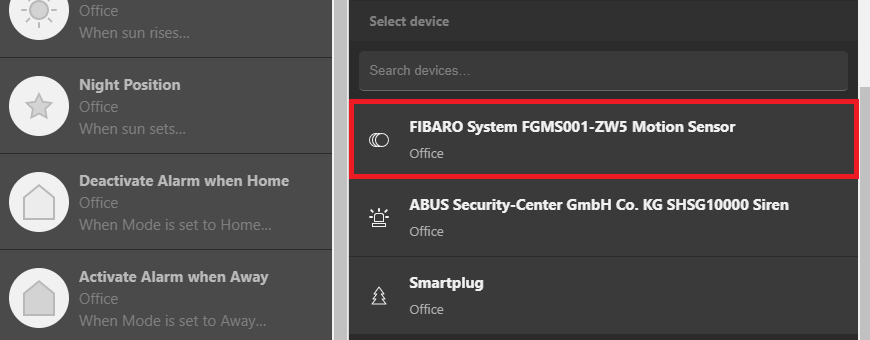
We choose a ZigBee motion detector that has been connected to our homee gateway:
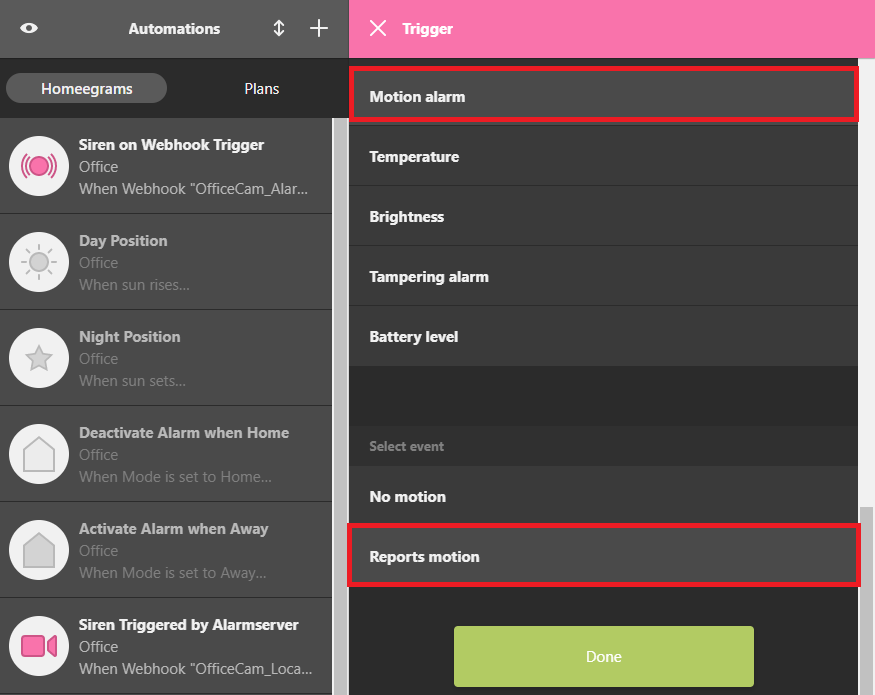
The action of this automation should trigger when the ZigBee sensor reports a motion:
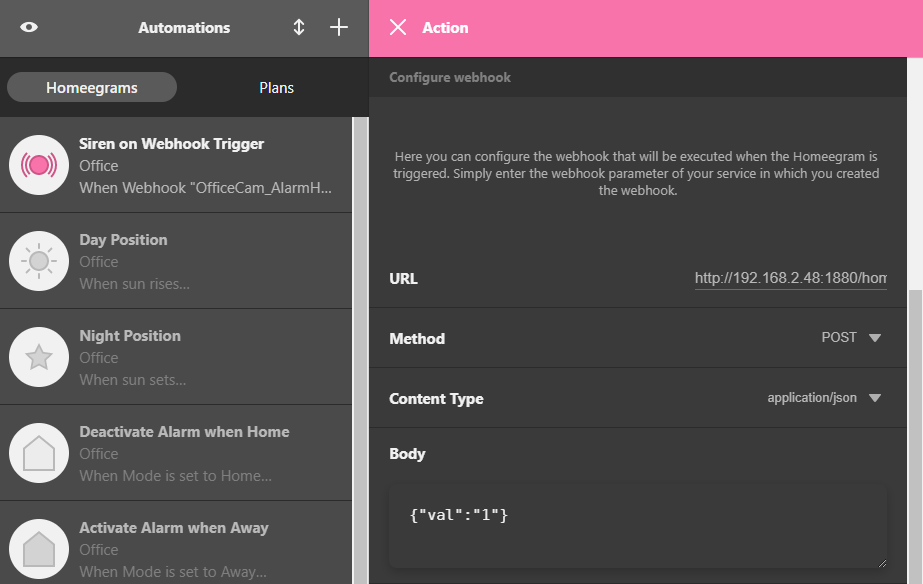
As action we choose a webhook http://192.168.2.48:1880/homee/motionsensor/ and POST a {"val":"1"} to it:
The corresponding webhook in Node-RED is even simpler this time:

homee sends us a POST request with the payload {"val":"1"} through the webhook. All we need to do is to connect a MQTT Out node that updates the topic /alarm/pushalarm on our camera. Now every time the ZigBee sensor reports a motion an alarm will be triggered on our camera.
Flow Download
[{"id":"4080d8b0.359ba8","type":"http in","z":"4ea30e4c.29d4","name":"homee motion","url":"/homee/motionsensor/","method":"post","upload":false,"swaggerDoc":"","x":90,"y":220,"wires":[["a073e475.1c5da8","66f1a6a1.b59f78"]]},{"id":"a073e475.1c5da8","type":"http response","z":"4ea30e4c.29d4","name":"Webhook","statusCode":"","headers":{"content-type":"application/json"},"x":238,"y":180,"wires":[]},{"id":"66f1a6a1.b59f78","type":"mqtt out","z":"4ea30e4c.29d4","name":"alarm/pushalarm","topic":"instar/000389888811/alarm/pushalarm","qos":"1","retain":"false","broker":"9e4e460d.640f18","x":270,"y":220,"wires":[]},{"id":"9e4e460d.640f18","type":"mqtt-broker","z":"","name":"IN-9010FHD","broker":"192.168.2.165","port":"8883","tls":"b55f9f2e.fe529","clientid":"","usetls":true,"compatmode":true,"keepalive":"60","cleansession":true,"birthTopic":"","birthQos":"0","birthPayload":"","closeTopic":"","closeQos":"0","closePayload":"","willTopic":"","willQos":"0","willPayload":""},{"id":"b55f9f2e.fe529","type":"tls-config","z":"","name":"","cert":"","key":"","ca":"","certname":"instar-cert.cert","keyname":"","caname":"","servername":"","verifyservercert":false}]
- Note that this flow uses the MQTT topic
instar/000389888811/alarm/pushalarm- you will have to swap 000389888811 with the MAC address of your camera to make this work.