INSTAR MQTTv5 with Python - Client Connection

Adding a Personal TLS Certificate
Generating a Private Certificate Authority
INSTAR Cameras already have a valid CA certificate installed that we can use when we access the MQTT service via the camera's DDNS address (e.g. ab1234.ddns3-instar.de). Alternatively, we can upload our own self-signed certificate.
To do this we will use OpenSSL to generate an X.509 digital certificate that uses the X.509 PKI (short for public key infrastructure) standard. This digital certificate allows us to confirm that a specific public key belongs to the subject included within the certificate. There is an identity that issues the certificate and its details are also included in the certificate.
Create a new directory named mosquitto_certificates enter the folder and run the following OpenSSL commands:
openssl genrsa -out ca.key 2048
openssl req -x509 -new -nodes -key ca.key -sha512 -days 3650 -out ca.crt
Since we will not be verifying the certificate, it does not really matter what you fill out here:
Country Name (2 letter code) [AU]:
State or Province Name (full name) [Some-State]:
Locality Name (eg, city) []:
Organization Name (eg, company) [Internet Widgits Pty Ltd]:INSTAR MQTTv5
Organizational Unit Name (eg, section) []:
Common Name (e.g. server FQDN or YOUR name) []:INSTAR MQTTv5
Email Address []:
After running the previous commands, we will have the following two files in the mqtt_certificates directory:
ca.key: Certificate authority keyca.crt: Certificate authority certificate file
Creating a Certificate for the Mosquitto Server
We need generate a new private key and use the key to and generates the server certificate: file
openssl genrsa -out server.key 2048
openssl req -new -key server.key -out server.csr
It does not really matter what you fill out here. Except - you have to set the FQDN to an address/url through which you will be contacting the MQTT service:
Country Name (2 letter code) [AU]:
State or Province Name (full name) [Some-State]:
Locality Name (eg, city) []:
Organization Name (eg, company) [Internet Widgits Pty Ltd]:INSTAR MQTTv5
Organizational Unit Name (eg, section) []:
Common Name (e.g. server FQDN or YOUR name) []:192.168.2.118
Email Address []:

Please enter the following 'extra' attributes
to be sent with your certificate request
A challenge password []:
An optional company name []:
The command generates a server.crt file with the signed X.509 digital certificate for the Mosquitto server:
openssl x509 -req -in server.csr -CA ca.crt -CAkey ca.key -CAcreateserial -out server.crt -days 3650 -sha512
Signature ok
subject=C = AU, ST = Some-State, O = INSTAR MQTTv5, CN = 192.168.2.118
Getting CA Private Key
After running the previous commands, we will have the following 3 new files in the mqtt_certificates directory:
server.key: Server keyserver.csr: Server certificate signing requestserver.crt: Server certificate file
Upload to your INSTAR Camera
Your INSTAR camera has two expectations that we need to full fill before uploading our certificates:
- Combine the
server.keyandserver.crtin a single fileserver.pem:
-----BEGIN RSA PRIVATE KEY-----
MIIEpAIBAAKCAQEAy/8kPEhDg9rJ3Rb60Vax7pgtUTKLQ0hi1BZl3OBH/JuKmvVO
...
jLeAC8HlqWJMNlm8DWSIGWZSBmgS11Dakw8gGxNJ4UThUwnx2XrnLA==
-----END RSA PRIVATE KEY-----
-----BEGIN CERTIFICATE-----
MIIDKzCCAhMCFArfrELy23ar8AW8OKk5WXn7TLa/MA0GCSqGSIb3DQEBDQUAMFIx
...
PlC3SfWTSo3XJlPjU2xRToRG4rO7oyxN/0X7dGQLCrSJjSJoC3Jeky91EpIouwU=
-----END CERTIFICATE-----
- Open the
ca.crtand re-save it asca.pem.
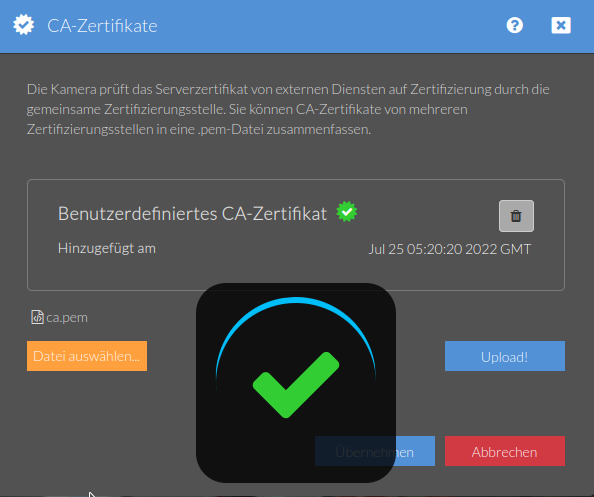
CA Store
Now take the ca.pem and upload it to the INSTAR CA Store:
Server Certificate
Next, upload the server.pem file as our camera's TLS certificate:
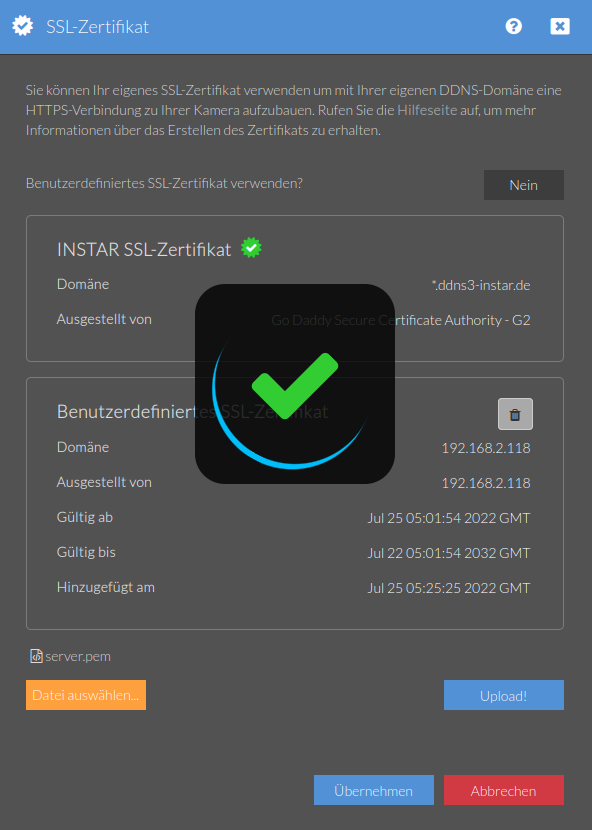
Don't forget to toggle it on before leaving this menu.
Creating a Certificate for each MQTT Client��
Run the following command to create a 2,048-bit client key and the certificate-signing request, also known as CSR:
openssl genrsa -out client.key 2048
openssl req -new -key client.key -out client.csr
Country Name (2 letter code) [AU]:
State or Province Name (full name) [Some-State]:
Locality Name (eg, city) []:
Organization Name (eg, company) [Internet Widgits Pty Ltd]:INSTAR MQTTv5
Organizational Unit Name (eg, section) []:
Common Name (e.g. server FQDN or YOUR name) []:MQTT Client
Email Address []:

Please enter the following 'extra' attributes
to be sent with your certificate request
A challenge password []:
An optional company name []:
The following command then generates a client.crt file with the signed X.509 digital certificate for the MQTT client:
openssl x509 -req -in client.csr -CA ca.crt -CAkey ca.key -CAcreateserial -out client.crt -days 3650 -sha512 -addtrust clientAuth
Signature ok
subject=C = AU, ST = Some-State, O = INSTAR MQTTv5, CN = MQTT Client
Getting CA Private Key
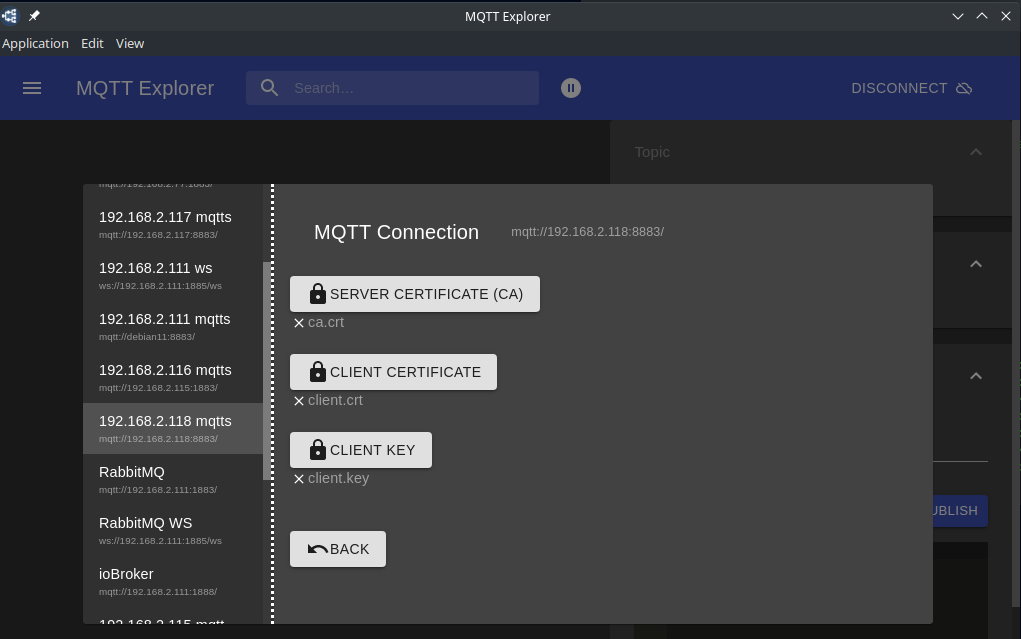
Testing the MQTT TLS Client Authentication
We can now test our certificates, for example, with an graphical MQTT client like the MQTT Explorer. Start by uploading the ca.crt and client.crt + client.key:
Activate your cameras MQTT Server with TLS encryption:
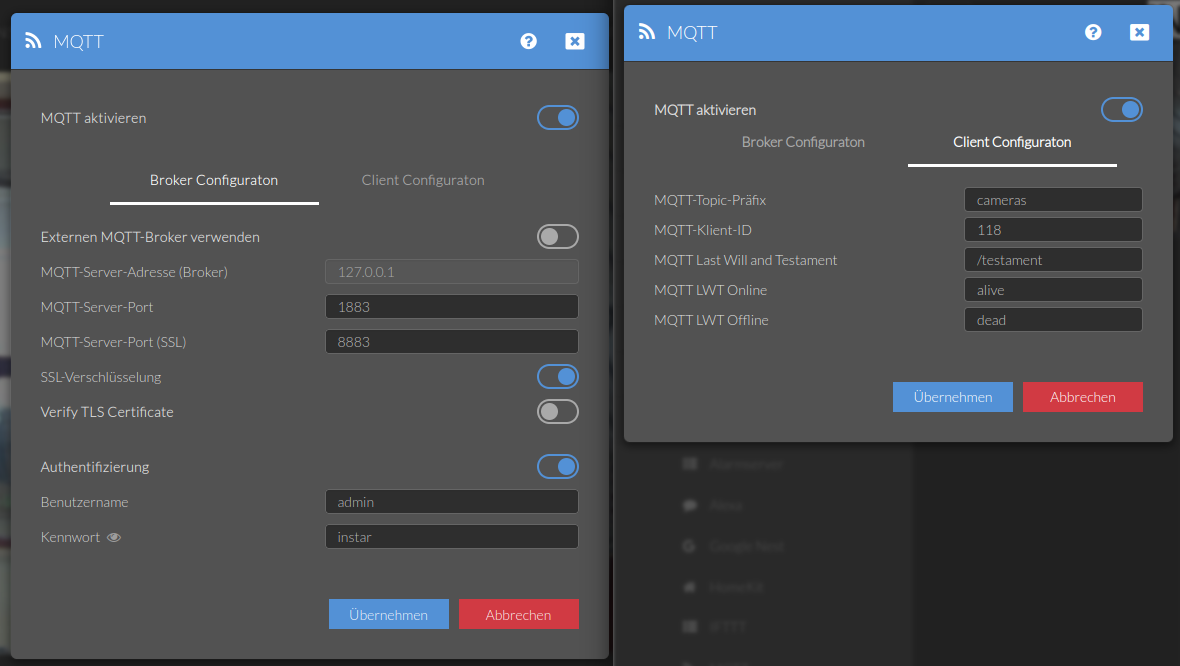
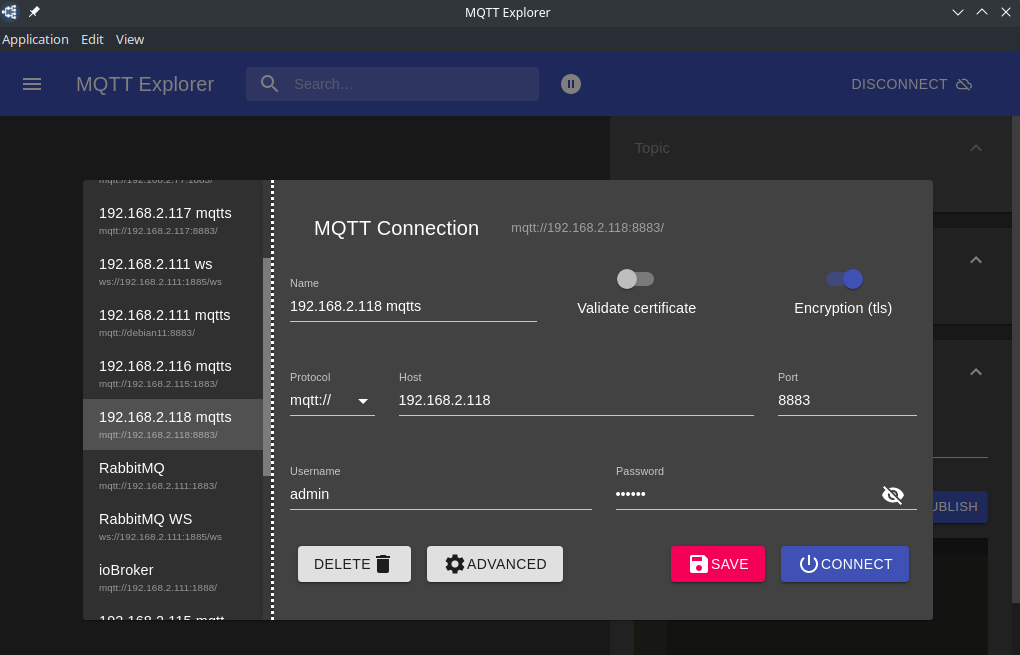
And configure the MQTT Explorer with your camera's IP address and MQTT Broker login:
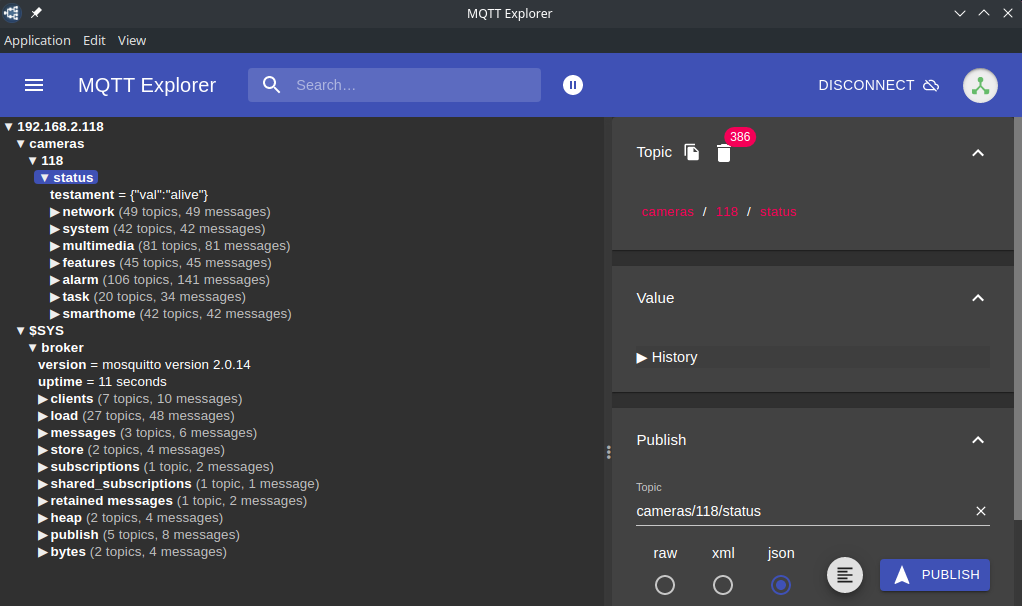
Hit Connect and you should see your Broker messages as well as your camera's state messages coming in:
Now with everything set up - Python!
Installing paho-mqtt for Python
Create a dependencies.txt file inside your project folder/venv with the following dependencies:
paho-mqtt==1.6.1
And install them using:
pip install -r dependencies.txt
Connecting a Python Client to our INSTAR MQTT(S)v5 Server
First, we will have to create an MQTT client with paho-mqtt that connects to the INSTAR MQTT server. And the configuration is about the same as the one we needed to connect the MQTT Explorer:
config.py
import os.path
# Replace mosquitto_certificates with the path
# in which you saved the certificate authority file,
# the client certificate file and the client key
certificates_path = "mosquitto_certificates"
ca_certificate = os.path.join(certificates_path, "ca.crt")
client_certificate = os.path.join(certificates_path, "client.crt")
client_key = os.path.join(certificates_path, "client.key")
# Replace 192.168.2.118 with the IP or hostname
# INSTAR IP cameras
# Make sure the IP or hostname matches the value
# you used for Common Name for the certificate
mqtt_server_host = "192.168.2.118"
mqtt_server_port = 8883
mqtt_bind_address = ""
mqtt_bind_port = 0
mqtt_username = "admin"
mqtt_password = "instar"
mqtt_transport = "tcp"
mqtt_keepalive = 60
mqtt_client_id = "mqtt5_client"
mqtt_lwt = "cameras/118/status/testament"
subscription.py
from config import *
import paho.mqtt.client as mqtt
import ssl
import json

def on_connect(client, userdata, flags, rc, properties=None):
    if rc==0:
        print("INFO :: Connected to MQTT Broker")
        client.subscribe(mqtt_lwt, qos=2, options=None, properties=None)
        client.connected_flag=True
    else:
        print("ERROR :: Connection failed:", rc)
        client.connected_flag=False

def on_subscribe(client, userdata, mid, granted_qos, properties=None):
    print("INFO :: LWT Subscription: {}".format(
        granted_qos[0]))

def on_message(client, userdata, msg):
    json_object = json.loads(msg.payload)
    print("INFO :: Message received. LWT: {}. State: {}".format(
        msg.topic,
        json_object["val"]))

if __name__ == "__main__":
    client = mqtt.Client(client_id = mqtt_client_id, protocol = mqtt.MQTTv5, transport = mqtt_transport)
    client.username_pw_set(username = mqtt_username, password = mqtt_password)
    client.tls_set(ca_certs = ca_certificate, certfile = client_certificate,
                    keyfile = client_key, cert_reqs = ssl.CERT_NONE,
                    tls_version = ssl.PROTOCOL_TLSv1_2)
    client.tls_insecure_set(True)
    client.connect(host = mqtt_server_host, port = mqtt_server_port,
                    keepalive = mqtt_keepalive, bind_address = mqtt_bind_address, bind_port = mqtt_bind_port, properties = None)
    client.on_connect = on_connect
    client.on_subscribe = on_subscribe
    client.on_message = on_message
    client.loop_forever()
    if client.bad_connection_flag:
        print("ERROR :: No Connection to Broker")
        client.loop_stop()
        sys.exit()
We can run the subscription script and restart our camera we can see the LWT (last-will-and-testament) topic value change from alive to dead and back to alive once our client managed to reconnect:
python subscription.py

INFO :: Connected to MQTT Broker
INFO :: LWT Subscription: Granted QoS 2
INFO :: Message received. LWT: cameras/118/status/testament. State: alive
INFO :: Message received. LWT: cameras/118/status/testament. State: dead
INFO :: Connected to MQTT Broker
INFO :: LWT Subscription: Granted QoS 2
INFO :: Message received. LWT: cameras/118/status/testament. State: alive