Managing Containers in Kubernetes

Kubernetes, the open-source system for deploying, managing, and scaling containerized apps, is at the heart of Google Kubernetes Engine. This integration is totally natural. Google developed Kubernetes in-house, and uses it to run its own most popular, global apps. Gmail, YouTube, and even Search run in Kubernetes Engine.
Technologies used:
-
Kubernetes: Kubernetes is a manager for cluster of containerized applications. It automates container deployment and scaling containers across clusters of hosts. A Kubernetes cluster is made up of Nodes or Minions (server instances to which pods are deployed), Pods (Pods consist of one or more containers. Those containers are located on the same host machine to facilitate sharing of resources. Pods are assigned unique IPs within each cluster.), Labels (key-value-pairs) can be assigned to Pods or Minions to group them, Selectors represent queries that are made against labels to resolve matching objects, Controllers manage a set of pods and enforce a configuration state and Containers (containerized applications/services executed by the docker runtime).
-
Docker: Docker is the container runtime that we are going to use to run our containerized applications on.
-
ectd: etcd is a distributed key value store that provides a reliable way to store data across a cluster of machines. Kubernetes uses etcd to exchange messages between master and minion server and reporting on the cluster status.
- Network Time Protocol Service
- Setting a Hostname
- Install Docker & Kuberenetes on CentOS
- Install and Configure Master Controller
- Install and Configure the Minions
- Testing Kubectl
- Working with Docker
- Working with Kubernetes
Network Time Protocol Service
NTP- is a protocol which runs over port 123 UDP at Transport Layer and allows computers to synchronize time over networks for an accurate time. This service - by default - is handled by Chrony.d on CentOS 7 and higher. But we are going to use the ntp package instead. Using the same service everywhere makes sure that every node inside the cluster is set to the same time - or as close as possible.
You can check if Chrony.d is active on your system with the command systemctl status chronyd.service, stopping and disabling it with systemctl stop chronyd.service, systemctl disable chronyd.service.
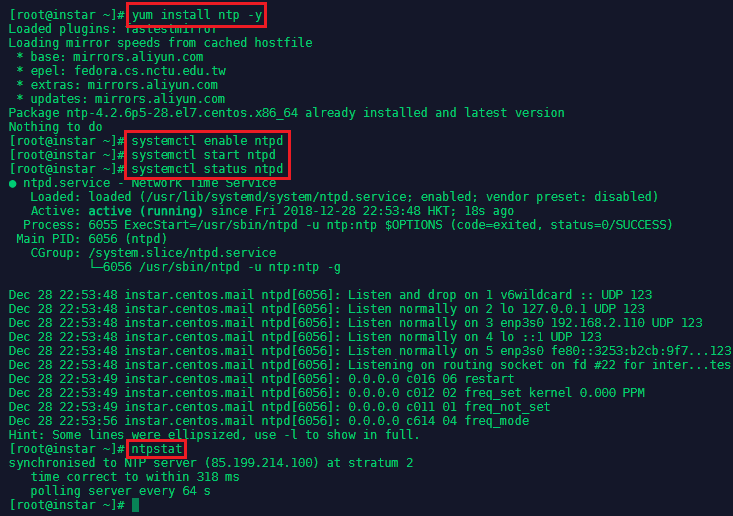
To install ntp run yum install ntp -y. Run systemctl enable ntpd && systemctl start ntpd to activate the NTP service. You can verify that the service is working with systemctl status ntpd and ntpstat:
The NTP daemon (ntpd) should be considered for systems which are normally kept permanently on. Systems which are required to use broadcast or multicast IP, or to perform authentication of packets with the Autokey protocol, should consider using ntpd.
Chrony would be considered a best match for the systems which are frequently suspended or otherwise intermittently disconnected from a network (mobile and virtual servers etc).
Setting a Hostname
We now need to make sure that all of our CentOS server can talk to each other via a hostname that is bound to their internal IP address. This can be set in nano /etc/hosts:

Add all server that you want to connect by their local IP and assign a host name, by which you want to call them - add those lines to all your server's host files:
192.168.2.110 in-centos-master
192.168.2.111 in-centos-minion1
You can test if the hostname is used by pinging it:

Install Docker & Kuberenetes on CentOS
First we need to add the repository to pull the Docker code from - type nano /etc/yum.repos.d/virt7-docker-common-release.repo and add:
[virt7-docker-common-release]
name=virt7-docker-common-release
baseurl=http://cbs.centos.org/repos/virt7-docker-common-release/x86_64/os/
gpgcheck=0
Then install Docker, Kubernetes and etcd on the master server as well as all your hosts:
yum update
yum -y install --enablerepo=virt7-docker-common-release kubernetes docker etcd
systemctl enable docker
systemctl start docker
Install and Configure Master Controller
Kubernetes
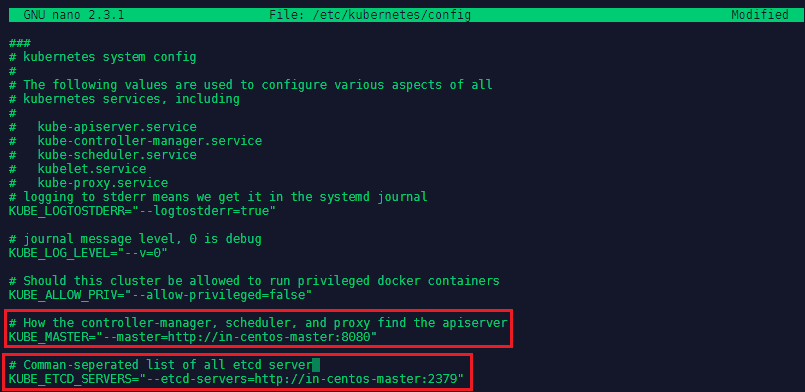
Let's start with editing the configuration file for Kubernetes in nano /etc/kubernetes/config. We need to add two information:
KUBE_MASTER="--master=http://in-centos-master:8080"

KUBE_ETCD_SERVERS="--etcd-servers=http://in-centos-master:2379"
The address / hostname of our master server and the etcd server - which, in our case, also resides on the master server.
etcd
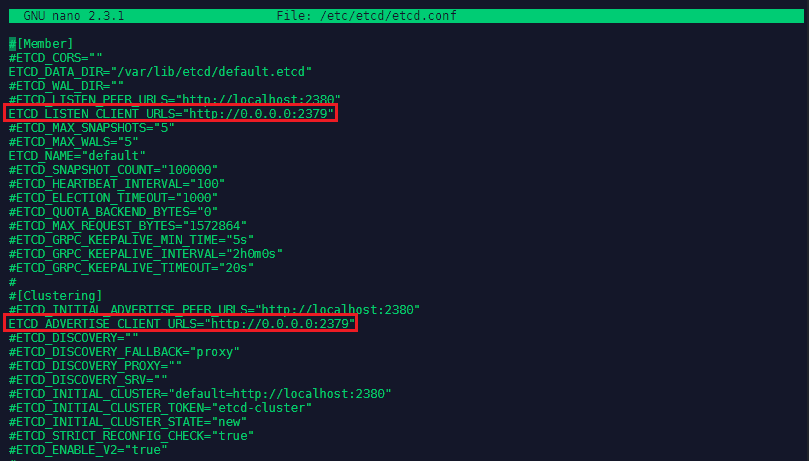
The etcd configuration can be found in nano /etc/etcd/etcd.conf. Here we need to change the following lines:
ETCD_LISTEN_CLIENT_URLS="http://0.0.0.0:2379"
ETCD_ADVERTISE_CLIENT_URLS="http://0.0.0.0:2379"
Changing those lines from http://localhost:2379 to http://0.0.0.0:2379 so we accept messages from every network interface.
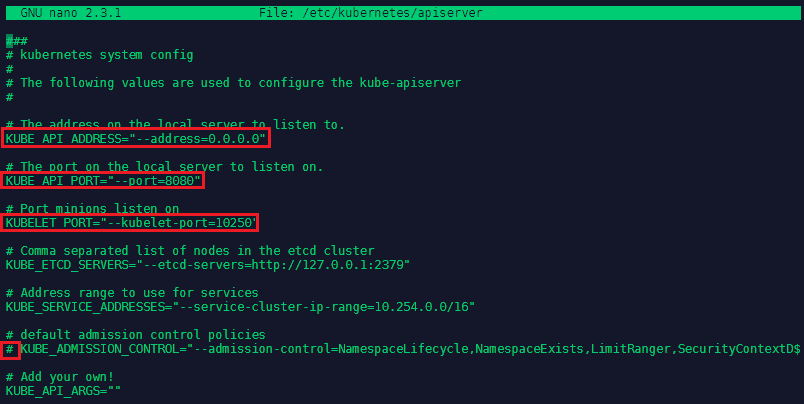
API Server
The Kubernetes API Server configuration can be found in nano /etc/kubernetes/apiserver - the following lines need to be changed:
KUBE_API_ADDRESS="--address=0.0.0.0"
KUBE_API_PORT="--port=8080"
KUBELET_PORT="--kubelet-port=10250"
# KUBE_ADMISSION_CONTROL="--admission-control=NamespaceLifecycle,NamespaceExists,LimitRanger,SecurityContextD$
We now have to make sure that the services on the Master Server are started in a particular order:
systemctl enable etcd kube-apiserver kube-controller-manager kube-scheduler
systemctl start etcd kube-apiserver kube-controller-manager kube-scheduler
systemctl status etcd kube-apiserver kube-controller-manager kube-scheduler | grep "(running)" | wc -l
The output of the last command should be 4 - as we wanted to start four services in total.
Install and Configure the Minions
Kubernetes
Let's start with editing the configuration file for Kubernetes in nano /etc/kubernetes/config. As before we need to add two lines:
KUBE_MASTER="--master=http://in-centos-master:8080"

KUBE_ETCD_SERVERS="--etcd-servers=http://in-centos-master:2379"
The address / hostname of our master server and the etcd server - which, in our case, also resides on the master server.
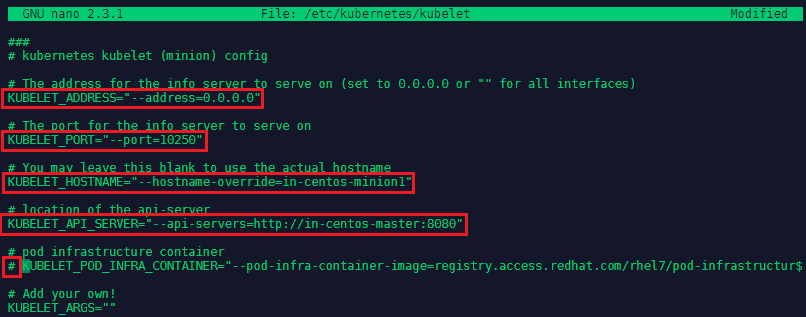
Kubelet
The Kubelet configuration can be found in nano /etc/kubernetes/kubelet - the following lines need to be changed:
KUBELET_ADDRESS="--address=0.0.0.0"
KUBELET_PORT="--port=10250"
KUBELET_HOSTNAME="--hostname-override=in-centos-minion1"
KUBELET_API_SERVER="--api-servers=http://in-centos-master:8080"
# KUBELET_POD_INFRA_CONTAINER="--pod-infra-container-image=registry.access.redhat.com/rhel7/pod-infrastructur$
We now have to make sure that the services on the Minion Server are started in this particular order:
systemctl enable kube-proxy kubelet docker
systemctl start kube-proxy kubelet docker
systemctl status kube-proxy kubelet docker | grep "(running)" | wc -l
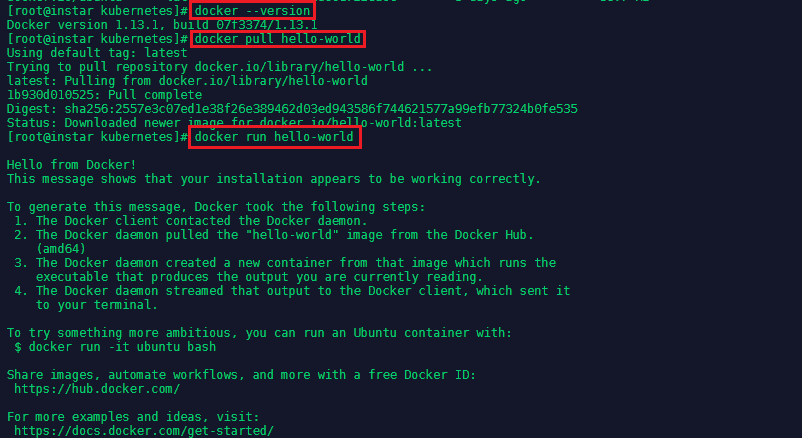
The output of the last command should be 3 - as we wanted to start three services in total. You can verify that docker is running with docker --version or docker images. To verify that docker is working, let's pull and run the hello-world image:
docker pull hello-world
docker run hello-world
The image will run, print it's hello world to your console and exit again - that means everything is in perfect order:
Testing Kubectl
kubectl is the control function for Kubernetes. A list of commands that you can try on your master server:
kubectl get nodes  //this should list all your minions
kubectl describe node in-centos-minion  //get info for a specific node
Working with Docker
Get information about your Docker installation with docker version and docker info - the latter can tell you how many images you downloaded, how many of the are running and how much space and memory you have left on your host system. Further information - e.g. on containers and volumes - can be found in cd /var/lib/docker.
Running Containers
Ready-build containers can be downloaded from the DockerHub - an example is the official image for Ubuntu. Requests for specific versions can be added to the pull command. E.g. the following command pulls the Ubuntu 18.04 Bionic image:
docker pull ubuntu:bionic
All available versions of the selected image are listed on the corresponding DockerHub page. Running this command will then build the image according to a Docker File. Alternatively, you can also use the search command to find all available versions:
docker search ubuntu
To build an container using that image the following command:
docker run -t -i ubuntu:bionic /bin/bash
The -i makes it interactive and the -t runs the output on your terminal - to run the image in the background instead use -d for detached mode. A full list of the command options can be found in the docker docs. Adding /bin/bash is the command you want Docker to run inside the image, which in this case will attach you as root user to the Ubuntu OS - you can verify with dh -f or ps aux.
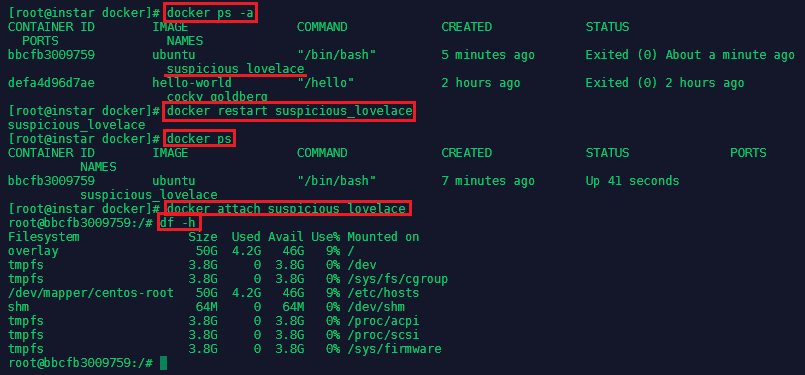
Typing exit will both exit you out of the container and stop it as well. You can verify with docker ps that no image is running anymore.
To restart the container run docker ps -a to find out the name that was given to the container - in this case it was suspicious_lovelace - then type docker restart suspicious_lovelace to run it in detached mode. And docker attach suspicious_lovelace when you need to reconnect your terminal.
To start a new container directly in detached mode run:
docker run -tid ubuntu:bionic /bin/bash
You can see that this spun up a second container from the same image:

You can get more information about the container with the inspect command followed by the name of the container you want to inspect:
docker inspect flamboyant_lamarr
docker inspect flamboyant_lamarr | grep IP
The second command will only show you information related to the IP configuration of the container:

Docker Files
A Docker File is a recipe for an Docker image. So far we only pulled predefined images from the DockerHub - writing our own Dockerfile allows us to make changes to those images. Lets start by creating a folder in your home directory named RunAsUser and add a Dockerfile nano Dockerfile with the following content:
# Dockerfile based on the latest CentOS 7 image - non-privileged user entry

FROM centos:latest

MAINTAINER mpolinowski@gmail.com

RUN useradd -ms /bin/bash user

USER user

The Dockerfile can now be used to build a Docker image with the following command:
docker build -t centos7/nonroot:v1 /root/docker/builds/RunAsUser
docker run -ti centos7/nonroot:v1 /bin/bash
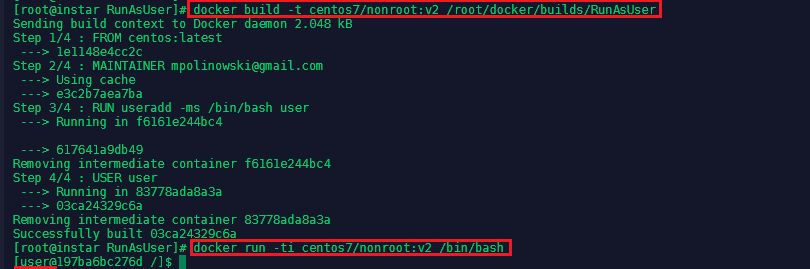
The container is build, the user user created and you are connected to the container with the non-privileged account. But we can still connect as the root user. First exit the container and run docker ps -a to find out the name that was assigned to it - in this case it was optimistic_swirles. Then start the container up again with docker start optimistic_swirles. Then run:
docker exec -u 0 -it optimistic_swirles /bin/bash
This command connects to the referenced container with the user with id=0 (root) and starts the bash terminal:

Another advantage is, that you can now exit the container without stoping it - it will continue running with the default non-privileged user.
Managing Ports
Docker allows us to expose ports to access services provided by applications inside the container. Let's pull the NGINX image and try to access the default landing page:
docker pull nginx
docker run -d nginx:latest
We can now run docker ps to find out the assigned container name (lucid_lichterman) and run docker inspect lucid_lichterman to find out the IP address the container is using (172.17.0.2). If you have the elinks text browser istalled, you can run elinks http://172.17.0.2 to see the NGINX greeting page:

But you cannot reach the page over elinks http://localhost because the internal port 80 was not exposed to be reachable from outside the Docker network. Let's stop the container docker stop lucid_lichterman and run it again - but this time we are going to forward the internal port 80 to the external port 8081:
docker run -d -p 8081:80 nginx:latest
The website is no reachable via elinks http://localhost:8081 on our host machine as well as on the local IP address on the local network - e.g. over http://192.168.2.111:8081.
Working with Kubernetes
Pod Definitions
Create a folder in your home directory on your master server and add nano nginx.yaml inside. This file is going to create a pod with a single container that runs the NGINX image v1.7.9:
apiVersion: v1
kind: Pod
metadata:
 name: nginx
spec:
 containers:
 - name: nginx
   image: nginx:1.7.9
   ports:
   - containerPort: 80
We can now use kubectl to create the pod based on our configuration file:
kubectl create -f /root/docker/builds/nginx.yaml