Creating a Kubernetes Cluster

In this hands-on lab from Linux Academy, we will install and configure a Kubernetes cluster consisting of 1 master and 2 nodes for the pods. Once the installation and configuration are complete, we will have a 3-node Kubernetes cluster that uses Flannel as the network overlay.
- Instructions
- Install Docker and Kubernetes
- Cluster Initialization
- Create and scale a deployment using kubectl
- Pod Deployment
- Kubernetes Services
- Updating the Pod
- Adding a Queue Server
- Replication (not recommended)
- Deployment (recommended)
- Networking and Service Discovery
- Kubernetes + Compose = Kompose
Instructions
In this learning activity, we will create a Kubernetes cluster. The commands we will use for this process can be found in the task list by clicking on the orange question mark buttons.
Once you have completed the lab, leave your cluster in its final state. Do not delete the deployment:
Objectives
- Install Docker and Kubernetes on all servers.
- Create and scale a deployment using kubectl.
Install Docker and Kubernetes
Prerequisites
- You first need to login as your root user or elevate your users privileges via sudo on your master and two minion servers:
sudo su
- This next step is not recommended in production (How do you create a SE Linux policy?) - but we are going to disable SE Linux on all 3 servers:
setenforce 0
sed -i --follow-symlinks 's/SELINUX=enforcing/SELINUX=disabled/g' /etc/sysconfig/selinux
- Now we need to enable the
br_netfiltermodule on all servers to allow our cluster to communicate:
modprobe br_netfilter
echo '1' > /proc/sys/net/bridge/bridge-nf-call-iptables

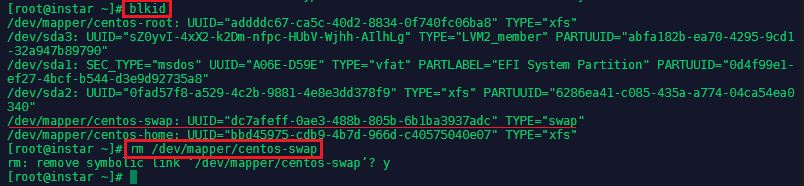
- Make sure that swap has been turned off:
To turn off swap on centos type
swapoff -aand check that the swap was removed withfree -h. Edit the/etc/fstabfile, search for the swap line and comment the entire line by adding a#in front of the line:
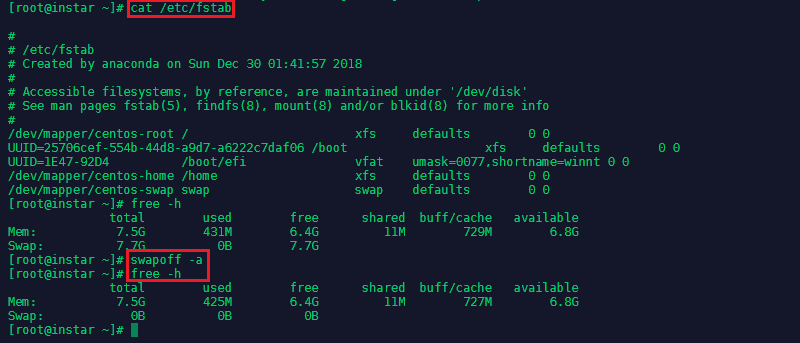
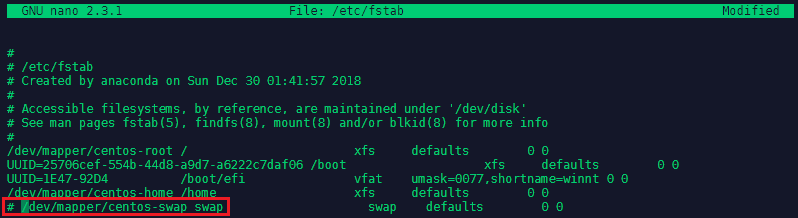
Now delete the remaining swap file - check the location
blkidand remove itrm /dev/mapper/centos-swap:
- Add a FirewallD Service
Configure FirewallD for Kubernetes to work correctly. First download the k8s-master.xml and k8s-worker.xml files to cd /etc/firewalld/services on your master and minion server:
wget https://raw.githubusercontent.com/mpolinowski/k8s-firewalld/master/k8s-master.xml

wget https://raw.githubusercontent.com/mpolinowski/k8s-firewalld/master/k8s-worker.xml

firewall-cmd --reload
On Master Node
firewall-cmd --add-service=k8s-master --zone=public --permanent
On Minion Nodes
firewall-cmd --add-service=k8s-worker --zone=public --permanent
TODO: I have to add firewall-cmd --add-service=dns --zone=public --permanent ?
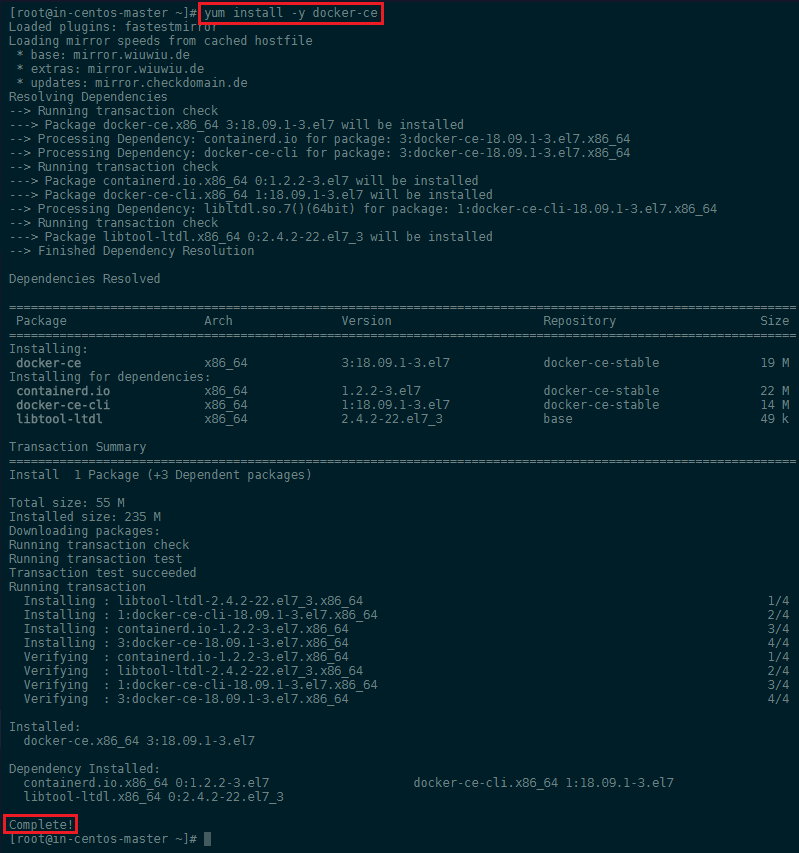
Install Docker CE
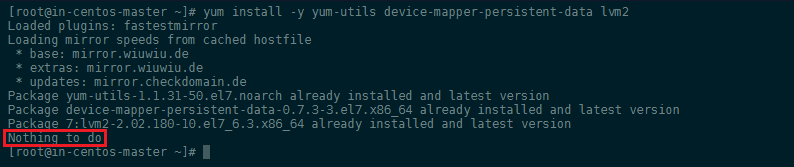
- Ensure that all Docker dependencies are installed:
yum install -y yum-utils device-mapper-persistent-data lvm2
- Now we can add the Docker repository and install it:
yum-config-manager --add-repo https://download.docker.com/linux/centos/docker-ce.repo
yum install -y docker-ce
Install Kubernetes
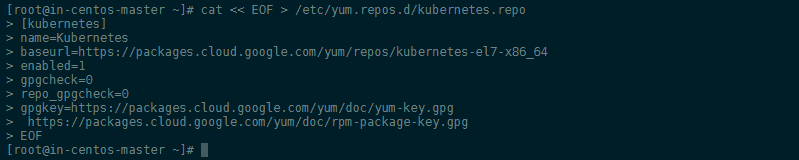
First we need to add the Kubernetes repository all servers:
cat << EOF > /etc/yum.repos.d/kubernetes.repo
[kubernetes]
name=Kubernetes
baseurl=https://packages.cloud.google.com/yum/repos/kubernetes-el7-x86_64
enabled=1
gpgcheck=0
repo_gpgcheck=0
gpgkey=https://packages.cloud.google.com/yum/doc/yum-key.gpg
 https://packages.cloud.google.com/yum/doc/rpm-package-key.gpg
EOF
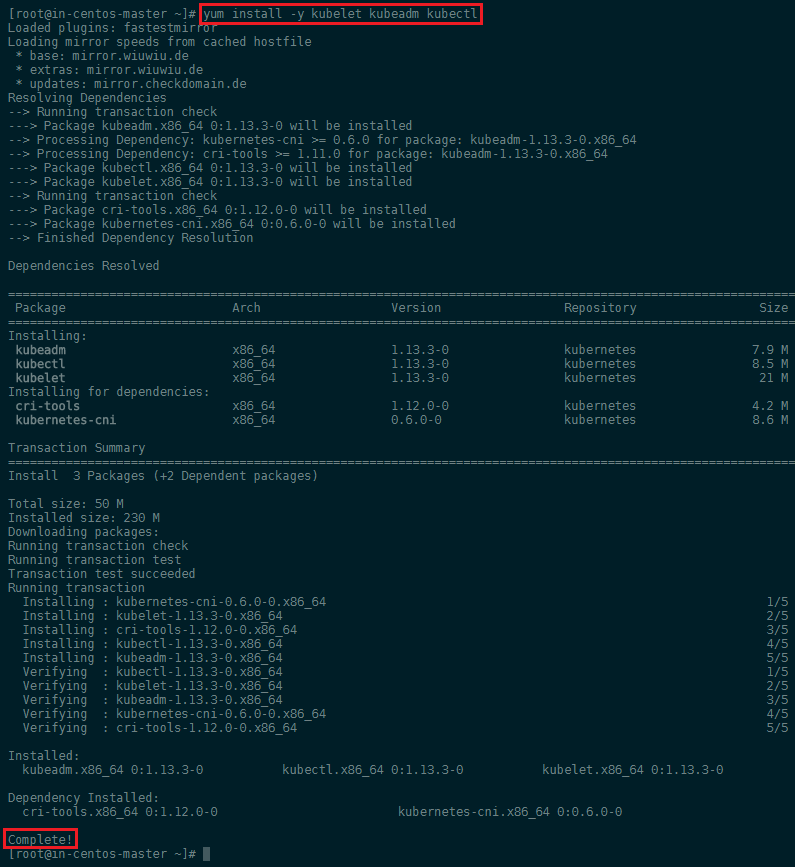
Now we can install Kubernetes on all servers via yum:
yum install -y kubelet kubeadm kubectl
Start Docker and Kublet
systemctl enable docker
systemctl enable kubelet
systemctl start docker
systemctl start kubelet

To check in what Group Docker is running, run docker info | grep -i cgroup:
![]()
In this case it is cgroupfs - we can now make sure that Kubernetes is added to this group:
sed -i 's/cgroup-driver=systemd/cgroup-driver=cgroupfs/g' /etc/systemd/system/kubelet.service.d/10-kubeadm.conf
systemctl daemon-reload
systemctl restart kubelet
Cluster Initialization
So far we did the basic setup for all our servers - now we will initialize our cluster from the MASTER SERVER using the IP range for Flannel. Kubeadm is a tool built to provide kubeadm init and kubeadm join as best-practice fast paths for creating Kubernetes clusters. The init command executes the following phases:
kubeadm init
Your Kubernetes master has initialized successfully! You can now join any number of machines by running the following on each node as root:
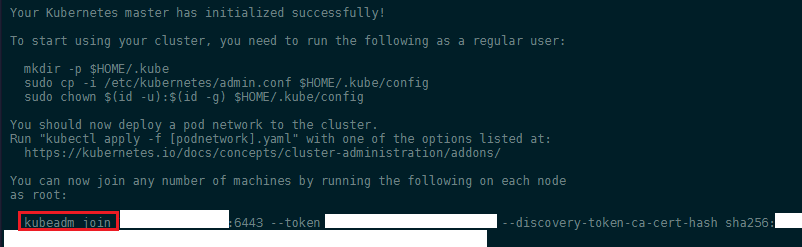
kubeadm join X.X.X.X:6443 --token XXXXXXXXXXXXXXX --discovery-token-ca-cert-hash sha256:XXXXXXXXXXXXXXXXXXXXXXXXXXXXXXXXXXXXXXXXXXXXXXXXXXXXXXXXXXXXXXXXXXXXX
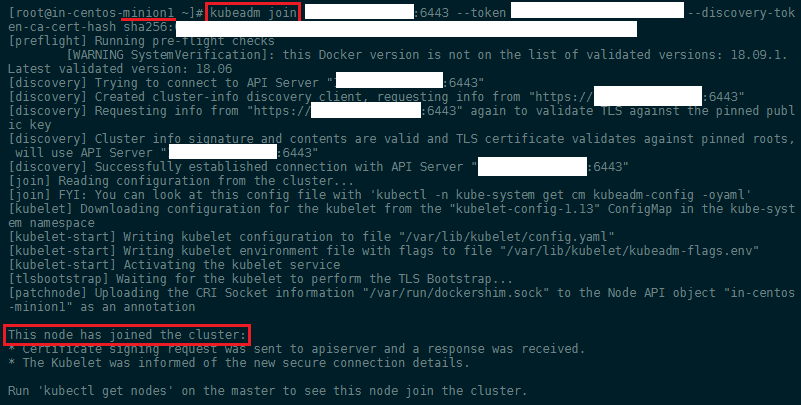
Copy the kubeadmin join command that is in the output and past it into your minion server terminals:
To start over and reset the init and join process by running the kubeadm reset command on your master and all minion servers + clean up iptables
iptables -F && iptables -t nat -F && iptables -t mangle -F && iptables -X
To start using your cluster, you need to run the following as a regular user:
mkdir -p $HOME/.kube
sudo cp -i /etc/kubernetes/admin.conf $HOME/.kube/config
sudo chown $(id -u):$(id -g) $HOME/.kube/config
Installing a Pod Network Add-on
You must install a pod network add-on so that your pods can communicate with each other. The network must be deployed before any applications. Also, CoreDNS will not start up before a network is installed. kubeadm only supports Container Network Interface (CNI) based networks (and does not support kubenet).
There are several CNI's listed for Kubernetes - but we will be using the solution from Weave Net. First Set /proc/sys/net/bridge/bridge-nf-call-iptables to 1 by running sysctl net.bridge.bridge-nf-call-iptables=1 to pass bridged IPv4 traffic to iptables’ chains. This is a requirement for some CNI plugins to work, for more information please see here.
sysctl -w net.bridge.bridge-nf-call-iptables=1
sysctl -w net.bridge.bridge-nf-call-ip6tables=1
reboot
Weave Net works on amd64, arm, arm64 and ppc64le without any extra action required. Weave Net sets hairpin mode by default. This allows Pods to access themselves via their Service IP address if they don’t know their PodIP:
kubectl apply -f "https://cloud.weave.works/k8s/net?k8s-version=$(kubectl version | base64 | tr -d '\n')"
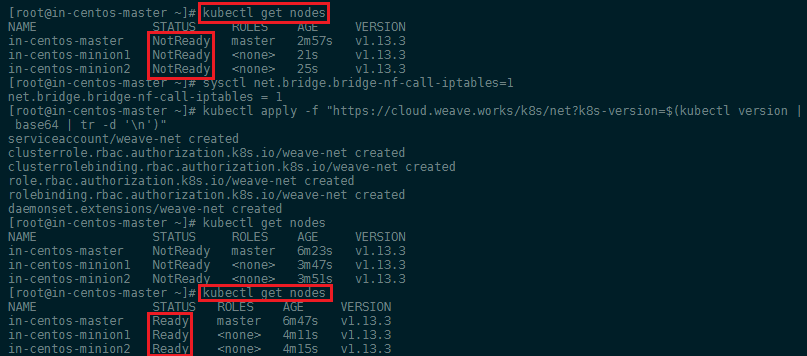
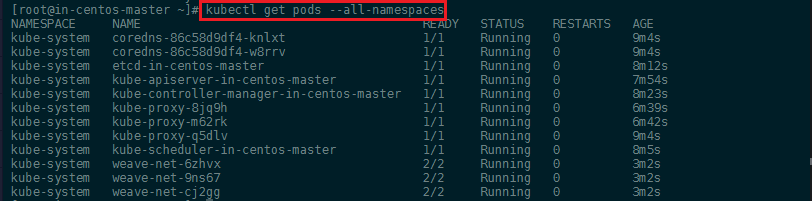
Check the cluster state.
A quick kubectl get nodes should confirm that all our nodes are now connected to the container network (see screenshot above)!
Once a pod network has been installed, you can confirm that it is working by checking that the CoreDNS pod is Running in the output of kubectl get pods --all-namespaces. And once the CoreDNS pod is up and running, you can continue by joining your nodes.
Platforms like Kubernetes assume that each container (pod) has a unique, routable IP inside the cluster. The advantage of this model is that it removes the port mapping complexities that come from sharing a single host IP.
Create and scale a deployment using kubectl
Kubectl is a command line interface for running commands against Kubernetes clusters. We can run a NGINX container with the following command:
kubectl create deployment nginx --image=nginx
You can verify that the Pod was created by Kubernetes:
kubectl get pods

Scaling
To scale up our web server contingent to 4, we can use the following kubectl command:
kubectl scale deployment nginx --replicas=4
kubectl get pods

To get rid of those pods you can scale it back down to 0 replicas and to delete Nginx completely delete the deployment (not the pods - those would be respawned automatically):
kubectl scale deployment nginx --replicas=0
kubectl delete deployment nginx

If you try to delete the pods by name kubectl delete pod nginx-5c7588df-lf2pb, or try to delete all: kubectl delete pods --all, Kubernetes will respawn new pods to meet your deployment scale requirement.
Pod Deployment
Let's deploy an simple Angular app inside a Kubernetes Pod - we will use the 0 release of this Docker image to get started with. To do this we will have to create a Pod Config file for it called webapp-angular.yaml:
apiVersion: v1
kind: Pod
metadata:
  name: webapp
spec:
  containers:
  - name: webapp
    image: richardchesterwood/k8s-fleetman-webapp-angular:release0

We can now use kubectl to read our configuration file and generate the webapp Pod:
kubectl apply -f webapp-angular.yaml

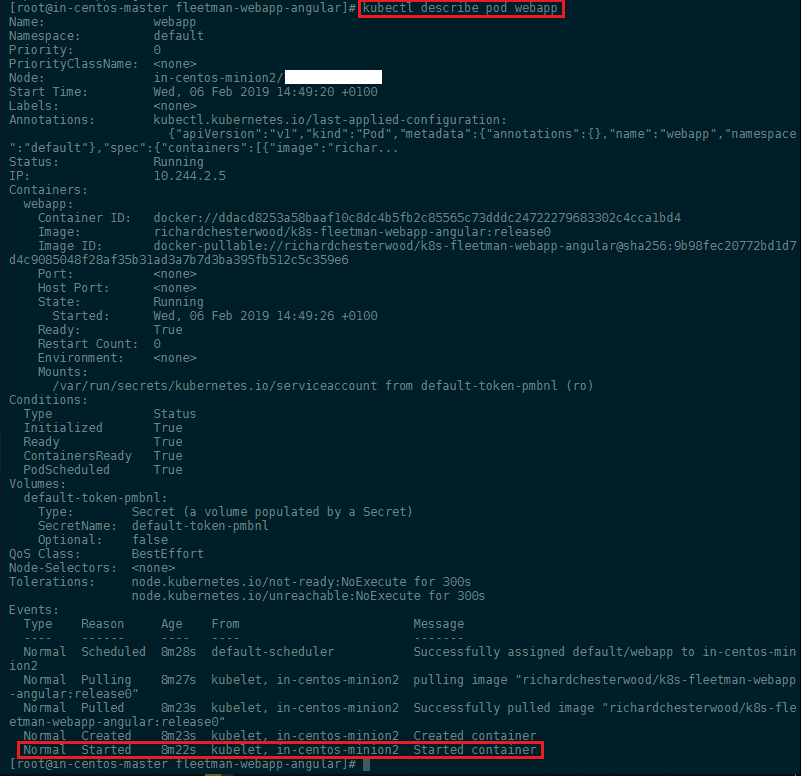
You can inspect the pod with:
kubectl describe pod webapp
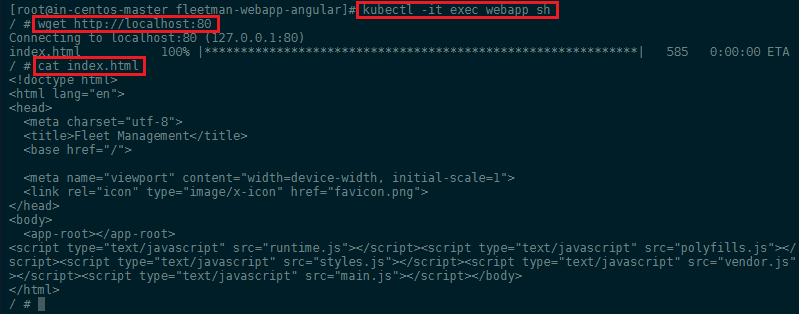
Just like in Docker, we can use kubectl to run commands against our containers - e.g. to access the shell inside your container, contact the webserver (that should be serving our Angular app) and printing out index page:
kubectl -it exec webapp sh
/ # wget http://localhost:80
/ # cat index.html
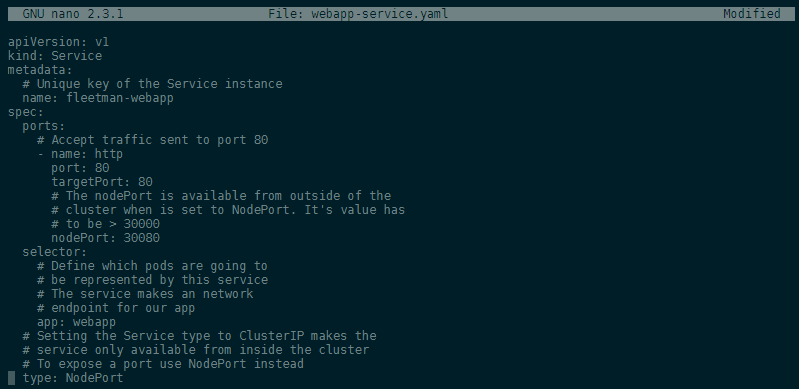
Kubernetes Services
We now have a Pod that is serving our Angular frontend. To be able to access this Pod from the outside we need to add a Kubernetes service. Let's create a file webapp-service.yaml:
apiVersion: v1
kind: Service
metadata:
  # Unique key of the Service instance
  name: fleetman-webapp
spec:
  ports:
    # Accept traffic sent to port 80
    - name: http
      port: 80
      targetPort: 80
      # The nodePort is available from outside of the
      # cluster when is set to NodePort. It's value has
      # to be > 30000
      nodePort: 30080
  selector:
    # Define which pods are going to
    # be represented by this service
    # The service makes an network
    # endpoint for our app
    app: webapp
  # Setting the Service type to ClusterIP makes the
  # service only available from inside the cluster
  # To expose a port use NodePort instead
  type: NodePort
We now have to add the Selector webapp in form of a label in webapp-angular.yaml to our frontend pod to connect it to our service:
apiVersion: v1
kind: Pod
metadata:
  name: webapp
  labels:
    app: webapp
spec:
  containers:
  - name: webapp
    image: richardchesterwood/k8s-fleetman-webapp-angular:release0
The service can be added to our cluster by the following commands:
kubectl apply -f webapp-angular.yaml
kubectl apply -f webapp-service.yaml

By applying our changes, we have updated our pod and created our service.

The webapp is now accessible on your Cluster IP with the Port 30080!
Updating the Pod
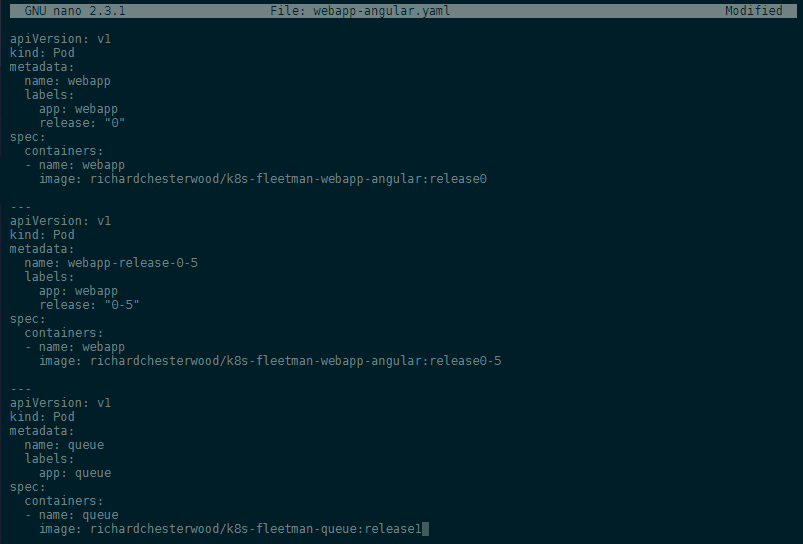
To Update a Pod in Production with 0 downtime we can use labels. We can define a second pod inside the same file webapp-angular.yaml. Right now we are going to use release versions to define our pods. Later we might change this to a production and a development version - both of which can then be run inside the same cluster and be served by different services:
apiVersion: v1
kind: Pod
metadata:
  name: webapp
  labels:
    app: webapp
    release: "0"
spec:
  containers:
  - name: webapp
    image: richardchesterwood/k8s-fleetman-webapp-angular:release0

---
apiVersion: v1
kind: Pod
metadata:
  name: webapp-release-0-5
  labels:
    app: webapp
    release: "0-5"
spec:
  containers:
  - name: webapp
    image: richardchesterwood/k8s-fleetman-webapp-angular:release0-5
Make sure to surround release version with quotation marks to convert it into a string - "0". Otherwise you end up with the error message for: "webapp-angular.yaml": cannot convert int64 to string.
Now we have to modify our service webapp-service.yaml: to not only check for the app name label, but also for the release version - we want to only connect to the current version 0. Once the version 0.5 is deployed we then can update the service to connect us to the updated Pod instead - allowing us to deploy the update with 0 downtime:
apiVersion: v1
kind: Service
metadata:
  # Unique key of the Service instance
  name: fleetman-webapp
spec:
  ports:
    # Accept traffic sent to port 80
    - name: http
      port: 80
      targetPort: 80
      # The nodePort is available from outside of the
      # cluster when is set to NodePort. It's value has
      # to be > 30000
      nodePort: 30080
  selector:
    # Define which pods are going to
    # be represented by this service
    # The service makes an network
    # endpoint for our app
    app: webapp
    release: "0"
  # Setting the Service type to ClusterIP makes the
  # service only available from inside the cluster
  # To expose a port use NodePort instead
  type: NodePort
Now update both our Pod and Service - as well add the new Pod with our updated Angular app:
kubectl apply -f webapp-angular.yaml
kubectl apply -f webapp-service.yaml
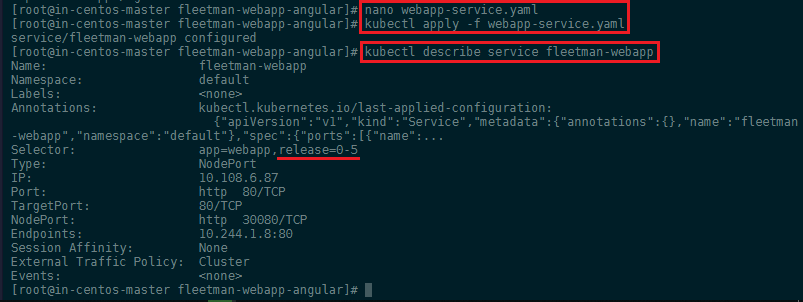
kubectl get pods --show-labels

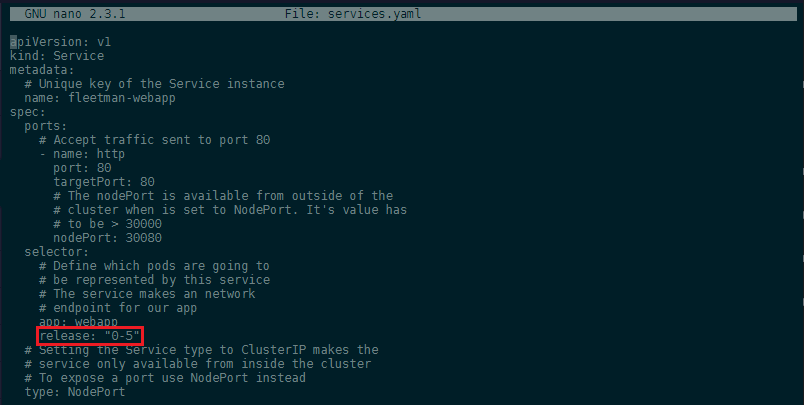
Now that both pods are running we can edit our service webapp-service.yaml and change the selector to release: "0-5". Apply the change with kubectl apply -f webapp-service.yaml and verify that the service is now switched to the new release with kubectl describe service fleetman-webapp:
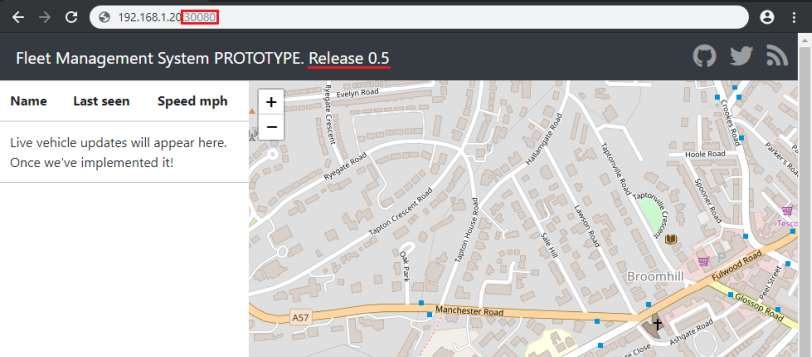
Type in the IP of your Kybernetes Cluster (WAN IP of your master server) and add the port 30080 to access the updated web interface with your browser:
Adding a Queue Server
Our finished WebApp is going to need a message broker to work. We are going to us the given Docker Image in the release1 version to add Apache ActiveMQ as a queue service for our app. ActiveMQ, or in generall all Message Oriented Middleware (MOM) implementations are designed for the purpose of sending messages between two applications, or two components inside one application.
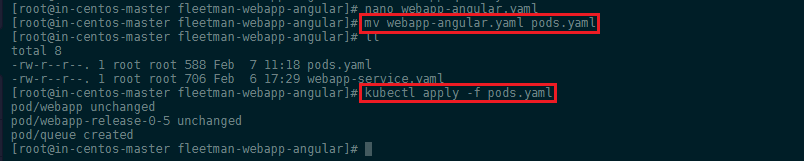
To add this service in a Pod, we need to create a configuration file for it - this can either be a new file called webapp-queue.yaml, or we can simply add it to the end of our existing webapp-angular.yaml configuration file to keep everything neat and tidy (this also means that we can simplify the filename to pods.yaml -> mv webapp-angular.yaml pods.yaml):
---
apiVersion: v1
kind: Pod
metadata:
  name: queue
  labels:
    app: queue
spec:
  containers:
  - name: queue
    image: richardchesterwood/k8s-fleetman-queue:release1
Use kubectl to read our configuration file and generate the Queue Pod:
kubectl apply -f pods.yaml
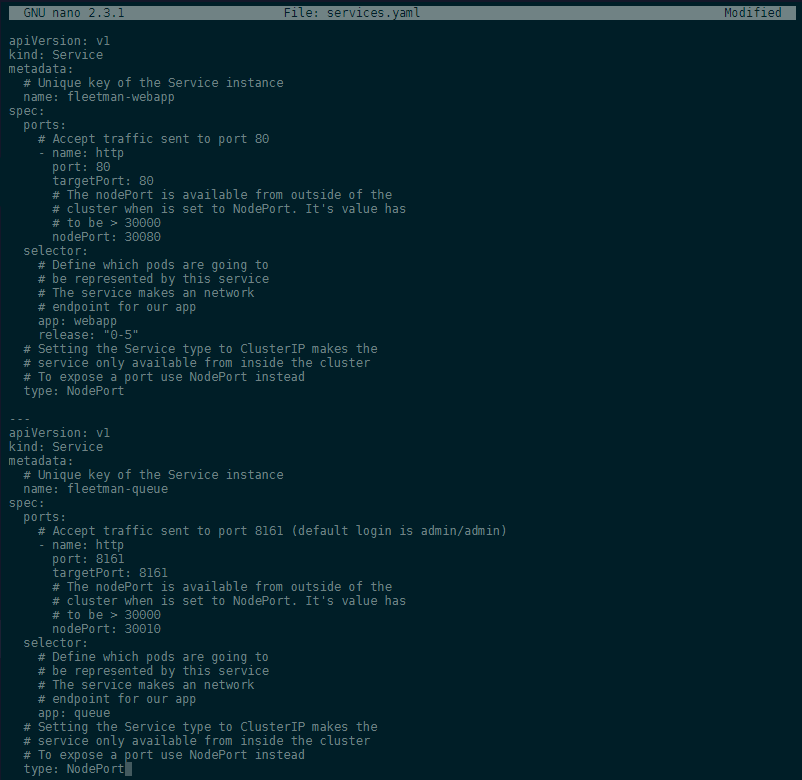
To be able to access the Pod, we need to add it to our service configuration webapp-service.yaml which we can rename to services.yaml -> mv webapp-service.yaml services.yaml:
---
apiVersion: v1
kind: Service
metadata:
  # Unique key of the Service instance
  name: fleetman-queue
spec:
  ports:
    # Accept traffic sent to port 8161 (default login is admin/admin)
    - name: http
      port: 8161
      targetPort: 8161
      # The nodePort is available from outside of the
      # cluster when is set to NodePort. It's value has
      # to be > 30000
      nodePort: 30010
  selector:
    # Define which pods are going to
    # be represented by this service
    # The service makes an network
    # endpoint for our app
    app: queue
  # Setting the Service type to ClusterIP makes the
  # service only available from inside the cluster
  # To expose a port use NodePort instead
  type: NodePort
We can now apply all changes with:
kubectl apply -f .
kubectl get all
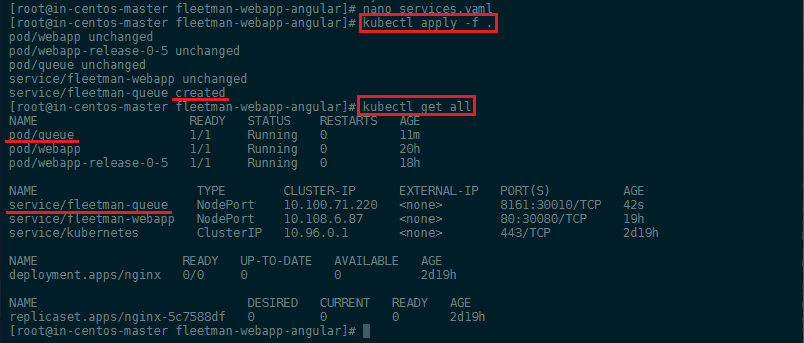
You can inspect the pod, in case that something doesn't look right. All events will be logged at the end of the console output:
kubectl describe pod queue

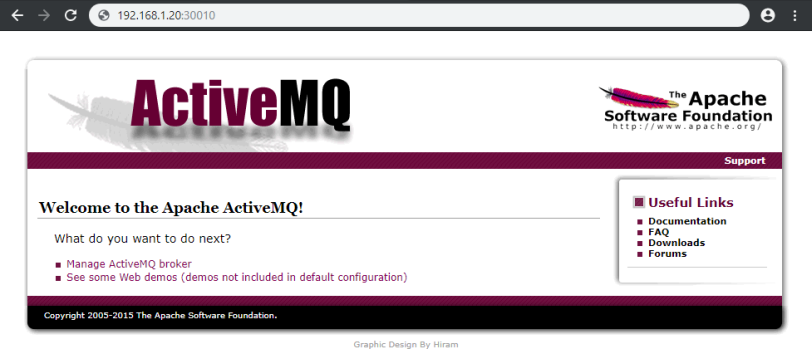
Type in the IP of your Kybernetes Cluster (WAN IP of your master server) and add the port 30010 to access the updated web interface with your browser:
Replication (not recommended)
So far we spawned all our Pods manually using the kubectl apply command. This way it is us who is responsible for the complete life-cycle of the pod. That means that you can delete (gracefully shutdown) or force shutdown those Pods with the kubectl delete command:
kubectl delete pod webapp-release-0-5
kubectl delete pod webapp-release-0-5 --force
The Pod will just disappear - check with kubectl get all - and not be restarted. The same would happen if your app crashes and that is a situation where we want Kubernetes to recover Pods to keep our App running.
ReplicaSets
The ReplicaSet is basically just a wrapper around our Pod configuration that defines the number of instances of our Pod we want to be running at all times - if one crashes, it will automatically be replaced by a new version of the same pod.
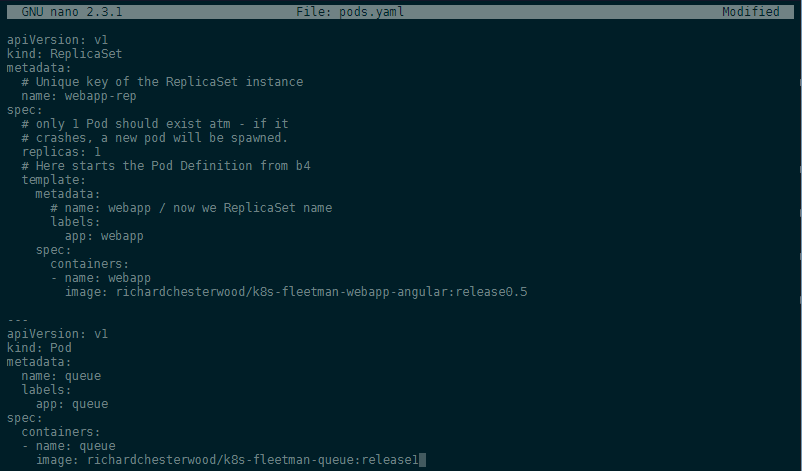
Let's re-write our Pod definition to a ReplicaSet - below is the original pods.yaml file (the webapp with release0 was removed):
apiVersion: v1
kind: Pod
metadata:
  name: webapp
  labels:
    app: webapp
    release: "0-5"
spec:
  containers:
  - name: webapp
    image: richardchesterwood/k8s-fleetman-webapp-angular:release0-5

---
apiVersion: v1
kind: Pod
metadata:
  name: queue
  labels:
    app: queue
spec:
  containers:
  - name: queue
    image: richardchesterwood/k8s-fleetman-queue:release1
The ReplicaSet just adds a few lines to the top of our Pod configuration:
apiVersion: apps/v1
kind: ReplicaSet
metadata:
  # Unique key of the ReplicaSet instance
  name: webapp
spec:
  selector:
    matchLabels:
      # the ReplicaSet manages all Pods
      # where the lable = app: webapp
      app: webapp
  # only 1 Pod should exist atm - if it
  # crashes, a new pod will be spawned.
  replicas: 1
  # Here starts the Pod Definition from b4
  template:
    metadata:
      # name: webapp / now we ReplicaSet name
      labels:
        app: webapp
    spec:
      containers:
      - name: webapp
        image: richardchesterwood/k8s-fleetman-webapp-angular:release0.5

---
apiVersion: v1
kind: Pod
metadata:
  name: queue
  labels:
    app: queue
spec:
  containers:
  - name: queue
    image: richardchesterwood/k8s-fleetman-queue:release1
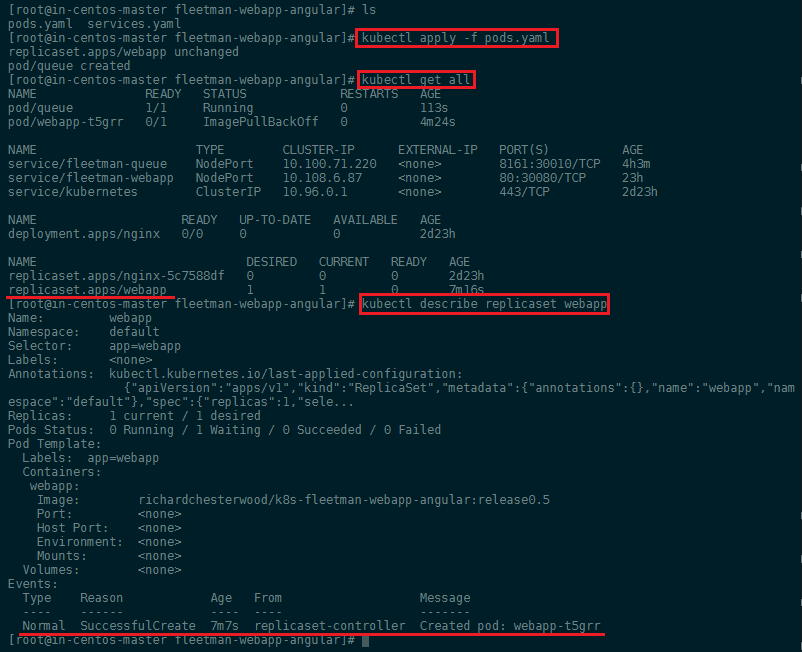
Before applying our new ReplicaSet let's first delete all pods we created earlier kubectl delete pods --all and then start the new Pods with kubectl apply -f pods.yaml. You can verify that everything worked with kubectl get all and kubectl describe replicaset webapp:
We earlier added a release selector to the services.yaml that now needs to be removed as we are no longer using it as a label for our Pod - afterwards run kubectl apply -f services.yaml:
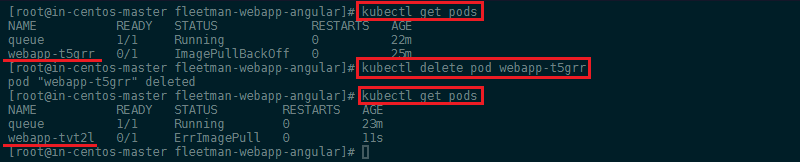
If you now delete the Pod manually - simulating a crash - a new pod will be automatically spawned by Kubernetes to replace the Pod you just lost:
In the case above, your web service would have experienced a few seconds of downtime while waiting for the new pod to spin up. To prevent this issue we can go back to pods.yaml and set the number of replicas to 2. Now if the first pod crashes, the second one will replace it right away:

Deployment (recommended)
Unlike ReplicaSets Deployments enable rolling updates with 0 downtime as well as roll-backs to older versions of your app!
Let's start with deleting our ReplicaSet kubectl delete replicaset webapp - this is going to remove both the set and all pods that have been spawned from it:

To now change our ReplicaSet into a Deployment we only have to change type: Deploymet inside our pods.yaml:
apiVersion: apps/v1
kind: Deployment
metadata:
  # Unique key of the Deployment
  name: webapp
spec:
  selector:
    matchLabels:
      # the Deployment manages all Pods
      # where the lable = app: webapp
      app: webapp
  # only 1 Pod should exist atm - if it
  # crashes, a new pod will be spawned.
  replicas: 1
  # Here starts the Pod Definition from b4
  template:
    metadata:
      # name: webapp / now we Deployment name
      labels:
        app: webapp
    spec:
      containers:
      - name: webapp
        image: richardchesterwood/k8s-fleetman-webapp-angular:release0

---
apiVersion: v1
kind: Pod
metadata:
  name: queue
  labels:
    app: queue
spec:
  containers:
  - name: queue
    image: richardchesterwood/k8s-fleetman-queue:release1
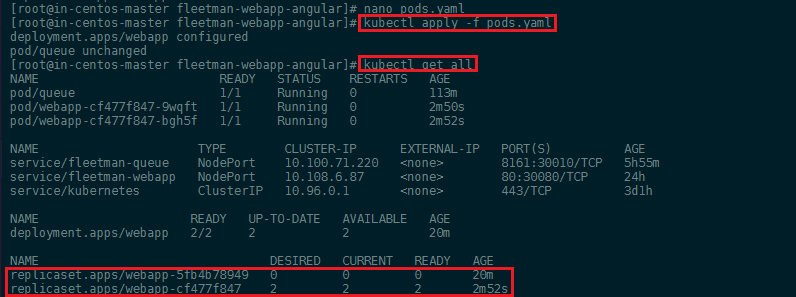
We also changed the version of our app back to release0 so we can later test out the update procedure. Then apply the cahnges you made with kubectl apply -f pods.yaml:
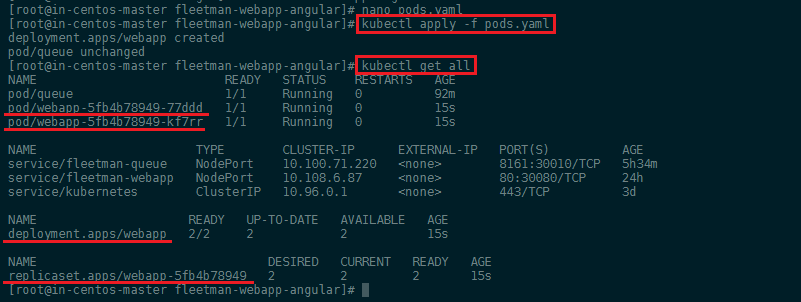
As you can see, the Deployment was created and set up a ReplicaSet for us that spawned two Pods:
- deployment.apps/webapp 2/2
- replicaset.apps/webapp-5fb4b78949 2
- pod/webapp-5fb4b78949-77ddd 1/1
- pod/webapp-5fb4b78949-kf7rr 1/1
Rolling Update and Rollback
Now to update our app back to release0-5 edit pods.yaml and set the image to back to the 0.5 release. Afterwards run kubectl apply -f pods.yaml. This will start up a new ReplicaSet with the updated pods, but keep the old set alive until the update is ready - resulting in a 0-downtime, rolling update of our app:
As seen above, the new ReplicaSet was successfully deployed - but the old one was not deleted. In case that something goes wrong during the update and the new pods never spin up, the old ones will not go down - keeping your app alive. This also allows you to always come back to the old version, if something goes wrong after the update. You can follow the rollout process with the following command:
kubectl rollout status deployment webapp
To roll back to a working version of your app - after a desasterous update - check the Rollout History and run the rollback command to go back to a previous version or specify the revision you need:
kubectl rollout history deployment webapp
kubectl rollout undo deployment webapp --to-revision=1

Networking and Service Discovery
We will now create a simple Pod to use as a test environment. Create a file named busybox.yaml with the following contents:
apiVersion: v1
kind: Pod
metadata:
  name: busybox
  namespace: default
spec:
  containers:
  - name: busybox
    image: busybox:1.28
    command:
      - sleep
      - "3600"
    imagePullPolicy: IfNotPresent
  restartPolicy: Always
Then create a pod using this file and verify its status:
kubectl create -f busybox.yaml
pod/busybox created

kubectl get pods busybox
NAME      READY     STATUS    RESTARTS   AGE
busybox   1/1       Running   0          12s
Once that pod is running, you can exec nslookup in that environment. If you see something like the following, DNS is working correctly:
kubectl exec -ti busybox -- nslookup kubernetes.default
Server:    10.96.0.10
Address 1: 10.96.0.10 kube-dns.kube-system.svc.cluster.local

Name:      kubernetes.default
Address 1: 10.96.0.1 kubernetes.default.svc.cluster.local
nslookup successfully contacted the internal CoreDNS server on 10.96.0.10 that Kubernetes provides and resolved the corresponding IP address for kubernetes.default. If the address resolution fails, try to to bring down FirewallD and test which port is being blocked - don't forget to bring it back up afterwards:
systemctl stop firewalld && systemctl disable firewalld
systemctl start firewalld && systemctl enable firewalld
What to do if shutting down FirewallD "solves" your Problem?
There are several threads on Github talking about this issue - this one solved the issue for me:
- Problem:
nslookupdoes not resolve any domains when FirewallD is active:
[root@in-centos-master ~]# kubectl exec -ti webapp-cf477f847-9wqft sh
/ # nslookup database
nslookup: can't resolve '(null)': Name does not resolve

nslookup: can't resolve 'database': Try again
/ # nslookup google.com
nslookup: can't resolve '(null)': Name does not resolve

nslookup: can't resolve 'google.com': Try again
/ # exit
command terminated with exit code 1
- Solution: Configure
iptablesas follows by copying this to all nodes in cluster:
systemctl stop kubelet
systemctl stop docker
rm -rf /var/lib/cni/
rm -rf /etc/cni/net.d
rm -rf /run/flannel

iptables -t nat -F
iptables -t mangle -F
iptables -F
iptables -X
iptables -P INPUT ACCEPT
iptables -P FORWARD ACCEPT
iptables -P OUTPUT ACCEPT


ip6tables -t nat -F
ip6tables -t mangle -F
ip6tables -F
ip6tables -X
ip6tables -P INPUT ACCEPT
ip6tables -P FORWARD ACCEPT
ip6tables -P OUTPUT ACCEPT

iptables -L -v -n
iptables -L -v -n -t nat
conntrack -L
ipset list

lsmod|grep br_netfilter
modprobe br_netfilter
systemctl start docker
systemctl start kubelet
nslookup should now work:
/ # nslookup database
nslookup: can't resolve '(null)': Name does not resolve

Name:      database
Address 1: 10.105.73.87 database.default.svc.cluster.local
/ #
Or check the DNS Debugging section in the Kubernetes documentation.
To be able to connect applications in different pods - e.g. having a backend container accessing a database in a different pod - Kubernetes has it's own DNS Service and we can assign pods to Namespaces to group them together. When we create a pod without specifying a namespace, it will be assigned the namespace: default. The command kubectl get all shows us all pods that are inside this specific space. We can run kubectl get namespaces to see all available spaces that have been assigned by the DNS service:
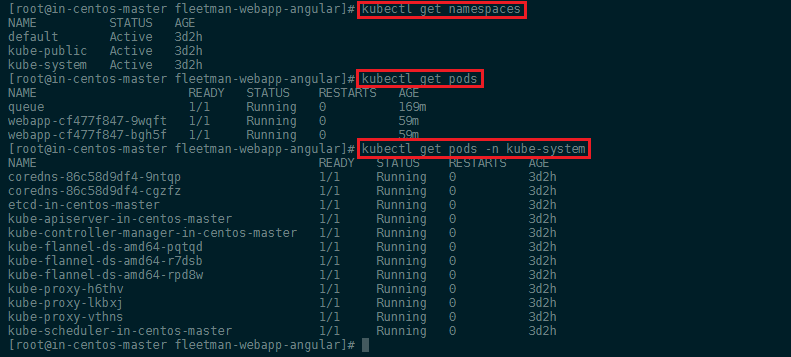
If we want to see Pods running in the kube-system namespace we can use the kubectl get pods -n kube-system command.
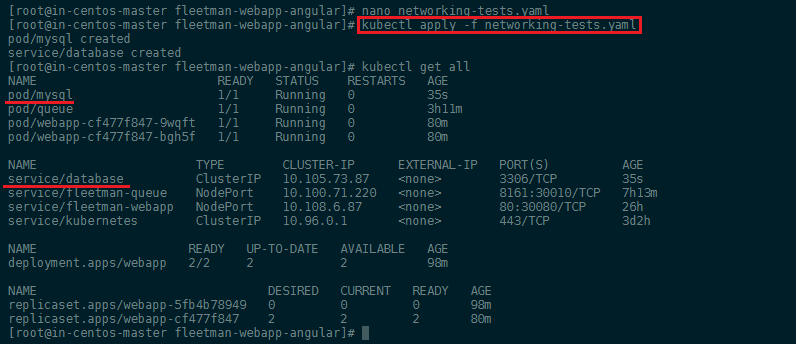
Creating a Database Pod
We now have a Web Application and a message broker in place. Next we want to a add a MariaDB database and we do so with the following configuration file networking-tests.yaml:
apiVersion: v1
kind: Pod
metadata:
  name: mysql
  labels:
    app: mysql
spec:
  containers:
   - name: mysql
     image: mysql:5
     env:
      # Use secret in real life
      - name: MYSQL_ROOT_PASSWORD
        value: password
      - name: MYSQL_DATABASE
        value: fleetman

---
apiVersion: v1
kind: Service
metadata:
  name: database
spec:
  selector:
    app: mysql
  ports:
  - port: 3306
  type: ClusterIP
We can apply this configuration to our cluster with kubectl apply -f networking-tests.yaml and verify that it is running with kubectl get all:
We now want to see if we can connect to the database from our webapp container. To do so we need to execute the shell command inside the container and check the DNS configuration file:
kubectl exec -it webapp-cf477f847-9wqft sh
/ # cat /etc/resolv.conf

In this case the CoreDNS server is registered under nameserver 10.96.0.10 - that means that every time we need to resolve a domain name, like we did earlier with kubernetes.default, this DNS server is contacted to resolve the underlying IP address for us. We can verify this by typing:
kubectl get services -n kube-system

That means that if we want to connect to our database server from another pod in our cluster (Service Discovery), all we need to do is to connect to the domain name database that is provided by the database service. This is very important since the assigned IP address can change all the time!
Going back into the webapp container we can run a nslookup to see if the DNS service is working correctly:
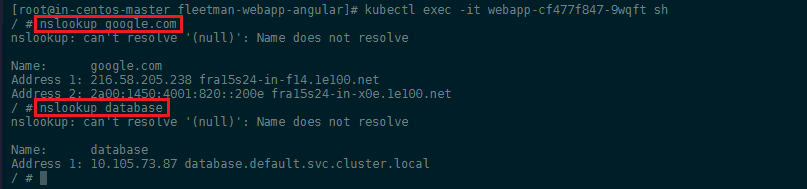
As you see, we can not only resolve internal cluster IPs but also internet domains - the CoreDNS service is using 8.8.8.8 and 8.8.4.4 as _Upstream DNS Servers by default.
You can also see that the FQDN (Fully Qualified Domain Name) of our database is actually database.default.svc.cluster.local. The reason why we can simply use databse to get an result, is that the /etc/resolv.conf file specifies that if a domain name is not found appened one of the standard strings to it and try again:
search default.svc.cluster.local svc.cluster.local cluster.local
Just using database as domain works fine because the pod is inside the default namespace. As soon as you start using different namespaces for different type of services, you have to use the FQDN instead - or at least appened the used namespace to it, e.g. database.mynondefaultnamespace (the DNS service will then add svc.cluster.local to find the FQDN for you).
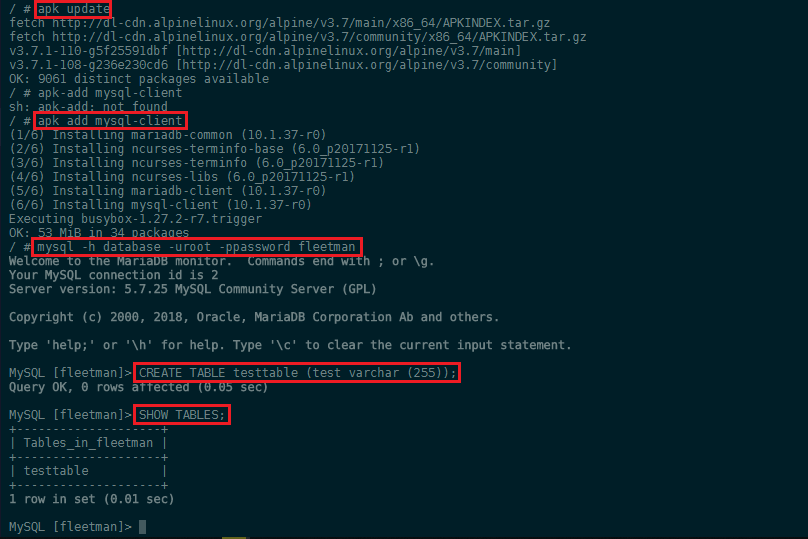
To check if the webapp container can access the MariaDB database, we can install the mySQL client on the Alpine image that serves our webapp:
apk update
apk add mysql-client
To connect to our database we just have to type mysql followed by the host address -h database and the login credentials we set inside the configuration file earlier:
mysql -h database -uroot -ppassword fleetman
MySQL [fleetman]> CREATE TABLE testtable (test varchar (255));
MySQL [fleetman]> SHOW TABLES;
Kubernetes + Compose = Kompose
Kompose is a conversion tool for Docker Compose to container orchestrators such as Kubernetes (or OpenShift).
- Simplify your development process with Docker Compose and then deploy your containers to a production cluster
- Convert your docker-compose.yaml with one simple command
kompose convert - Immediately bring up your cluster with
kompose up - Bring it back down with
kompose down
Kompose is in EPEL CentOS repository. If you don’t have EPEL repository already installed and enabled you can do it by running yum install epel-release:
yum -y install kompose
Use Kompose
In just a few steps, we’ll take you from Docker Compose to Kubernetes. All you need is an existing docker-compose.yml file:
- Go to the directory containing your docker-compose.yml file. Run the
kompose upcommand to deploy to Kubernetes directly. - Or convert the docker-compose.yml file to files that you can use with
kubectl, runkompose convert:
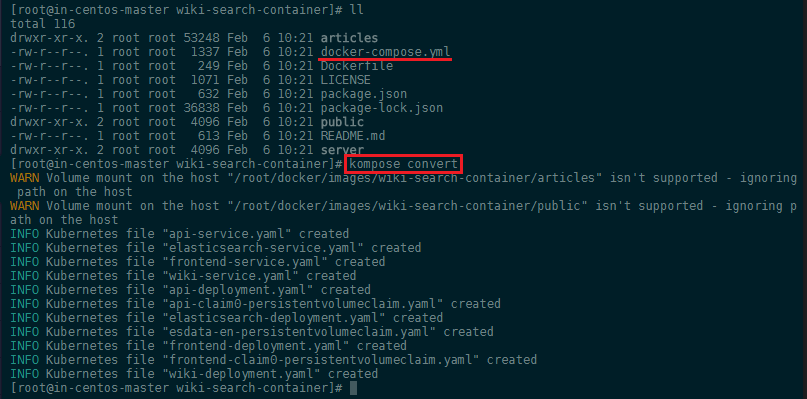
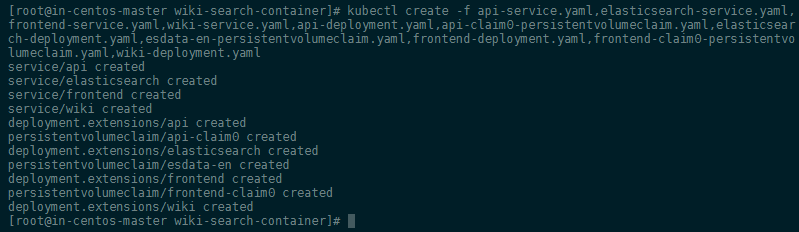
And then kubectl create -f <output files> - e.g. :
kubectl create -f api-service.yaml,elasticsearch-service.yaml,frontend-service.yaml,wiki-service.yaml,api-deployment.yaml,api-claim0-persistentvolumeclaim.yaml,elasticsearch-deployment.yaml,esdata-en-persistentvolumeclaim.yaml,frontend-deployment.yaml,frontend-claim0-persistentvolumeclaim.yaml,wiki-deployment.yaml