Kubernetes Beyond the Edge

- K3s
- Manually Deploy Images and Binary
- Installing K3s in an Air-Gapped Environment
- Kubernetes Dashboard
- Local Access to the Dashboard
- Run a Stateless Application Using a Deployment
- Uninstalling K3s
K3s
K3S - the lightweight Kubernetes. Production ready, easy to install, half the memory, all in a binary less than 100 MB. Used for Edge, IoT, CI, Development, ARM, Embedding k8s and situations where a PhD in k8s clusterology is infeasible
You can install K3s in an air-gapped environment using two different methods. An air-gapped environment is any environment that is not directly connected to the Internet. You can either deploy a private registry and mirror docker.io, or you can manually deploy images such as for small clusters.
Embedded Component Versions
| Component | Version |
|---|---|
| Kubernetes | v1.25.3 |
| Kine | v0.9.3 |
| SQLite | 3.36.0 |
| Etcd | v3.5.3-k3s1 |
| Containerd | v1.6.8-k3s1 |
| Runc | v1.1.4 |
| Flannel | v0.19.2 |
| Metrics-server | v0.6.1 |
| Traefik | v2.9.1 |
| CoreDNS | v1.9.1 |
| Helm-controller | v0.12.3 |
| Local-path-provisioner | v0.0.21 |
Manually Deploy Images and Binary
This method requires you to manually deploy the necessary images to each node and is appropriate for edge deployments where running a private registry is not practical.
Prepare the Images Directory and K3s Binary
Obtain the images tar file for your architecture from the releases page for the version of K3s you will be running. Place the tar file in the images directory, for example:
wget https://github.com/k3s-io/k3s/releases/download/v1.25.3%2Bk3s1/k3s-airgap-images-amd64.tar.zst
sudo mkdir -p /var/lib/rancher/k3s/agent/images/
sudo tar --use-compress-program=unzstd -xvf ./k3s-airgap-images-amd64.tar.zst --directory /var/lib/rancher/k3s/agent/images
rm ./k3s-airgap-images-amd64.tar.zst
Prepare the K3s Binary
Download the K3s binary from the releases page, matching the same version used to get the airgap images. Place the binary in /usr/local/bin on each air-gapped node and ensure it is executable:
sudo wget https://github.com/k3s-io/k3s/releases/download/v1.25.3%2Bk3s1/k3s --directory-prefix=/usr/local/bin
sudo chmod +x /usr/local/bin/k3s
Installing K3s in an Air-Gapped Environment
Download the K3s install script at get.k3s.io. Place the install script anywhere on each air-gapped node, and name it install.sh. When running the K3s script with the INSTALL_K3S_SKIP_DOWNLOAD environment variable, K3s will use the local version of the script and binary:
wget --output-document=./install.sh  https://get.k3s.io
chmod +x ./install.sh
To install K3s on a single server, simply do the following on the server node:
INSTALL_K3S_SKIP_DOWNLOAD=true ./install.sh

[INFO]  Skipping k3s download and verify
[INFO]  Skipping installation of SELinux RPM
[INFO]  Creating /usr/local/bin/kubectl symlink to k3s
[INFO]  Creating /usr/local/bin/crictl symlink to k3s
[INFO]  Skipping /usr/local/bin/ctr symlink to k3s, command exists in PATH at /usr/bin/ctr
[INFO]  Creating killall script /usr/local/bin/k3s-killall.sh
[INFO]  Creating uninstall script /usr/local/bin/k3s-uninstall.sh
[INFO]  env: Creating environment file /etc/systemd/system/k3s.service.env
[INFO]  systemd: Creating service file /etc/systemd/system/k3s.service
[INFO]  systemd: Enabling k3s unit
Created symlink /etc/systemd/system/multi-user.target.wants/k3s.service → /etc/systemd/system/k3s.service.
[INFO]  systemd: Starting k3s
Then, to optionally add additional agents download the install.sh and run the following on each agent node.
INSTALL_K3S_SKIP_DOWNLOAD=true K3S_URL=https://myserver:6443 K3S_TOKEN=mynodetoken ./install.sh
Take care to ensure you replace myserver with the IP or valid DNS of the server and replace mynodetoken with the node token from the server typically at /var/lib/rancher/k3s/server/node-token:
sudo cat /var/lib/rancher/k3s/server/node-token
K109ff43654eb75675r756r49f41e02ve5467e5v45b9139esfdh23c8::server:ef896e4377876834524356876
Before adding an external client make sure that all Kubernetes ports are opened and accessible on all systems.
INSTALL_K3S_SKIP_DOWNLOAD=true K3S_URL=https://192.168.1.101:6443 K3S_TOKEN=K109ff43654eb75675r756r49f41e02ve5467e5v45b9139esfdh23c8::server:ef896e4377876834524356876 ./install.sh
Verify that the installation was successful:
sudo kubectl version --short --output=yaml

clientVersion:
  buildDate: "2022-10-25T19:59:38Z"
  compiler: gc
  gitCommit: f2585c1671b31b4b34bddbb3bf4e7d69662b0821
  gitTreeState: clean
  gitVersion: v1.25.3+k3s1
  goVersion: go1.19.2
  major: "1"
  minor: "25"
  platform: linux/amd64
kustomizeVersion: v4.5.7
serverVersion:
  buildDate: "2022-10-25T19:59:38Z"
  compiler: gc
  gitCommit: f2585c1671b31b4b34bddbb3bf4e7d69662b0821
  gitTreeState: clean
  gitVersion: v1.25.3+k3s1
  goVersion: go1.19.2
  major: "1"
  minor: "25"
  platform: linux/amd64
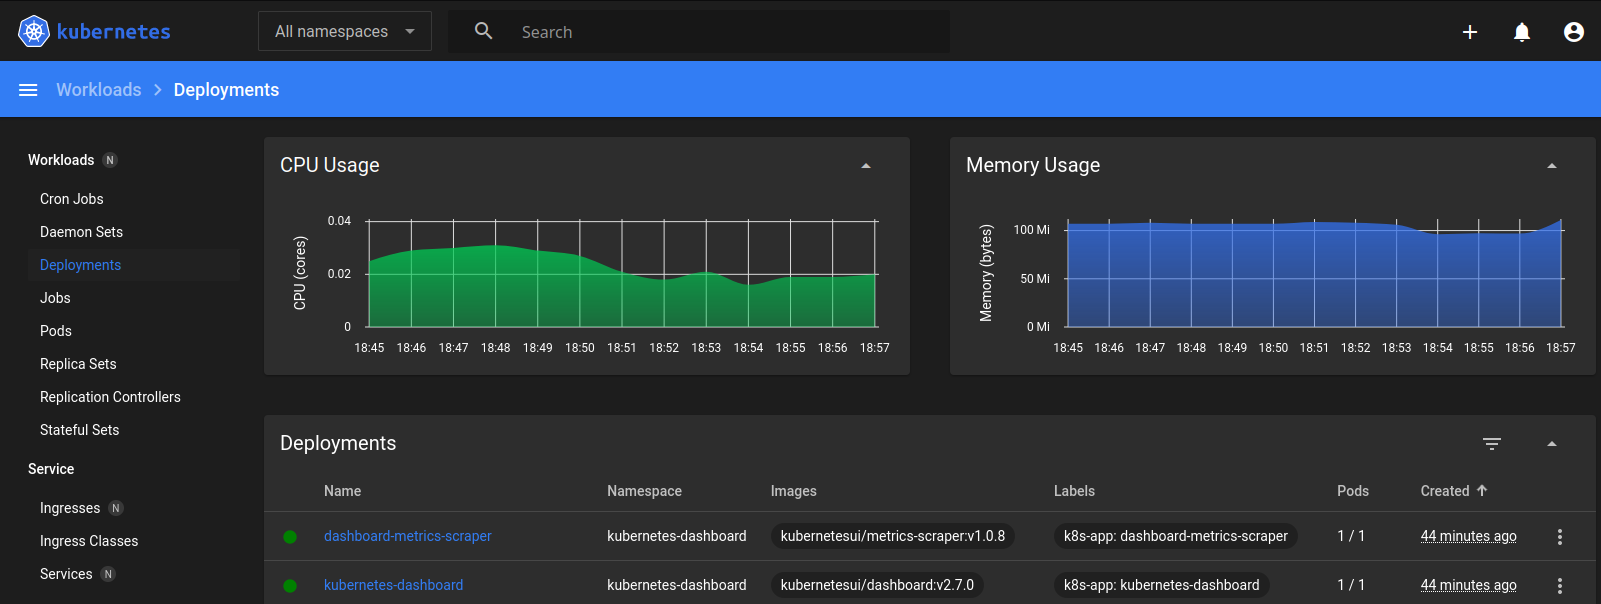
Kubernetes Dashboard
The Kubernetes Dashboard is a web-based Kubernetes user interface. You can use Dashboard to deploy containerized applications to a Kubernetes cluster, troubleshoot your containerized application, and manage the cluster resources. You can use Dashboard to get an overview of applications running on your cluster, as well as for creating or modifying individual Kubernetes resources (such as Deployments, Jobs, DaemonSets, etc). For example, you can scale a Deployment, initiate a rolling update, restart a pod or deploy new applications using a deploy wizard.
Deploying the Kubernetes Dashboard
To install the dashboard on an Edge (online) system you should set the following global variables to get the latest version:
GITHUB_URL=https://github.com/kubernetes/dashboard/releases
VERSION_KUBE_DASHBOARD=$(curl -w '%{url_effective}' -I -L -s -S ${GITHUB_URL}/latest -o /dev/null | sed -e 's|.*/||')
I can check the latest version on the release page - in my case this is v2.7.0. So instead of running:
sudo k3s kubectl create -f https://raw.githubusercontent.com/kubernetes/dashboard/${VERSION_KUBE_DASHBOARD}/aio/deploy/recommended.yaml
I can download the file and transfer it to my air-gapped system:
sudo mkdir /opt/k3s
sudo chown myuser:myuser /opt/k3s
wget --output-document=/opt/k3s/kube-dash.yaml https://raw.githubusercontent.com/kubernetes/dashboard/v2.7.0/aio/deploy/recommended.yaml
This file will deploy two container to the Kubernetes cluster that we can pull on a live system:
docker pull kubernetesui/dashboard:v2.7.0
docker pull kubernetesui/metrics-scraper:v1.0.8
And then transfer to my air-gapped system before applying the downloaded job file.
Now I can deploy the dashboard:
sudo k3s kubectl create -f /opt/k3s/kube-dash.yaml

namespace/kubernetes-dashboard created
serviceaccount/kubernetes-dashboard created
service/kubernetes-dashboard created
secret/kubernetes-dashboard-certs created
secret/kubernetes-dashboard-csrf created
secret/kubernetes-dashboard-key-holder created
configmap/kubernetes-dashboard-settings created
role.rbac.authorization.k8s.io/kubernetes-dashboard created
clusterrole.rbac.authorization.k8s.io/kubernetes-dashboard created
rolebinding.rbac.authorization.k8s.io/kubernetes-dashboard created
clusterrolebinding.rbac.authorization.k8s.io/kubernetes-dashboard created
deployment.apps/kubernetes-dashboard created
service/dashboard-metrics-scraper created
deployment.apps/dashboard-metrics-scraper created
This seemed to have worked. Let's verify that both pods are now running:
sudo kubectl get pod --all-namespaces -o wide

NAMESPACE              NAME                                         READY STATUS    AGE   IP
kube-system            coredns-75fc8f8fff-lm4zk                     1/1   Running   3m45s 10.42.0.6
kube-system            local-path-provisioner-5b5579c644-znhxp      1/1   Running   3m45s 10.42.0.4
kube-system            helm-install-traefik-crd-bqfzh               0/1   Completed 3m45s 10.42.0.5
kube-system            helm-install-traefik-s2k47                   0/1   Completed 3m45s 10.42.0.2
kube-system            metrics-server-5c8978b444-57t9t              1/1   Running   3m45s 10.42.0.3
kube-system            svclb-traefik-6b2eda7a-grvsv                 2/2   Running   3m7s  10.42.0.7
kube-system            traefik-9c6dc6686-778mw                      1/1   Running   3m7s  10.42.0.8
kubernetes-dashboard   dashboard-metrics-scraper-64bcc67c9c-ppdj4   1/1   Running   54s   10.42.0.10
kubernetes-dashboard   kubernetes-dashboard-5c8bd6b59-96xdj         1/1   Running   54s   10.42.0.9
sudo kubectl get deployments -n kubernetes-dashboard

NAME                        READY   UP-TO-DATE   AVAILABLE   AGE
dashboard-metrics-scraper   1/1     1            1           55s
kubernetes-dashboard        1/1     1            1           55s
sudo kubectl get services -n kubernetes-dashboard

NAME                        TYPE        CLUSTER-IP     EXTERNAL-IP   PORT(S)    AGE
kubernetes-dashboard        ClusterIP   10.43.53.84    <none>        443/TCP    57s
dashboard-metrics-scraper   ClusterIP   10.43.58.132   <none>        8000/TCP   57s
Looking good :)
Dashboard RBAC Configuration
Create the following resource manifest files:
nano /opt/k3s/dashboard.admin-user.yml
apiVersion: v1
kind: ServiceAccount
metadata:
  name: admin-user
  namespace: kubernetes-dashboard
nano /opt/k3s/dashboard.admin-user-role.yml
apiVersion: rbac.authorization.k8s.io/v1
kind: ClusterRoleBinding
metadata:
  name: admin-user
roleRef:
  apiGroup: rbac.authorization.k8s.io
  kind: ClusterRole
  name: cluster-admin
subjects:
- kind: ServiceAccount
  name: admin-user
  namespace: kubernetes-dashboard
Deploy the admin-user configuration:
sudo k3s kubectl create -f /opt/k3s/dashboard.admin-user.yml -f /opt/k3s/dashboard.admin-user-role.yml

serviceaccount/admin-user created
clusterrolebinding.rbac.authorization.k8s.io/admin-user created
Obtain the Bearer Token
sudo k3s kubectl -n kubernetes-dashboard create token admin-user

eyJhbGciOiJSUzI1NiIsImtpZCI6IkdnaWluV2RRbnpuMENIaUI2TFB2QmxhbGctQUhUVWVjM2FXSWhKRTRXNUEifQ.eyJhdWQiOlsiaHR0cHM6Ly9rdWJlcm5ldGVzLmRlZmF1bHQuc3ZjLmNsdXN0ZXIubG9jYWwiLCJrM3MiXSwiZXhwIjoxNjY4ODU3MDA1LCJpYXQiOjE2Njg4NTM0MDUsImlzcyI6Imh0dHBzOi8va3ViZXJuZXRlcy5kZWZhdWx0LnN2Yy5jbHVzdGVyLmxvY2FsIiwia3ViZXJuZXRlcy5pbyI6eyJuYW1lc3BhY2UiOiJrdWJlcm5ldGVzLWRhc2hib2FyZCIsInNlcnZpY2VhY2NvdW50Ijp7Im5hbWUiOiJhZG1pbi11c2VyIiwidWlkIjoiYzNhNjY0ODUtYjQ2Ny00NzNjLTg4MzktMDk3YzUwMzE4NzI5In19LCJuYmYiOjE2Njg4NTM0MDUsInN1YiI6InN5c3RlbTpzZXJ2aWNlYWNjb3VudDprdWJlcm5ldGVzLWRhc2hib2FyZDphZG1pbi11c2VyIn0.Aq7mrvx3yo4EGsziJZs5poXWYJsq_s5uMkWhuinu0h_XNi-Qke9ZAX2f5cCw31vErXY2NcIYqQKgMMmcFpW9Kod_g--ZdIEmxGRqsIk_bBm1pjgYvdHvQDA8EZrFpT4BMgQMX10I8qp6zE6Y7iLckABDCiTWl0Pu42oRXxnRPp5_OppGOEbOte4Z1A5xjsR889t4YgVeKa9RHlvroWyaDkd5hyEpolpoDxteSd16e6TYXkNUkh70taPbcUzxO-DheP8apWWLsFSzQOUXbG0L2JJIAL1rYbBsvCYH346VtP2SwGFU5Z_S1whACH4O3lKu56aesnT5TERUPL6PdBclIQ
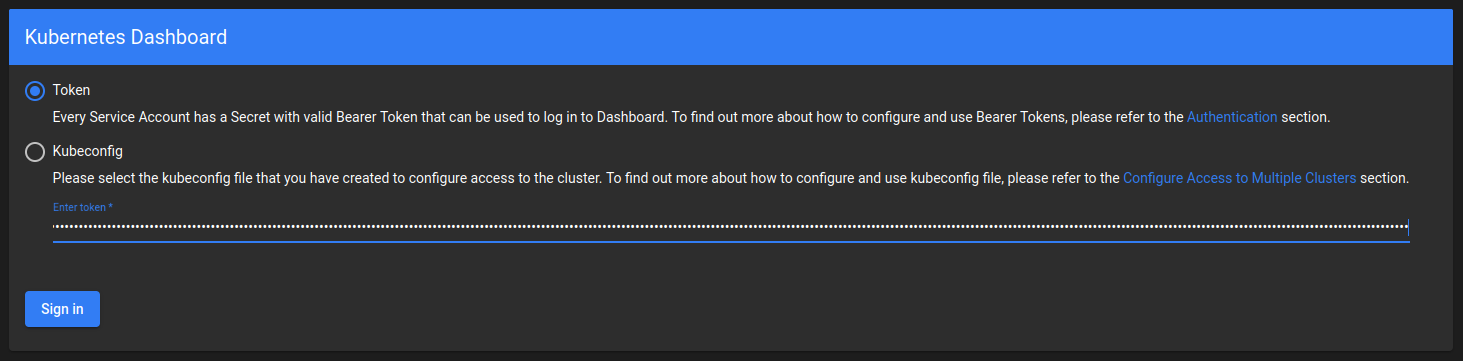
Local Access to the Dashboard
To access the Dashboard you must create a secure channel to your K3s cluster:
sudo k3s kubectl proxy

Starting to serve on 127.0.0.1:8001
The Dashboard is now accessible at:
http://localhost:8001/api/v1/namespaces/kubernetes-dashboard/services/https:kubernetes-dashboard:/proxy/- Sign In with the admin-user Bearer Token
Run a Stateless Application Using a Deployment
You can run an application by creating a Kubernetes Deployment object, and you can describe a Deployment in a YAML file. For example, this YAML file describes a Deployment that runs the latest nginx:alpine Docker image (the image needs to be present on the air-gapped system):
apiVersion: apps/v1
kind: Deployment
metadata:
  name: nginx-deployment
spec:
  selector:
    matchLabels:
      app: nginx
  replicas: 2 # tells deployment to run 2 pods matching the template
  template:
    metadata:
      labels:
        app: nginx
    spec:
      containers:
      - name: nginx
        image: nginx:alpine
        ports:
        - containerPort: 80
Using kubectl you can now deploy this job file with:
sudo kubectl apply -f https://k8s.io/examples/application/deployment.yaml
sudo kubectl describe deployment nginx-deployment
sudo kubectl get pods -l app=nginx
sudo kubectl describe pod <pod-name>
sudo kubectl delete deployment nginx-deployment
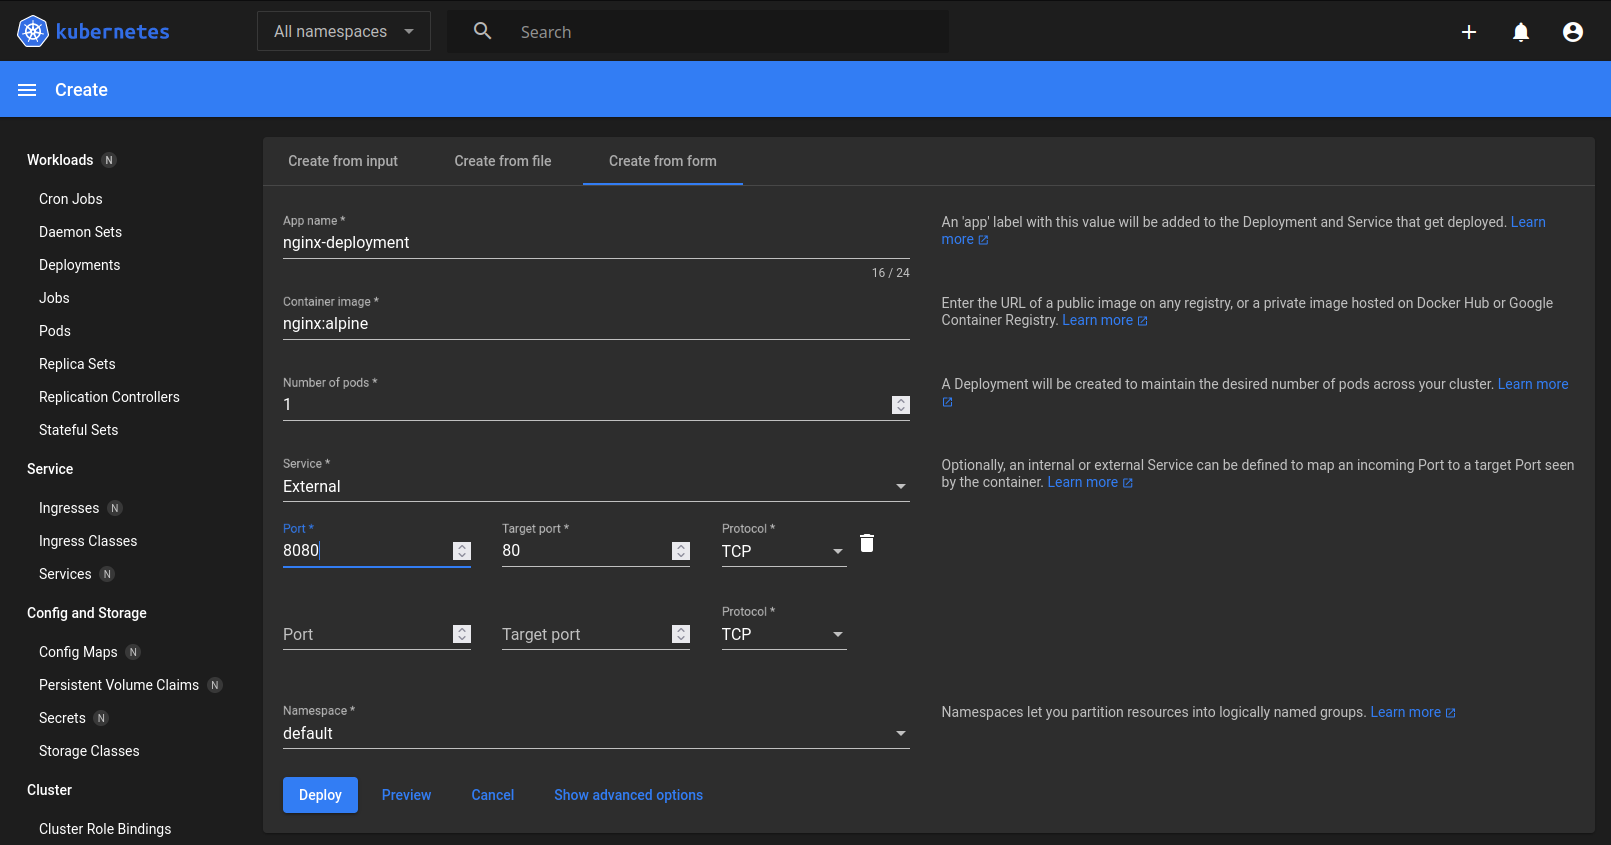
Or we can use the Kubernetes Dashboard - click on Create a new resource in the top right and fill out the form:
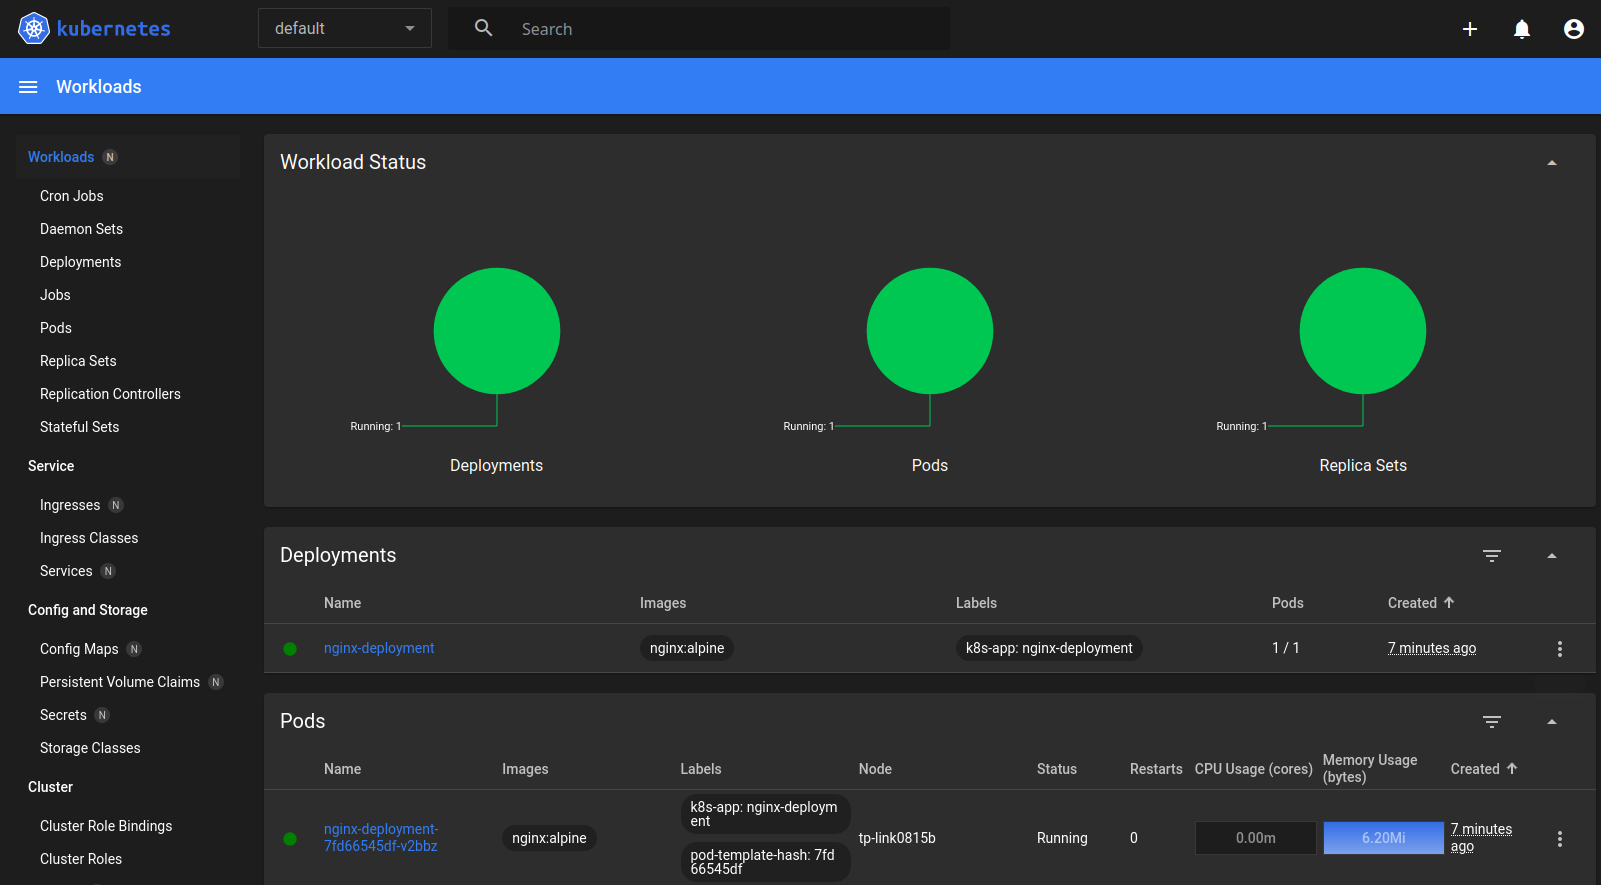
Verify via kubectl:
sudo kubectl describe deployment nginx-deployment
Name:                   nginx-deployment
Namespace:              default
CreationTimestamp:      Sat, 19 Nov 2022 19:40:31 +0800
Labels:                 k8s-app=nginx-deployment
...
sudo kubectl get pods -l k8s-app=nginx-deployment

NAME                                READY   STATUS    RESTARTS   AGE
nginx-deployment-7fd66545df-v2bbz   1/1     Running   0          116s
sudo kubectl describe pod nginx-deployment-7fd66545df-v2bbz

Name:             nginx-deployment-7fd66545df-v2bbz
Namespace:        default
Priority:         0
Service Account:  default
Node:             tp-link0815b/192.168.2.112
Start Time:       Sat, 19 Nov 2022 19:40:31 +0800
Labels:           k8s-app=nginx-deployment
                  pod-template-hash=7fd66545df
Annotations:      <none>
Status:           Running
IP:               10.42.0.14

...

Events:
  Type    Reason     Age    From               Message
  ----    ------     ----   ----               -------
  Normal  Scheduled  4m42s  default-scheduler  Successfully assigned default/nginx-deployment-7fd66545df-v2bbz to tp-link0815b
  Normal  Pulled     4m42s  kubelet            Container image "nginx:alpine" already present on machine
  Normal  Created    4m42s  kubelet            Created container nginx-deployment
  Normal  Started    4m42s  kubelet            Started container nginx-deployment
Uninstalling K3s
To uninstall K3s from a server node, run:
/usr/local/bin/k3s-uninstall.sh
To uninstall K3s from an agent node, run:
/usr/local/bin/k3s-agent-uninstall.sh