Magento 2 Installation with NGINX on Debian Buster

Install PHP 7.3
Run below commands to upgrade the current packages to the latest version:
sudo apt update
sudo apt upgrade
Now setup PPA on Debian 10. Then import packages signing key. After that configure PPA for the PHP packages on your system:
sudo apt install ca-certificates apt-transport-https
wget -q https://packages.sury.org/php/apt.gpg -O- | sudo apt-key add -
echo "deb https://packages.sury.org/php/ buster main" | sudo tee /etc/apt/sources.list.d/php.list
Now run the following commands to install PHP 7.3:
sudo apt update
sudo apt install php7.3
Install the necessary PHP modules:
sudo apt install php7.3-cli php7.3-common php7.3-curl php7.3-gd php7.3-json php7.3-mbstring php7.3-mysql php7.3-xml php7.3-bcmath php7.3-gd php7.3-intl php7.3-opcache php7.3-soap php7.3-imagick
Now we need to configure PHP v7.3 - to find out which php.ini file is the one that is loaded run php -i:
php -i
phpinfo()
PHP Version => 7.3.26-1+0~20191218.33+debian10~1.gbpb5a34b

System => Linux Magento2 4.19.0-6-amd64 #1 SMP Debian 4.19.67-2+deb10u2 (2019-11-11) x86_64
Build Date => Dec 18 2019 15:01:47
Server API => Command Line Interface
Virtual Directory Support => disabled
Configuration File (php.ini) Path => /etc/php/7.3/cli
Loaded Configuration File => /etc/php/7.3/cli/php.ini
Scan this dir for additional .ini files => /etc/php/7.3/cli/conf.d
Additional .ini files parsed => /etc/php/7.3/cli/conf.d/10-mysqlnd.ini,
Note: on my system there was a second configuration file in
/etc/php/7.3/apache2/php.ini. In a later step I am going to install NGINX that is going to add more files in/etc/php/7.3/fpm/php.iniand/etc/php/7.3/cli/php.ini. The Magento documentation recommend to do all changes to allphp.inifiles on your system.
We can see that the loaded configuration file is /etc/php/7.3/cli/php.ini:
nano /etc/php/7.3/cli/php.ini
Set the Timezone
Edit the php.ini configuration file and update the timezone value in date.timezone setting tag:
date.timezone = "Europe/Berlin"
Increase PHP memory limit
Simply increase the default value to the recommended value:
- Compiling code or deploying static assets:
756M - Installing and updating Magento components from Magento Marketplace:
2G - Testing:
~3-4G
memory_limit = 2G
Disable asp_tags
ASP style tags have been removed from PHP in version 7. If you still use a template that uses them, they need to be deactivated on the theme side
Enable opcache.save_comments
Enable opcache.save_comments and it is recommended to enable the PHP OpCache for performance reasons.
[opcache]
; Determines if Zend OPCache is enabled
opcache.save_comments=1
opcache.enable=1
Install NGINX
NGINX installation:
apt -y install nginx
Install and configure php-fpm
The php-fpm extension is needed for NGINX in addition to the modules we already installed earlier:
apt -y install php7.3-fpm php7.3-cli
Configure PHP
Open the following two, new php.ini files in an editor:
nano /etc/php/7.3/fpm/php.ini
nano /etc/php/7.3/cli/php.ini
And edit both files to match the following lines:
memory_limit = 2G
max_execution_time = 1800
zlib.output_compression = On
Now restart all services:
systemctl restart php7.3-fpm
service nginx restart
Install MySQL
MySQL team provides official MySQL PPA for Debian Linux. You can download and install the package on your Debian system, which will add PPA file to your system. Run below command to enable PPA:
wget http://repo.mysql.com/mysql-apt-config_0.8.13-1_all.deb
sudo dpkg -i mysql-apt-config_0.8.13-1_all.deb
During the installation of MySQL apt config package, It will prompt to select MySQL version to install. Select the MySQL 5.7 option to install on your system:
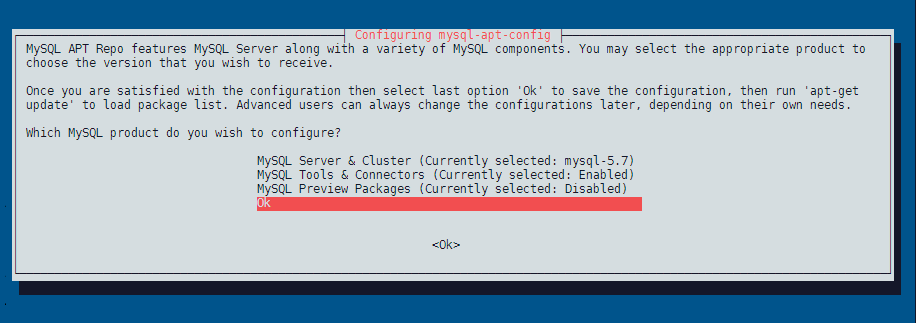
Install MySQL on Debian 10
Run the following commands to install MySQL on a Debian machine.
sudo apt update && apt upgrade
sudo apt install mysql-server
Input a secure password and same to confirm password window. This will be MySQL root user password required to log in to MySQL server:

Connect MySQL
Now connect to the MySQL database using the command line:
mysql -u root -p
Enter password:
Welcome to the MySQL monitor.  Commands end with ; or \g.
Your MySQL connection id is 2
Server version: 5.7.28 MySQL Community Server (GPL)

Copyright (c) 2000, 2019, Oracle and/or its affiliates. All rights reserved.

Oracle is a registered trademark of Oracle Corporation and/or its
affiliates. Other names may be trademarks of their respective
owners.

Type 'help;' or '\h' for help. Type '\c' to clear the current input statement.

mysql>
max_allowed_packet
If you expect to import large numbers of products into Magento, you can increase the value for max_allowed_packet that is larger than the default, 16MB.
To increase the value, open /etc/mysql/mysql.cnf in a text editor and locate the value for max_allowed_packet. Save your changes to mysql.cnf, close the text editor, and restart MySQL (service mysql restart).
Configuring the Magento database
Enter the following commands in the order shown to create a database instance named magento with username magento (make sure that you are on the MySQL CLI mysql -u root -p):
create database magento;
create user magento IDENTIFIED BY 'magento';
GRANT ALL ON magento.* TO magento@localhost IDENTIFIED BY 'magento';
flush privileges;
Enter exit to quit the command prompt.
Verify the database by logging in with the Magento user
mysql -u magento -p
If you can login with the password magento and have access to the created database named magento everything is looking fine:
mysql -u magento -p
Enter password:
Welcome to the MySQL monitor.  Commands end with ; or \g.
Your MySQL connection id is 3
Server version: 5.7.28 MySQL Community Server (GPL)

Copyright (c) 2000, 2019, Oracle and/or its affiliates. All rights reserved.

Oracle is a registered trademark of Oracle Corporation and/or its
affiliates. Other names may be trademarks of their respective
owners.

Type 'help;' or '\h' for help. Type '\c' to clear the current input statement.

mysql> show databases;
+--------------------+
| Database           |
+--------------------+
| information_schema |
| magento            |
+--------------------+
2 rows in set (0.00 sec)

mysql>
Install Magento
Install composer
sudo apt-get install composer
sudo useradd -r -s /bin/false magento
su - magento
If your web server docroot directory is /var/www/html run the following command to have composer install magento to /var/www/html/magento
composer create-project --repository=https://repo.magento.com/ magento/project-community-edition /var/www/html/magento
When prompted, enter your Magento authentication keys. Public and private keys are created and configured in your Magento Marketplace. The public key will be the username and the private key will be the password.
ERROR Message: The zip extension and unzip command are both missing, skipping. Your command-line PHP is using multiple ini files. Run php --ini to show them.
Install apt install zip unzip php7.3-zip - but I can only see the cli php.ini when I run php -i?
Set file permissions
You must set read-write permissions for the web server group before you install the Magento software. This is necessary so that the Setup Wizard and command line can write files to the Magento file system.
cd /var/www/html/magento
find var generated vendor pub/static pub/media app/etc -type f -exec chmod g+w {} +
find var generated vendor pub/static pub/media app/etc -type d -exec chmod g+ws {} +
chown -R :www-data .
chmod u+x bin/magento
Install Magento
This example assumes that the Magento install directory is named magento2ee, the db-host is on the same machine (localhost), and that the db-name, db-user, and db-password are all magento:
bin/magento setup:install \
--base-url=http://mysite.dev \
--db-host=localhost \
--db-name=magento \
--db-user=magento \
--db-password=magento \
--admin-firstname=admin \
--admin-lastname=admin \
--admin-email=admin@admin.com \
--admin-user=admin \
--admin-password=admin123 \
--language=en_US \
--currency=USD \
--timezone=America/Chicago \
--use-rewrites=1
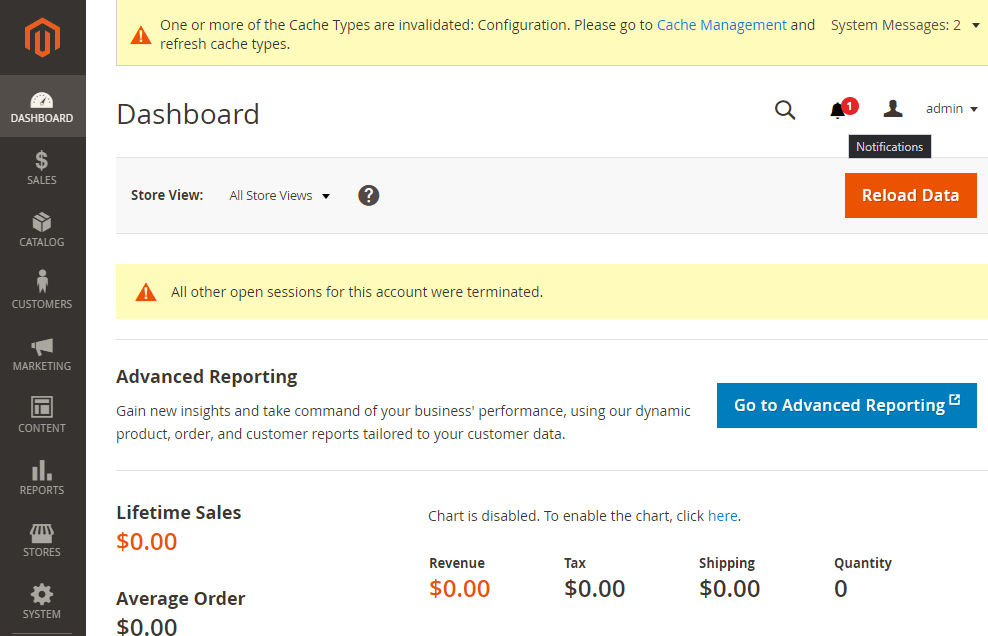
Don't forget to write down the Admin panel URL that will be displayed at the end of the installation process! It will looks something like this
/af345azfd. Once the Installation is through, you will be able access your web shop via the base URL that you assigned above, e.g. http://mysite.dev (make sure that it is an URL that resolves to your development server, obviously). The Admin panel can then be reached by adding the admin URL to the end of this domain:http://mysite.dev/af345azfd.
Switch to Developer Mode
cd /var/www/html/magento/bin
./magento deploy:mode:set developer
Configure NGINX
- Create a new virtual host for your Magento site:
nano /etc/nginx/sites-available/magento.conf
- Add the following configuration:
upstream fastcgi_backend {
  server  unix:/run/php/php7.3-fpm.sock;
}

server {

  listen 88;
  server_name www.magento-dev.com;
  set $MAGE_ROOT /var/www/html/magento;
  include /var/www/html/magento/nginx.conf.sample;
}
Replace www.magento-dev.com with your domain name.
Activate the newly created virtual host by creating a symlink to it in the /etc/nginx/sites-enabled directory:
ln -s /etc/nginx/sites-available/magento.conf /etc/nginx/sites-enabled
- Save and exit the editor and verify that the syntax is correct:
nginx -t
nginx: the configuration file /etc/nginx/nginx.conf syntax is ok
nginx: configuration file /etc/nginx/nginx.conf test is successful
Restart nginx:
systemctl reload nginx
You can now access the webshop through the URL you set as base-url in the Magento installation script: