Magento 2 and Elasticsearch

Install prerequisites and Elasticsearch
Installing OpenJDK 8
Start by verifying that Java hasn't been installed yet on your system:
java -version
-bash: java: command not found
Java LTS version 8 is not available in the official Debian Buster repositories. You can still install it by enabling the AdoptOpenJDK repository which provides prebuilt OpenJDK packages (check alternatives):
apt update
apt install apt-transport-https ca-certificates wget dirmngr gnupg software-properties-common
Import the repository’s GPG key using the following wget command:
wget -qO - https://adoptopenjdk.jfrog.io/adoptopenjdk/api/gpg/key/public | sudo apt-key add -
Add the AdoptOpenJDK APT repository to your system:
sudo add-apt-repository --yes https://adoptopenjdk.jfrog.io/adoptopenjdk/deb/
Once the repository is enabled, update apt sources and install Java 8 using the following commands:
sudo apt update
sudo apt install adoptopenjdk-8-hotspot
Finally, verify the installation by checking the Java version. The output should look something like this::
java -version
openjdk version "1.8.0_232"
OpenJDK Runtime Environment (AdoptOpenJDK)(build 1.8.0_232-b09)
OpenJDK 64-Bit Server VM (AdoptOpenJDK)(build 25.232-b09, mixed mode)
Install Elasticsearch 6.x
Download and install the public signing key:
wget -qO - https://artifacts.elastic.co/GPG-KEY-elasticsearch | sudo apt-key add -
Save the repository definition to /etc/apt/sources.list.d/elastic-6.x.list:
echo "deb https://artifacts.elastic.co/packages/6.x/apt stable main" | sudo tee -a /etc/apt/sources.list.d/elastic-6.x.list
You can install the Elasticsearch Debian package with:
apt update && sudo apt install elasticsearch
To configure Elasticsearch to start automatically when the system boots up, run the following commands:
sudo /bin/systemctl daemon-reload
sudo /bin/systemctl enable elasticsearch.service
Elasticsearch can be started and stopped as follows:
systemctl start elasticsearch.service
systemctl stop elasticsearch.service
These commands provide no feedback as to whether Elasticsearch was started successfully or not. Instead, this information will be written in the log files located in /var/log/elasticsearch/. You can also check the service status:
systemctl status elasticsearch.service
● elasticsearch.service - Elasticsearch
   Loaded: loaded (/lib/systemd/system/elasticsearch.service; enabled; vendor preset: enabled)
   Active: active (running) since Mon 2020-01-13 07:47:05 CET; 8s ago
     Docs: http://www.elastic.co
 Main PID: 30088 (java)
    Tasks: 30 (limit: 4915)
   Memory: 1.2G
   CGroup: /system.slice/elasticsearch.service
           ├─30088 /bin/java -Xms1g -Xmx1g -XX:+UseConcMarkSweepGC -XX:CMSInitiatingOccupancyFraction=75 -XX:+UseCMSInitiatingOccup           └─30180 /usr/share/elasticsearch/modules/x-pack-ml/platform/linux-x86_64/bin/controller

Jan 13 07:47:05 Magento2 systemd[1]: Started Elasticsearch.
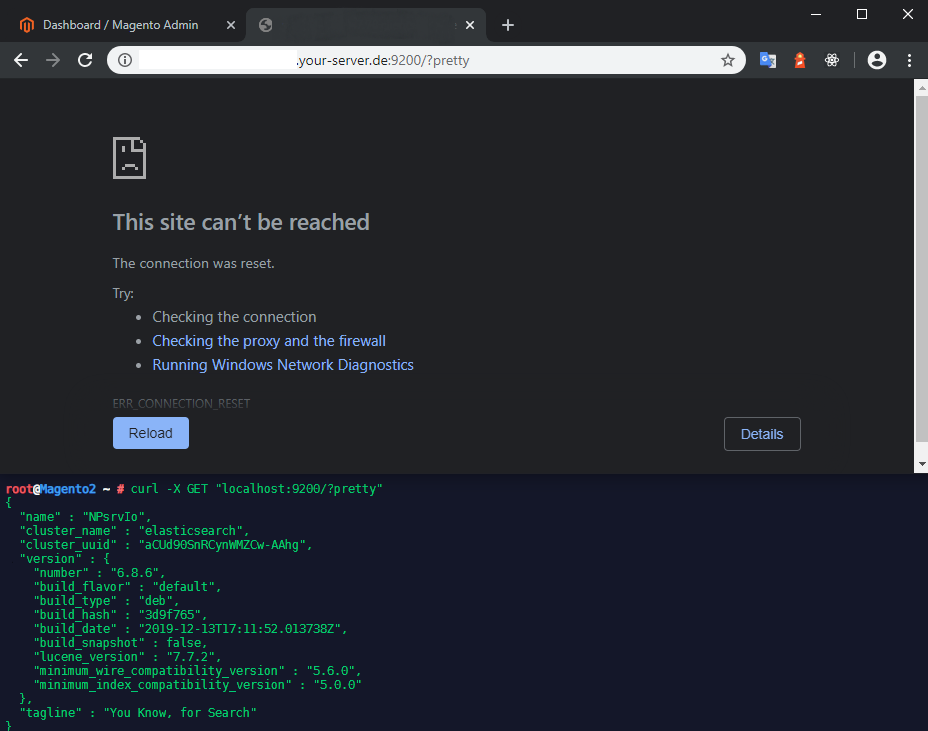
You can now access Elasticsearch by:
url -X GET "localhost:9200/?pretty"

{
  "name" : "NPsrvIo",
  "cluster_name" : "elasticsearch",
  "cluster_uuid" : "aCUd90SnRCynWMZCw-AAhg",
  "version" : {
    "number" : "6.8.6",
    "build_flavor" : "default",
    "build_type" : "deb",
    "build_hash" : "3d9f765",
    "build_date" : "2019-12-13T17:11:52.013738Z",
    "build_snapshot" : false,
    "lucene_version" : "7.7.2",
    "minimum_wire_compatibility_version" : "5.6.0",
    "minimum_index_compatibility_version" : "5.0.0"
  },
  "tagline" : "You Know, for Search"
}
Elasticsearch is configured to only be accessible from localhost:
You can change this in the Network Section of /etc/elasticsearch/elasticsearch.yml:
# ---------------------------------- Network -----------------------------------
#
# Set the bind address to a specific IP (IPv4 or IPv6):
#
#network.host: 192.168.0.1
#
# Set a custom port for HTTP:
#
#http.port: 9200
#
# For more information, consult the network module documentation.
By default the network.host is set to 127.0.0.1 - setting it to 0.0.0.0 will open Elasticsearch up to all your network interfaces. But be aware that Elasticsearch 6 does not have a free User Authentication pre-installed!
Configure NGINX and Elasticsearch
Set up NGINX as a proxy
Create a new file /etc/nginx/sites-available/elasticsearch.conf with the following content:
server {
   listen 8080;
   location /_cluster/health {
      proxy_pass http://localhost:9200/_cluster/health;
   }
}
Symlink the configuration file into site-enabled and restart NGINX:
ln -s /etc/nginx/sites-available/elasticsearch.conf /etc/nginx/sites-enabled
nginx -t
service nginx restart
Verify the proxy works by entering the following command netstat -plnt and try opening the URL inside your browser http://your-server.de:8080/_cluster/health :
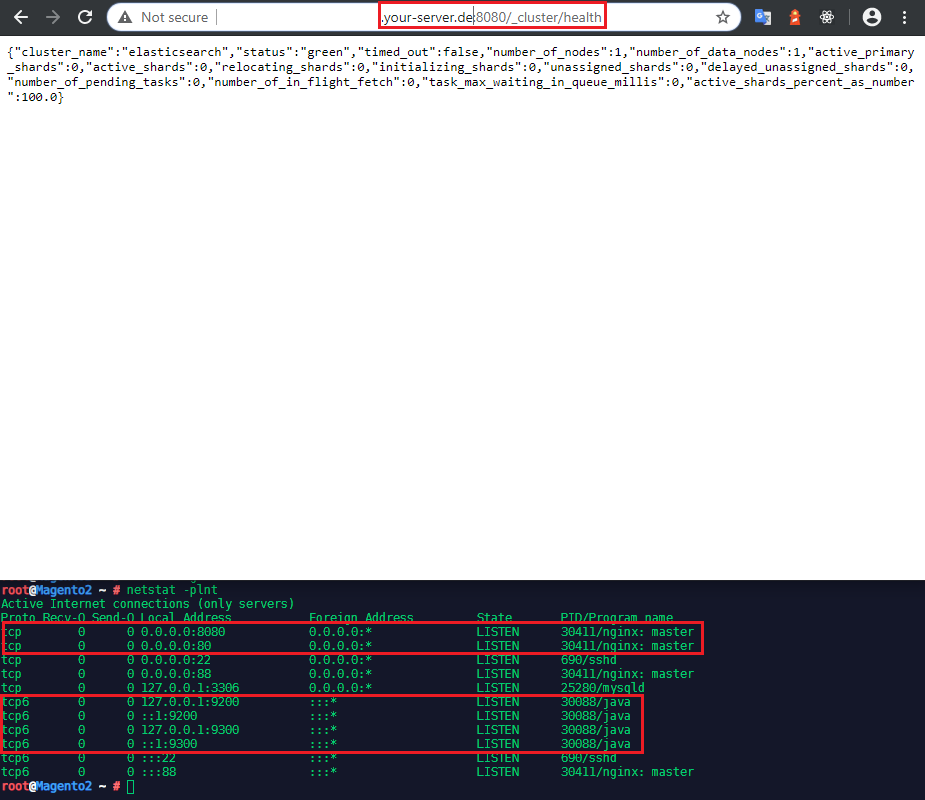
We now have Magento 2.3.3 running on Port 80 and our health check for Elasticsearch on Port 8080 - both available on all network interfaces 0.0.0.0. While the Elasticsearch API Ports 9200/9300 are securely bound to 127.0.0.1 and cannot be accessed from the internet.
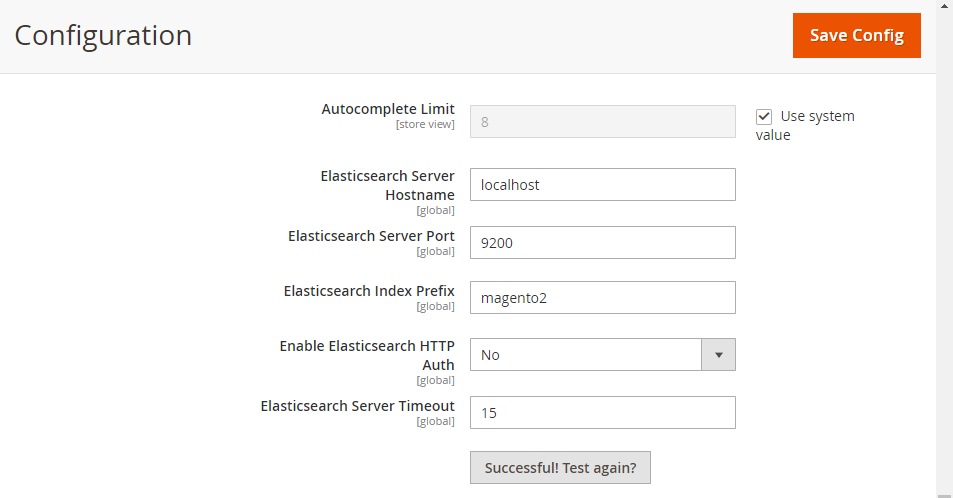
Configure Elasticsearch within Magento
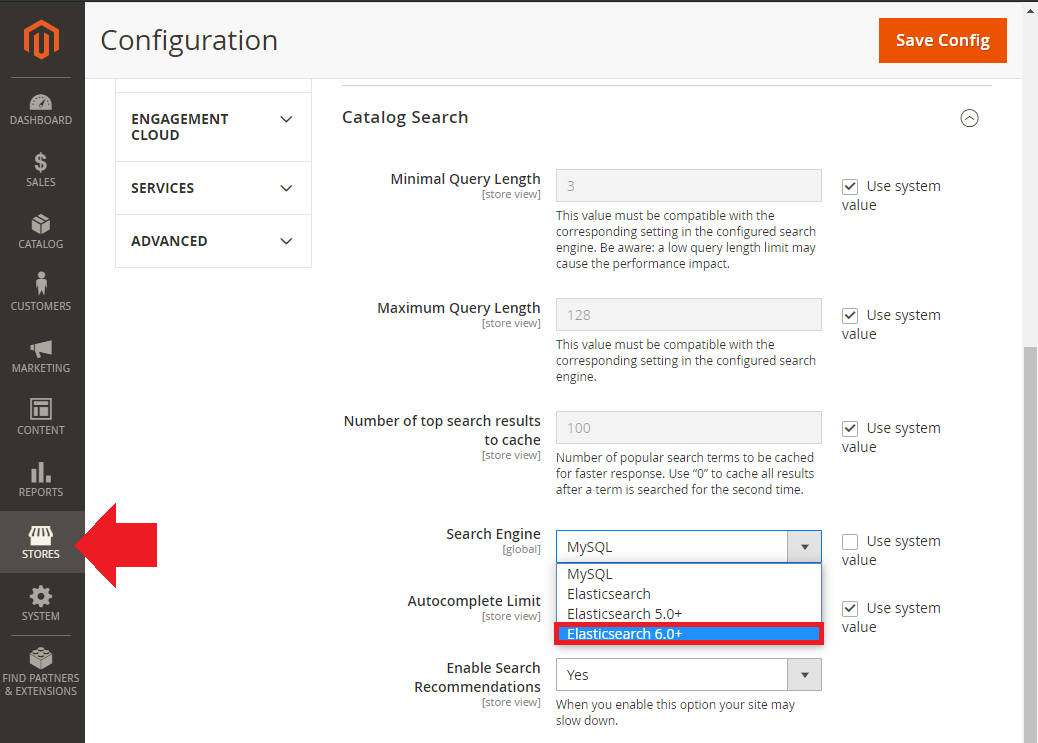
- Log in to the Magento Admin as an administrator.
- Click Stores > Configuration > Catalog > Catalog Search.
- From the Search Engine list, select the correct Elasticsearch version as the following figure shows.
| Option | Description |
|---|---|
| Elasticsearch Server Hostname | Enter the fully qualified hostname or IP address of the machine running Elasticsearch - as we are running Elasticsearch locally, we can use localhost |
| Elasticsearch Server Port | Enter the Elasticsearch web server proxy port - for us 9200 |
| Elasticsearch Index Prefix | Enter the Elasticsearch index prefix. If you use a single Elasticsearch instance for more than one Magento installation |
| Enable Elasticsearch HTTP Auth | Click Yes only if you enabled authentication for your Elasticsearch server - we did not. |
- Click Test Connection.
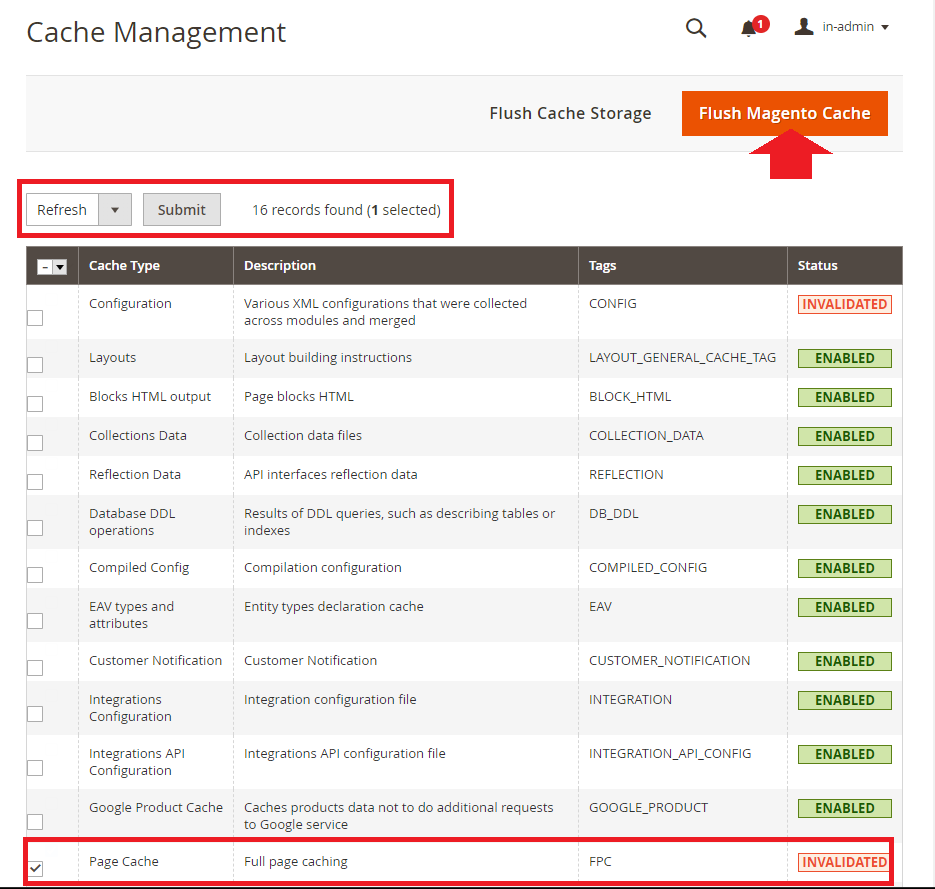
Reindexing catalog search and refreshing the full page cache
After you change Magento’s Elasticsearch configuration, you must reindex the catalog search index and refresh the full page cache using the Admin or command line.
To refresh the cache using the Admin:
- In the Admin, click System > Cache Management.
- Select the checkbox next to Page Cache.
- From the Actions list in the upper right, click Refresh.
- Flush the Magento Cache
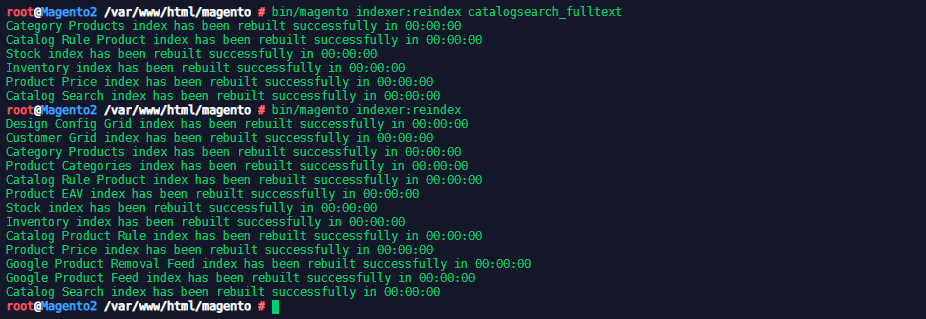
Enter the following command to reindex the catalog search index only:
bin/magento indexer:reindex catalogsearch_fulltext
Enter the following command to reindex all indexers:
bin/magento indexer:reindex
Wait until reindexing completes.