Red Hat Certified Engineer (RHCE) Exam

This exam and the exam objectives provided here are based on the Red Hat® Enterprise Linux® 7.0 version of the exam.
The performance-based Red Hat Certified Engineer exam (EX300) tests to determine if your knowledge, skill, and ability meet those required of a senior system administrator responsible for Red Hat Enterprise Linux (RHEL) systems.
- Network Time Protocol Service
- Setting up FirewallD
- Samba File sharing
- Email Server
- Network Interface Bonding
- Network Interface Teaming
Network Time Protocol Service
NTP- is a protocol which runs over port 123 UDP at Transport Layer and allows computers to synchronize time over networks for an accurate time. This service is handled by Chrony.d on CentOS 7 and higher. We can edit this service via nano /etc/chrony.conf:
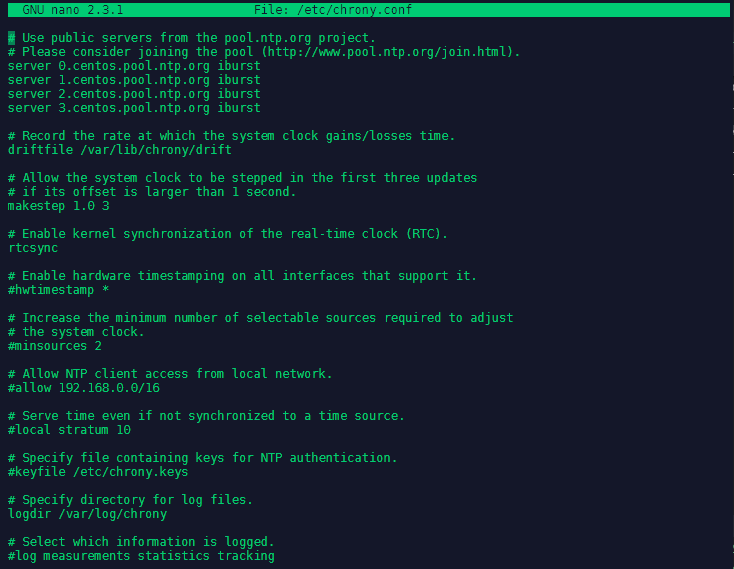
As you can see, the service is pre-configured with 4 NTP server - that can be replaced as needed:
server 0.centos.pool.ntp.org iburst
server 1.centos.pool.ntp.org iburst
server 2.centos.pool.ntp.org iburst
server 3.centos.pool.ntp.org iburst
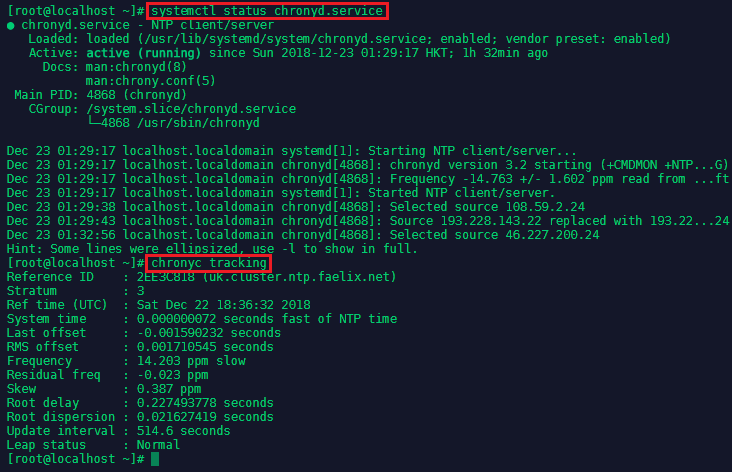
The service can then be enabled systemctl enabled chronyd.service, restarted systemctl restart chronyd.service and it's status be checked systemctl status chronyd.service.
To check the current output of the NTP service type chronyc tracking:
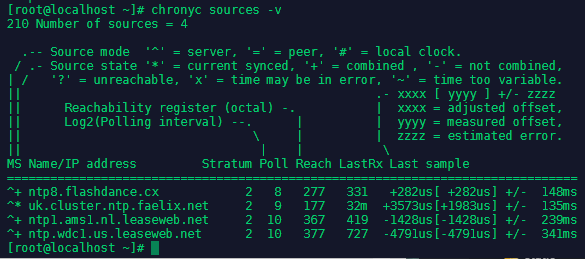
Current sources can be checked by chronyc sources -v
To check your current selected timezone run timedatectl | grep 'Time zone'. To set a different timezone, e.g. UTC, run timedatectl set-timezone UTC.
Setting up FirewallD
Firewalld provides a dynamically managed firewall with support for network/firewall zones that define the trust level of network connections or interfaces.
Predefined Zones
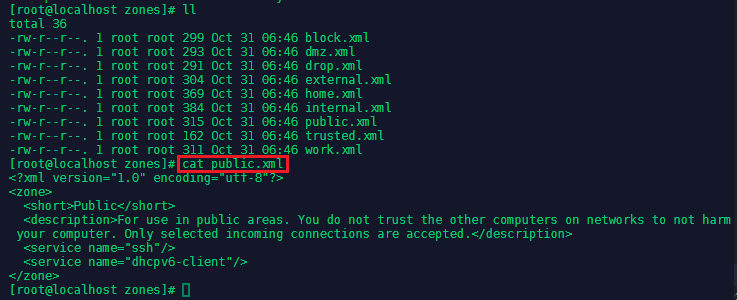
These are the zones provided by firewalld sorted according to the default trust level of the zones from untrusted to trusted - to see all available zones type firewall-cmd --get-zones / to see the configuration of a specific zone, e.g. public, type firewall-cmd --zone=public --list-all
-
drop: Any incoming network packets are dropped, there is no reply. Only outgoing network connections are possible.
-
block: Any incoming network connections are rejected with an icmp-host-prohibited message for IPv4 and icmp6-adm-prohibited for IPv6. Only network connections initiated within this system are possible.
-
public: For use in public areas. You do not trust the other computers on networks to not harm your computer. Only selected incoming connections are accepted.
-
external : For use on external networks with masquerading enabled especially for routers. You do not trust the other computers on networks to not harm your computer. Only selected incoming connections are accepted.
-
dmz: For computers in your demilitarized zone that are publicly-accessible with limited access to your internal network. Only selected incoming connections are accepted.
-
work : For use in work areas. You mostly trust the other computers on networks to not harm your computer. Only selected incoming connections are accepted.
-
home : For use in home areas. You mostly trust the other computers on networks to not harm your computer. Only selected incoming connections are accepted.
-
internal: For use on internal networks. You mostly trust the other computers on the networks to not harm your computer. Only selected incoming connections are accepted.
-
trusted: All network connections are accepted.
Installation
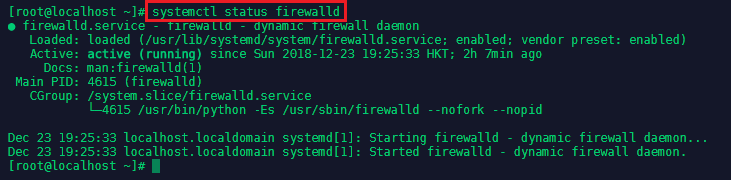
FirewallD is most likely already installed on your system. You can check the service status by typing systemctl status firewalld. If the service is missing, install FirewallD via yum install -y firewalld + systemctl enable firewalld:
You can check the default zone that is configured for system by typing firewall-cmd --get-default-zone or check active zones in general via firewall-cmd --get-active-zone:

Setting rules for applications
Predefined Services
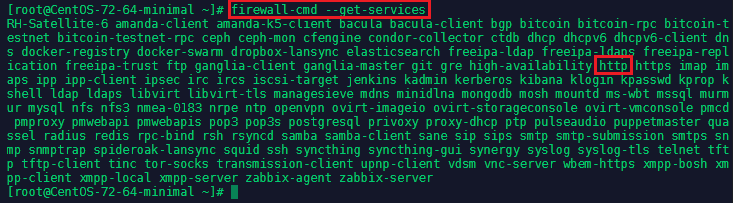
A firewalld service can be a list of local ports and destinations and additionally also a list of firewall helper modules automatically loaded if a service is enabled. The use of predefined services makes it easier for the user to enable and disable access to a service. To see all predefined services that come with FirewallD type firewall-cmd --get-services:
If we want to allow http traffic through our firewall, all we have to do is to activate the corresponding service for the active zone - in our case this is public: firewall-cmd --zone=public --add-service=http. You can check if adding the service was successful by typing firewall-cmd --zone=public --list-services:

To make a change persist after a reboot, you need to add the --permanent flag to the add-command, e.g. firewall-cmd --zone=public --permanent --add-service=http. To list all permanent active services type firewall-cmd --zone=public --permanent --list-services.
Adding Ports to Firewall Rules
A simple port number or port range can be used in the cases where no additional changes are needed. For example with opening port 80/tcp to allow access to a local http servicer on the standard port - which would be identical to using the http service we activated above firewall-cmd --permanent --zone=public --add-port=80/tcp. This can be tested by typing firewall-cmd --zone=public --permanent --list-ports. To add a range of ports, define the beginning and end port like this firewall-cmd --permanent --zone=public --add-port=40999-41001/udp.
Creating a Custom Service
Adding Ports manually is highly flexible but might make you loose track after a while - which port belonged to that application I just deleted? Grouping ports for applications in services makes it much easier to handle deployments. All predefined services can be found under /usr/lib/firewalld/services in form of XML Files that we can use as templates for our services:

We can copy a file cp ssh.xml example.xml and edit the copy according to our needs:

Now reload FirewallD firewall-cmd --reload, add the example services you created firewall-cmd --zone=public --add-service=example and check if it is running firewall-cmd --zone=public --list-services:

Creating a Custom Zone
To configure or add zones you can either use one of the firewalld interfaces to handle and change the configuration. These are the graphical configuration tool firewall-config, the command line tool firewall-cmd or the D-BUS interface. Or you can create or copy a zone file in one of the configuration directories. /usr/lib/firewalld/zones is used for default and fallback configurations and /etc/firewalld/zones is used for user created and customized configuration files.
A new zone can be added with the following command, e.g. example zone: firewall-cmd --permanent --new-zone=example. To use your custom zone, you first need to reload FirewallD firewall-cmd --reload.
Just as with custom services, we can use the predefined zones in /usr/lib/firewalld/zones as a template for our custom zone:
Or use the command firewall-cmd --zone=example --permanent --add-service=http to manually add default services to your zone. To assign your custom zone to the correct network interface - in my case enp0s3 (use ip addr to find your interface name) - type firewall-cmd --zone=example --permanent --change-interface=enp0s3.
To change the default zone to your custom zone type firewall-cmd --set-default-zone=example.
Setting Rich Rules
With the rich language more complex firewall rules can be created in an easy to understand way. The language uses keywords with values and is an abstract representation of ip*tables rules. The rich language extends the current zone elements (service, port, icmp-block, icmp-type, masquerade, forward-port and source-port) with additional source and destination addresses, logging, actions and limits for logs and actions.
Allow Traffic: Allow traffic from an 10.0.0.0/24 network to a specific client with an IP address of 192.168.2.110/24 via the ports 8080 to 8090.
firewall-cmd --permanent --zone=example --add-rich-rule='rule family=ipv4 source address=10.0.0.0/24 destination address=192.168.2.110/24 port port=8080-8090 protocol=tcp accept'
You can test your rich rules via firewall-cmd --permanent --zone=example --list-rich-rules.
To remove a rich rule type:
firewall-cmd --permanent --zone=example --remove-rich-rule='rule family=ipv4 source address=10.0.0.0/24 destination address=192.168.2.110/24 port port=8080-8090 protocol=tcp accept'
Reject Traffic: We want to block all traffic that we receive from the IP address 192.168.2.44/24.
firewall-cmd --permanent --zone=example --add-rich-rule='rule family=ipv4 source address=192.168.2.44/24 reject'
This rule will now actively reject all incoming traffic from the given IP address (not only silently dropping it).
Limit Sessions: Limit the connection time for incomming SSH connections to 10min:
firewall-cmd --permanent --zone=example --add-rich-rule='rule service name=ssh limit value=10/m accept'
Logging Sessions: Log all connections from a specific IP address:
firewall-cmd --permanent --zone=example --add-rich-rule='rule family=ipv4 source address='192.168.0.0/24' service name='ssh' log prefix='ssh' level='info' limit value='50/m' accept'
NAT and Port Forwarding
Masquerading a Connection:
firewall-cmd --permanent --zone=example --add-masquerade
firewall-cmd --permanent --zone=example --add-rich-rule='rule family=ipv4 source address=192.168.2.0/24 masquerade'
Forwarding a Port:
firewall-cmd --permanent --zone=example --add-forward-port=port=22:proto=tcp:toport=2222:toaddress=10.0.0.10
firewall-cmd --permanent --zone=example --query-forward-port=port=22:proto=tcp:toport=2222:toaddress=10.0.0.10
firewall-cmd --permanent --zone=example --list-all
firewall-cmd --permanent --zone=example --add-rich-rule='rule family=ipv4 source address=192.168.2.0/24 forward-port port=22 protocol=tcp to-port=2222 to-addr=10.0.0.0/24'
Samba File sharing
Samba is the standard Windows interoperability suite of programs for Linux and Unix. Samba is an important component to seamlessly integrate Linux/Unix Servers and Desktops into Active Directory environments. It can function both as a domain controller or as a regular domain member.
To install Samba on your CentOS 7 server run the following command yum install samba samba-client samba-common.
To allow Samba through your firewall, we first have to activate the according service in FirewallD firewall-cmd --zone=public --permanent --add-service=samba and reload the firewall firewall-cmd --reload to load the service.
To use the anonymous filesharing, we first need to create a folder for it from which files will be shared:
mkdir -p /srv/samba/anonymous
chmod -R 0775 /srv/samba/anonymous
chcon -t samba_share_t /srv/samba/anonymous
You can find the configuration file for the Samba service under /etc/samba/smb.conf (make a copy before starting to edit it cp /etc/samba/smb.conf /etc/samba/smb.conf.bak). The file should look like this:
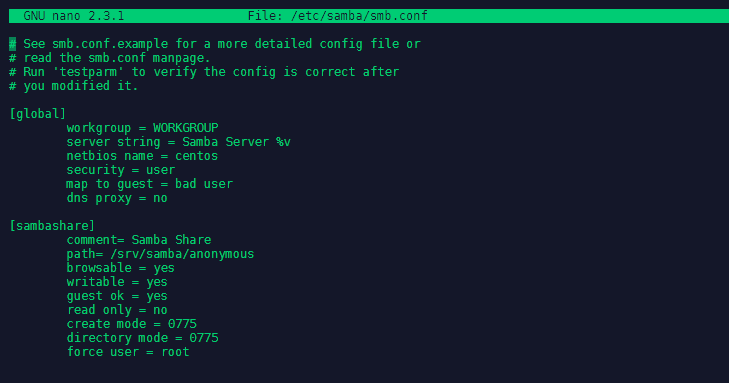
[global]
        workgroup = WORKGROUP
        server string = Samba Server %v
        netbios name = centos
        security = user
        map to guest = bad user
        dns proxy = no

[sambashare]
        comment= Samba Share
        path= /srv/samba/anonymous
        browsable = yes
        writable = yes
        guest ok = yes
        read only = no
        create mode = 0775
        directory mode = 0775
        force user = root
You can test your configuration with the testparm command:

Note The rlimit_max: increasing rlimit_max (1024) to minimum Windows limit (16384) warning can be ignored as Samba already adjusts the limit automatically. To do this manually add the line * – nofile 16384 to /etc/security/limits.conf.
Now run the Samba Service with
systemctl enable smb.service
systemctl enable nmb.service
systemctl restart smb.service
systemctl restart nmb.service
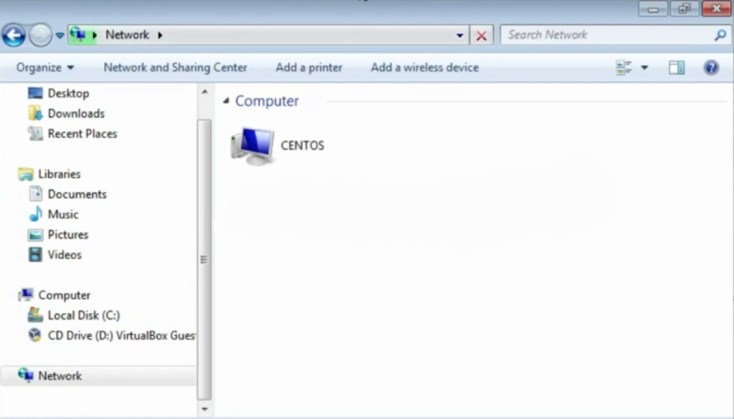
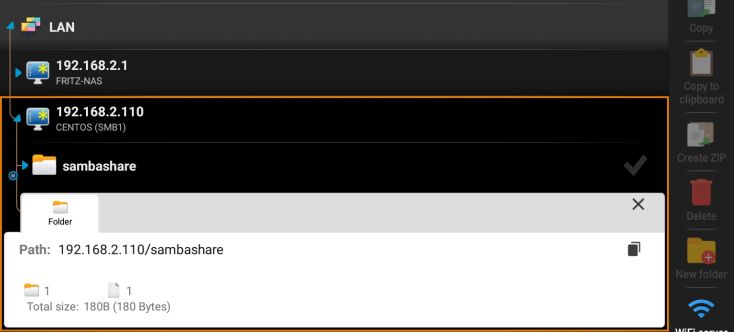
The share should now be discoverable on the Windows Network Search:
As well as under Android with Apps like the X-plore File Manager:
Email Server
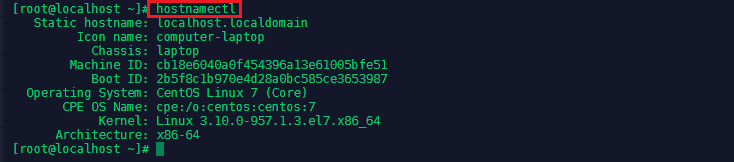
To use an email service we first have to set a hostname for our CentOS server. You can check for your servers hostname with hostnamectl:
For internal networking, change the host that is associated with the main IP address for your server found at /etc/hosts - make sure to set a static IP address for your server first ( -> nano /etc/sysconfig/network-scripts/ifcfg-enp3s0) :

To set a hostname use hostnamectl set-hostname your-new-hostname, e.g. :
hostnamectl set-hostname instar.centos.mail
systemctl reboot
Installing Postfix and Dovecot
Postfix architecture is based on a loose composition of services that receive emails and pass them on to other services (with services like SMTP on the receiving outer edge). Postfix itself implements the core requirements to receive, route, and deliver mail, and relies on third-party extensions to do the rest.
Dovecot is an open source IMAP and POP3 email server for Linux/UNIX-like systems, written with security primarily in mind. Dovecot is an excellent choice for both small and large installations. It's fast, simple to set up, requires no special administration and it uses very little memory.
yum install -y postfix dovecot
Setting up SSL certificate
For SSL, you need a certificate and a private key. In this tutorial, we're going to assume that the certificate is saved in /etc/ssl/certs/mailcert.pem and the key is saved in /etc/ssl/private/mail.key. Make sure the key is only readable by the root user!
Creating a self-signed test certificate is as easy as executing:
openssl req -x509 -nodes -days 365 -newkey rsa:2048 -keyout /etc/ssl/private/mail.key -out /etc/ssl/certs/mailcert.pem
and leaving the default values in by just hitting enter on all questions asked. Most CAs will require you to submit a certificate signing request. (CSR) You can generate one like this:
openssl req -nodes -days 365 -newkey rsa:2048 -keyout /etc/ssl/private/mail.key -out mailcert.csr
Postfix Configuration
Postfix has two main config files: /etc/postfix/main.cf, which specifies what you would think of as config options, and /etc/postfix/master.cf, which specifies the services postfix should run.
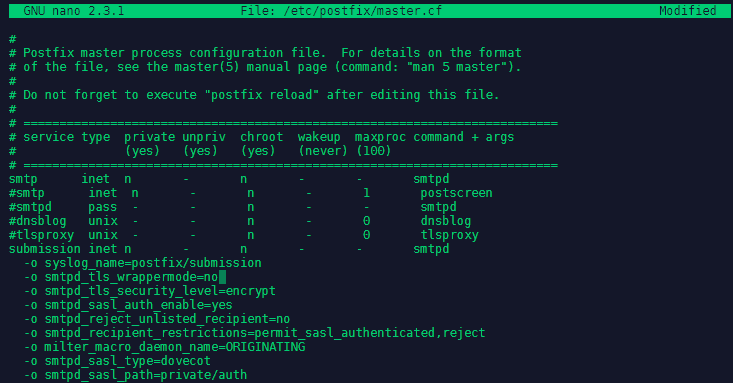
First, configure the master.cf file (nano /etc/postfix/master.cf). Uncomment the 'smtpd' instance called 'submission' that will take mail from trusted clients for delivery to the world at large, which we don't allow for anyone else. And add options to enable SASL :
submission inet n       -       n       -       -       smtpd
  -o syslog_name=postfix/submission
  -o smtpd_tls_wrappermode=no
  -o smtpd_tls_security_level=encrypt
  -o smtpd_sasl_auth_enable=yes
  -o smtpd_reject_unlisted_recipient=no
  -o smtpd_recipient_restrictions=permit_sasl_authenticated,reject
  -o milter_macro_daemon_name=ORIGINATING
  -o smtpd_sasl_type=dovecot
  -o smtpd_sasl_path=private/auth
The -o ... options override the settings that are taken from defaults or define in the config, which we'll set later. This enables the 'submission' daemon with TLS to secure the outer connection, and dovecot-mediated SASL to check the username and password of connecting clients.
The important detail is one that can't be seen: The smtpd_recipient_restrictions is missing reject_unauth_destination, which is present as a default and restricts relaying.
Now open the main configuration file nano /etc/postfix/main.cf and delete its content - better make a copy before you do that cp /etc/postfix/main.cf /etc/postfix/main.cf.bak. Let's first set the network information:
Network Interface Bonding
Use network teaming or bonding to combine two or more network interfaces for higher throughput and redundancy or load balancing.
Types of Bonding
The behaviour of bonded interfaces depend on the mode they are set to - either hot-standby or load-balancing.
- mode=0 (balance-rr): The RR stands for Round-Robin and it is a pure load-balancing and fault tolerance mode. It transfers packets in sequential order, from the the first to the last available interface.
- mode=1 (active-backup): In this mode only one interface is active. The next one is only activated, if the first one fails. The bonds MAC address is only visiable externally on one port. This setup only provides fault tolerance.
- mode=2 (balance-xor): All network interfaces of the bond are used. But source and destination MAC addresses are paired (Source MAC address is XOR’d with destination MAC address) - packets send to a specific destination will always be send from the same source interface. You get load-balancing and fault tolerance.
- mode=3 (broadcast): The broadcast mode transmits everything on all slave interfaces and provides only fault tolerance.
- mode 4 (802.3ad): The 802.3ad mode is known as Dynamic Link Aggregation mode. It creates aggregation groups that share the same speed and duplex settings. This mode requires a switch that supports IEEE 802.3ad Dynamic link. It offers fault tolerance by using all slave interfaces.
- mode 5 (balance-tlb): This is called Adaptive transmit load balancing. The outgoing traffic is distributed according to the current load and queue on each slave interface. Incoming traffic is received by the current slave. *mode 6 (balance-alb): This is Adaptive load balancing mode. This includes balance-tlb + receive load balancing (rlb) for IPV4 traffic. The receive load balancing is achieved by ARP negotiation. The bonding driver intercepts the ARP Replies sent by the server on their way out and overwrites the src hw address with the unique hw address of one of the slaves in the bond such that different clients use different hw addresses for the server.
Enabling Bonding on CentOS 7
The Bonding is not enabled by default and has to be loaded using the modprobe command.
modprobe is an intelligent command for listing, inserting as well as removing modules from the kernel. It searches in the module directory /lib/modules/$(uname -r) for all the modules and related files. To insert a module, simply provide its name as follows:
modprobe bonding
You can add the --first-time flag to be alerted if loading the module fails. To remove a module use the -r:

Let's create a configuration file to have the bonding module loaded at boot by typing nano /etc/modules-load.d/bonding.conf and adding the following lines:
# Load the bonding kernel module at boot
bonding

We can reboot the system now and check if the module is being loaded with lsmod | grep bonding:

We can check which driver version the module is using with modinfo bonding - in our case it is v3.7.1:

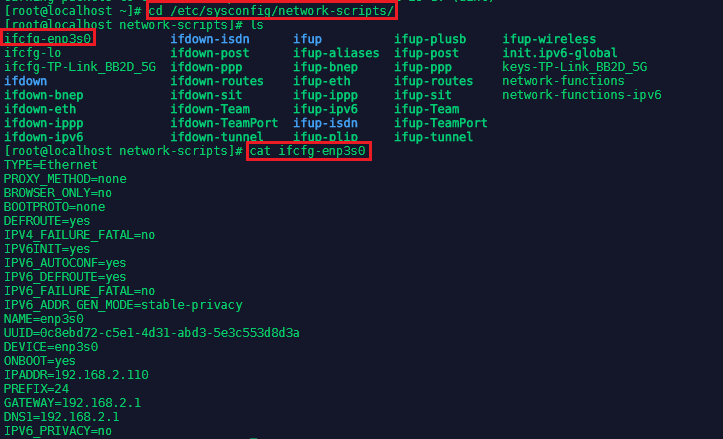
To create the Bond Interface cd into /etc/sysconfig/network-scripts/ - this folder contains the configuration (ifconfig) files for all your network interfaces. As seen below, this machine has a default LAN interface enp3s0, which defines the LAN IP address, gateway, DNS Server, etc:
We can now create a config file for our bonding interface by typing nano ifcfg-bond0:
DEVICE=bond0
TYPE=Bond
NAME=bond0
BONDING_MASTER=yes
BOOTPROTO=none
ONBOOT=yes
IPADDR=192.168.2.110
PREFIX=24
NETMASK=255.255.255.0
GATEWAY=192.168.2.1
DNS1=192.168.2.1
BONDING_OPTS='mode=1 miimon=100'
The interface is now now set up to be loaded on-boot and boot protocol is set to none, to deactivate DHCP.Make sure to change the network information according to your local network setup. The type of bonding is set to Mode 1 as specified earlier.
miimon specifies the MII link monitoring frequency in milliseconds. This determines how often the link state of each slave is inspected for link failures. A value of zero disables MII link monitoring. A value of 100 is a good starting point.

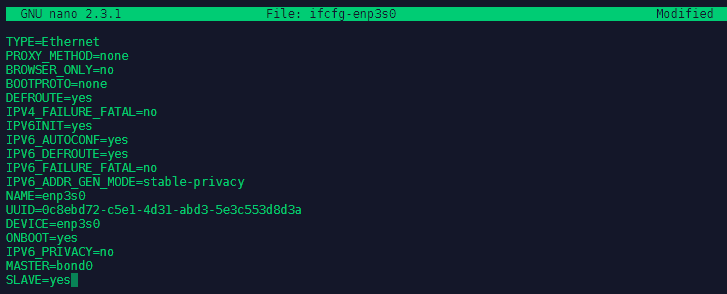
We now have to add the NIC Bonding inside our network interface configuration file nano ifcfg-enp3s0 - we need to add the following lines:
MASTER=bond0
SLAVE=yes
As well as removing the IP configuration, that is now handled by our bonding interface:
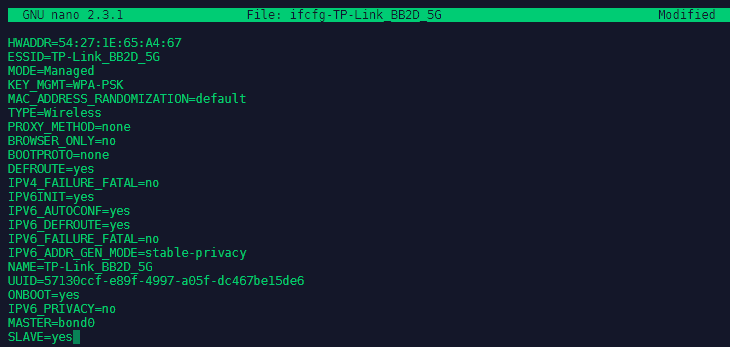
We now have to repeat this step for the secondary network interface of the system - which in my case is a wifi interface on a different network ifcfg-TP-Link_BB2D_5G and gave me some problems. The interface was not added to the bond with the configuration below - the installation later worked on a virtual machine with 2 LAN interfaces that were on the same network. Right now I am not sure what the limitation is that I hit here - is the Wifi module deactivated once Ethernet is connected?:
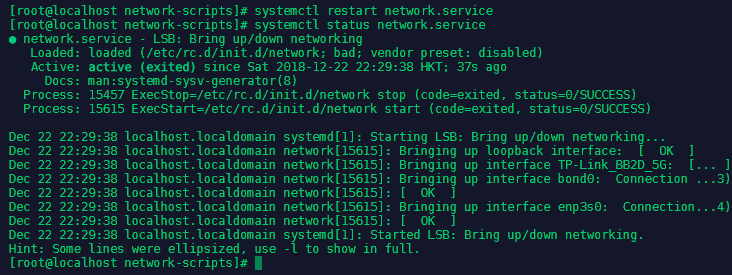
We can now restart the network service with systemctl restart network.service and check the status with systemctl status network.service:
The network service is back up and we can check if the Master/Slave configuration worked by typing ip link show:
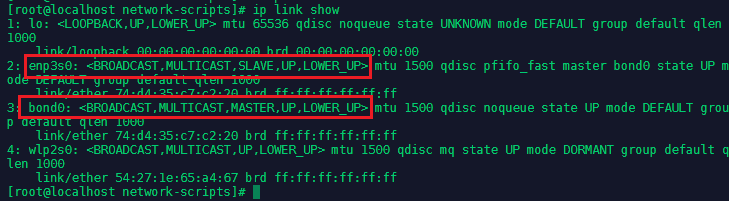
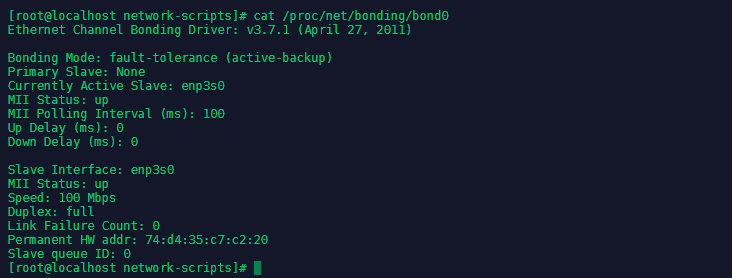
As we can see the configuration is working - the Ethernet interface is in a slave configuration to our bond0 interface. But the Wifi interface was not added. We can get more information about our bond interface under cat /proc/net/bonding/bond0:
Configure multiple IP addresses for bond0
Right now the bonding interface uses only one IP address - to assign multiple IP addresses we need to create an alias for the bond0 interface. To create an alias for bond0, copy the existing configuration file(ifcfg-bond0) to a new configuration file(ifcfg-bond0:1) and edit file:
cp /ifcfg-bond0 /ifcfg-bond0:1
nano ifcfg-bond0:1

As you see we made the following changes to the configuration file to assign 192.168.2.118 as a secondary IP address to our bond:
DEVICE=bond0.1
IPADDR=192.168.2.118
Save your changes and reload the network service systemctl restart network.
Network Interface Teaming
The term Network Teaming has been chosen to refer to this new implementation of the concept. The existing bonding driver is unaffected, Network Teaming is offered as an alternative and does not replace bonding in Red Hat Enterprise Linux 7 with a small kernel driver and a user-space daemon, teamd. Software, called runners, implement load balancing and active-backup logic, such as roundrobin.
The following runners are available to teamd:
| Runner | Explanation |
|---|---|
| broadcast | A simple runner which transmit packet from all ports |
| roundrobin | A simple runner which transmits packets in a round-robin fashion from each of the ports. |
| activebackup | This is a failover runner which watches for link changes and selects an active port for data transfers |
| loadbalance | This runner monitors traffic and uses a hash function to try to reach a perfect balance when selecting ports for packet transmission. |
| lacp | Implements the 802.3ad LinkAggregation Control Protocol. Can use the same transmit port selection possibilities as the load balance runner. |
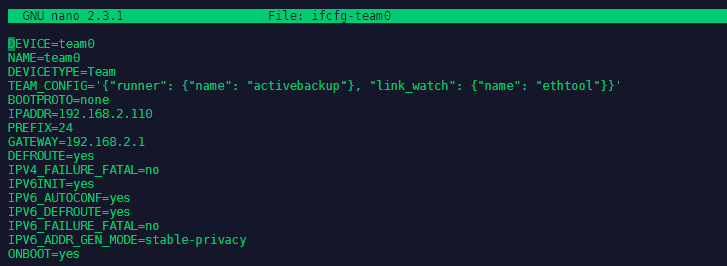
We can install teamd with the yum -y install teamd command - but it will most likely already be installed on your CentOS 7 server. Now go to cd /etc/sysconfig/network-scripts and create a file ifcfg-team0:
DEVICE=team0
NAME=team0
DEVICETYPE=Team
TEAM_CONFIG='{'runner': {'name': 'activebackup'}, 'link_watch': {'name': 'ethtool'}}'
BOOTPROTO=none
IPADDR=192.168.2.110
PREFIX=24
GATEWAY=192.168.2.1
DEFROUTE=yes
IPV4_FAILURE_FATAL=no
IPV6INIT=yes
IPV6_AUTOCONF=yes
IPV6_DEFROUTE=yes
IPV6_FAILURE_FATAL=no
IPV6_ADDR_GEN_MODE=stable-privacy
ONBOOT=yes
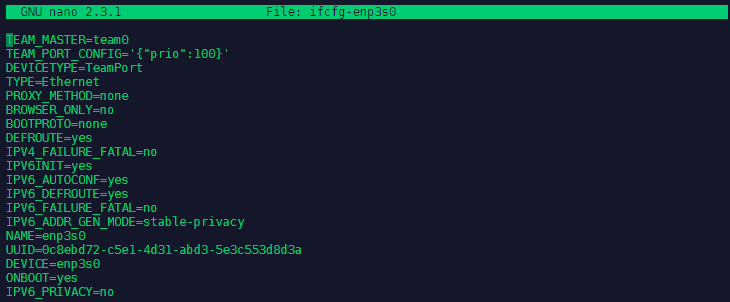
We now need to add three lines to our Ethernet interface config file nano ifcfg-enp3s0:
TEAM_MASTER=team0
TEAM_PORT_CONFIG='{'prio':100}'
DEVICETYPE=TeamPort
Now edit your secondary network interface by adding the following 3 lines - note that the Priority is set to a lower value then in our first interface above:
TEAM_MASTER=team0
TEAM_PORT_CONFIG='{'prio':99}'
DEVICETYPE=TeamPort
We can now load our new team configuration by typing ifdown ifcfg-team0; ifup ifcfg-team0. The teaming can be verified with teamnl team0 ports and teamdctl team0 state.
This process can be simplified by using the nmcli:
nmcli con add type team con-name team0 ifname ifcfg-team0 ip4 192.168.2.110 gw4 192.168.2.1
nmcli con add type team-slave con-name enp0s3 ifname enp0s3 master team0