Installing OpenWRT on a Raspberry Pi 4

Downloading the Image
| Model | Version | Current Release | Firmware OpenWrt Install | Firmware OpenWrt Upgrade |
|---|---|---|---|---|
| Raspberry Pi 4 | B | 21.02.0 | Link | Link |
Direct Download Link: openwrt-21.02.0-bcm27xx-bcm2711-rpi-4-squashfs-factory
How to flash OpenWrt to MicroSD card
On a Linux desktop and Windows desktop:
- Unpack the
imgfile - Insert your MicroSD
- Use BalenaEtcher software to write the img file to your MicroSD card's. [https://www.balena.io/etcher/]
- Insert the MicroSD into your Pi4B and plug in the power
Connect to OpenWRT
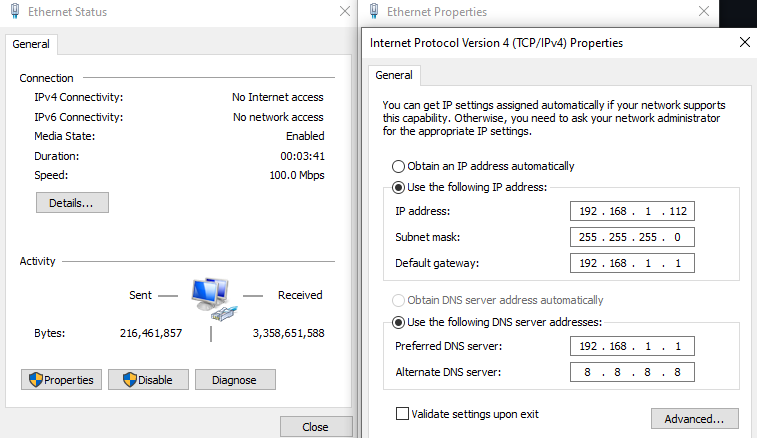
Connect your PC to your Raspberry Pi via an Ethernet cable and change your network settings to an address inside 192.168.1.* - e.g. on Windows:
The Default IP of your OpenWRT server is 192.168.1.1 - connect to it with your SSH client ssh root@192.168.1.1:
BusyBox v1.33.1 (2021-08-31 22:20:08 UTC) built-in shell (ash)

  _______                     ________        __
 |       |.-----.-----.-----.|  |  |  |.----.|  |_
 |   -   ||  _  |  -__|     ||  |  |  ||   _||   _|
 |_______||   __|_____|__|__||________||__|  |____|
          |__| W I R E L E S S   F R E E D O M
 -----------------------------------------------------
 OpenWrt 21.02.0, r16279-5cc0535800
 -----------------------------------------------------
=== WARNING! =====================================
There is no root password defined on this device!
Use the "passwd" command to set up a new password
in order to prevent unauthorized SSH logins.
--------------------------------------------------
root@OpenWrt:~#
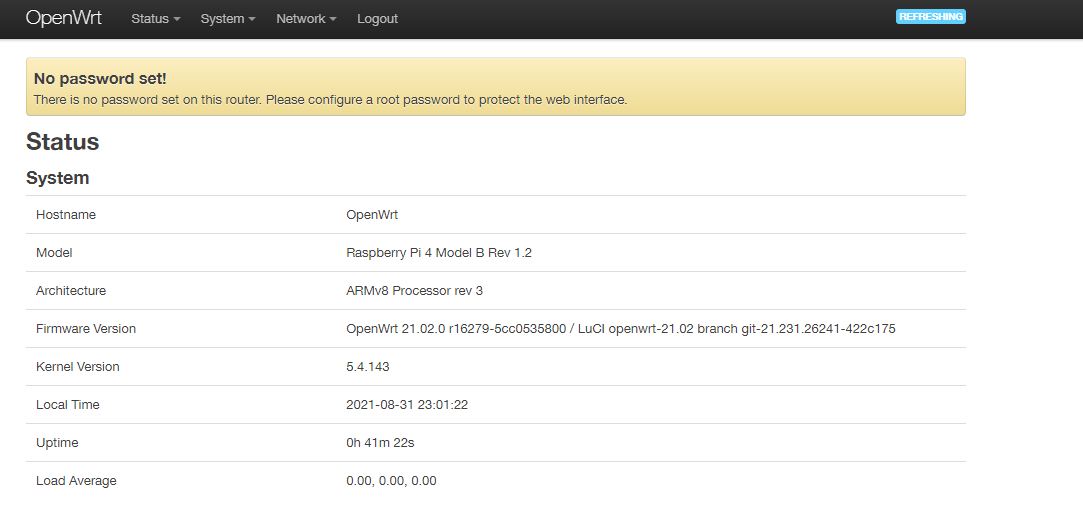
And the WebUI is also available under this address:
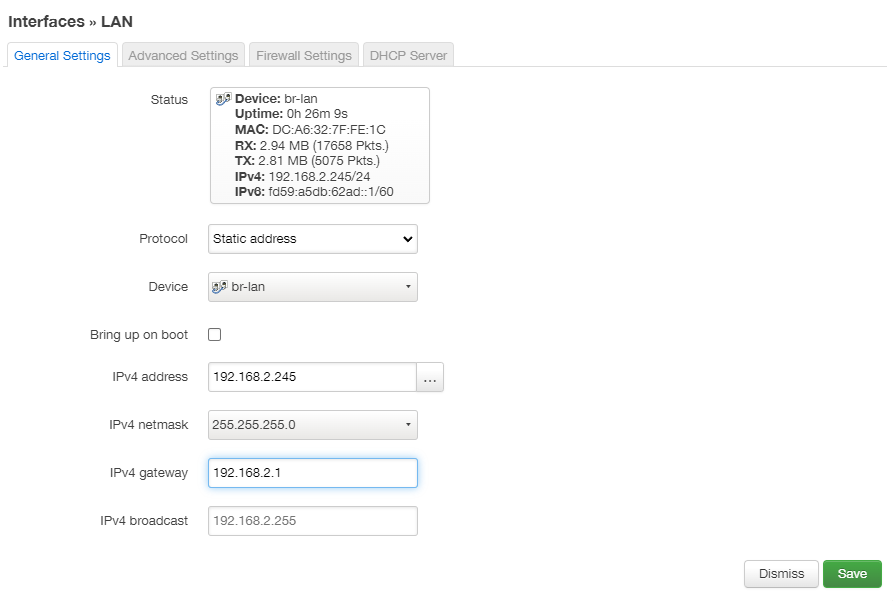
Now we can change the login and assign a static IP address inside our own Network IP address space:
passwd root
uci set network.lan.ipaddr=192.168.2.245
uci commit
/etc/init.d/network restart
Unplug the LAN cable, switch your PC back to it's original IP and connect both to your router. The OpenWRT WebUI should now be available on the Ip address you set above e.g. 192.168.2.245:
I noticed that OpenWRT started giving out DHCP leases - You can disable this in the Interfaces/LAN settings Ignore interface: Disable DHCP for this interface.:
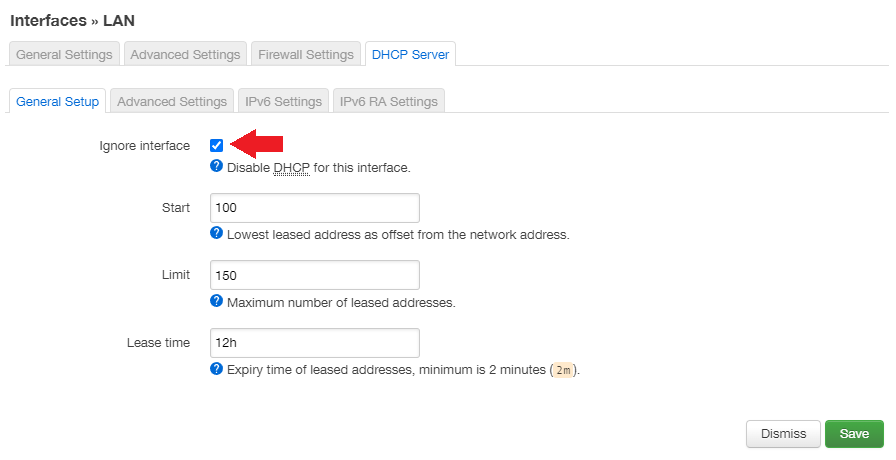
And setting everything to disabled in the DHCP/IPv6 Settings:
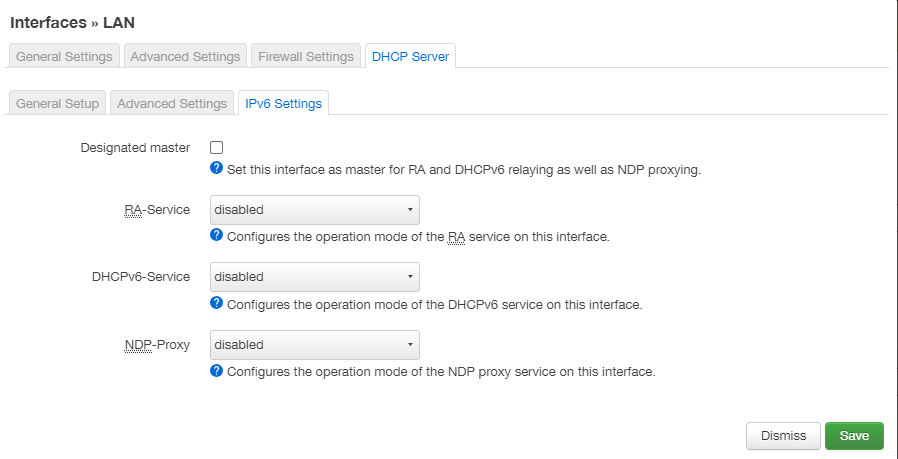
In the top menu go to System → Startup, and disable firewall, dnsmasq and odhcpd in the list of startup scripts. It should be noted that even though they are disabled, flashing a new image to the device will re-enable them. Click the Save and Apply button. Hard-Restart your router if you're not able to connect anymore.
Adding WiFi Clients
cat /etc/wpa_supplicant.conf

ctrl_interface=/var/run/wpa_supplicant
update_config=1
ap_scan=1
autoscan=periodic:10
disable_scan_offload=1
network={
        ssid="OpenWrt"
        psk="astrongpassword"
}
wpa_supplicant -B -iwlan0 -c/etc/wpa_supplicant.conf -Dnl80211
WPA CLI
wpa_cli reconfigure
wpa_cli reassociate
wpa_cli

wpa_cli v2.9
Copyright (c) 2004-2019, Jouni Malinen <j@w1.fi> and contributors

This software may be distributed under the terms of the BSD license.
See README for more details.


Selected interface 'wlan0'

Interactive mode

> add_network
1
> set_network 0 ssid "OpenWrt"
OK
> set_network 0 psk "astrongpassword"
OK
> set_network 0 ieee80211w 2
OK
> set_network 0 key_mgmt SAE
OK
> enable_network 0
OK
> reconnect
OK
set_network 0 key_mgmt WPA-PSK-SHA256for mixed WPA2/WPA3 mode