Installing Kali LINUX on a Raspberry Pi 3

Downloading the Image
| Version | Download | Torrent | SHA256sum |
|---|---|---|---|
| Raspberry Pi 2, 3, 4 and 400 (32-bit) | Link | Torrent | 9da12eb9899c7b9a6860ba421bb9f45ce023593b58869ff2ab8db69ce8aa2630 |
How to get it onto your Raspberry Pi 3 B+
On a Linux desktop and Windows desktop:
- Insert your MicroSD to your PC
- Use BalenaEtcher software to write the img file to your MicroSD card's. [https://www.balena.io/etcher/]
- Insert the SD Card into your RasPi and wait for it to boot - it will show up as
kali
Note: Make sure that the MicroSD (once flashed by Etcher) has an empty file called ssh on it - this will enable the SSH remote access. I ran into the problem that the root access did not work for me. So I had to use the kali user.
Login
Default Logins:
| Username | Password |
|---|---|
| root | toor |
| kali | kali |
After using the kali login I can change the default root login and re-login with that:
ssh kali@192.168.2.48
kali@192.168.2.48's password: kali
sudo su
passwd root
And allow the root login:
nano /etc/ssh/sshd_config
by adding the following line:
#PermitRootLogin prohibit-password
PermitRootLogin yes
After restarting the SSH service you will now be able to remotely login using the root user with your personal password:
/etc/init.d/ssh restart
Change the IP Address
sudo nano /etc/network/interfaces
Deactivate the DHCP service and add your static IP configuration:
auto lo
iface lo inet loopback

auto eth0
allow-hotplug eth0
# iface eth0 inet dhcp
iface eth0 inet static
  address 192.168.2.113
  netmask 255.255.255.0
  gateway 192.168.2.1
  dns-nameservers 192.168.2.1
Restart the networking service and login again on your new IP address:
systemctl restart networking.service
Change the Hostname
Set new hostname:
hostnamectl set-hostname server1
Edit the hostfile to resolve your new hostname to localhost:
nano /etc/hosts

127.0.0.1       server1    localhost
And verify that the hostname was set successfully:
hostnamectl

Static hostname: server1
         Icon name: computer
        Machine ID: 068a7d772bd446b79607eb8f3fe0ac6b
           Boot ID: db0592c1953f4c9489312c7caa3e38f4
  Operating System: Kali GNU/Linux Rolling
            Kernel: Linux 5.4.83-Re4son-v7+
      Architecture: arm
Trying Airmon-NG
I was having some difficulties getting the Broadcom WiFi into monitoring mode. I tried several things and one of them - or a combination of them - finally enabled me to capture WiFi packages:

Here is a list of steps that I took:
Activating Monitoring Mode for the main WiFi Board
ifconfig wlan0 down
iwconfig wlan0 mode monitor
ifconfig wlan0 up
The second step above failed with the following error message:
Error for wireless request "Set Mode" (8B06) :
    SET failed on device wlan0 ; Device or resource busy.
The following command helps you to kill all processes that might be using wlan0:
airmon-ng check kill
This killed the wpa_supplicant service and I continued masking this service and rebooted the pi:
systemctl mask wpa_supplicant.service
reboot
Starting the monitoring service
airmon-ng start wlan0
This gave me an error message:
ERROR adding monitor mode interface: command failed: Operation not supported (-95)
This is a bug can be solved by reloading the Broadcom driver:
rmmod brcmfmac
modprobe brcmfmac
Afterward I was able to start the service:
airmon-ng start wlan0
And the monitoring interface was now listed:
airmon-ng

PHY     Interface       Driver          Chipset

phy1    wlan0           brcmfmac        Broadcom 43430
phy1    wlan0mon        brcmfmac        Broadcom 43430
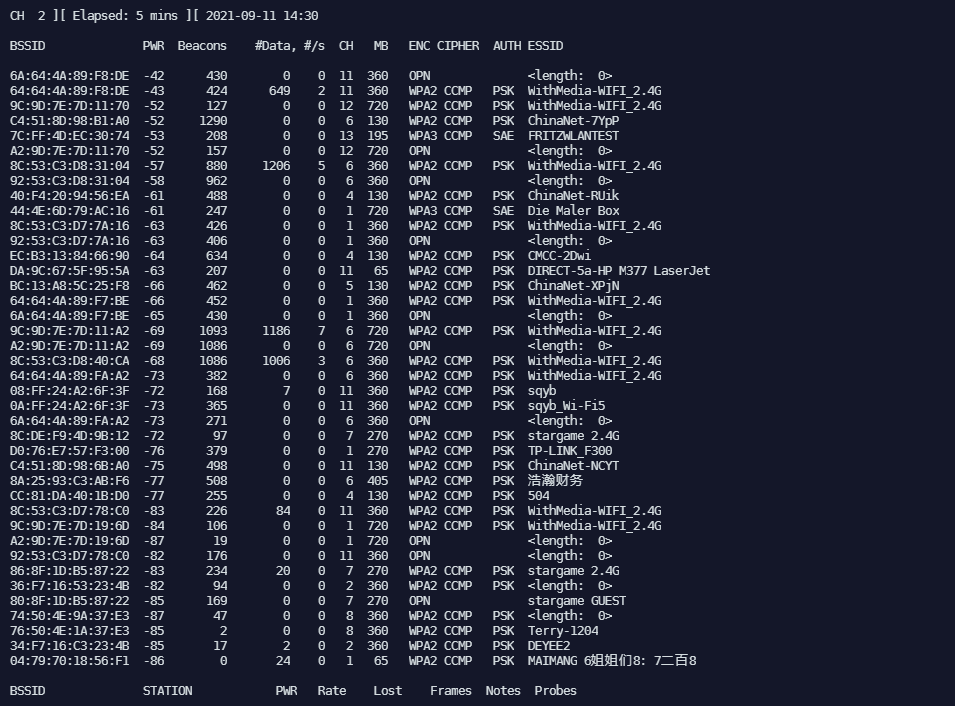
Starting airodump-ng to display the captured packages
This command lead me to the screenshot above:
airodump-ng wlan0mon
Verify that it is working
To make sure this wasn't a fluke I rebooted my Pi and ran the following commands:
airmon-ng start wlan0
airodump-ng wlan0mon
And it worked - this time without any complaints!