From NeoVim to LunarVim

<!-- TOC -->
<!-- /TOC -->
LunarVim - an IDE layer for Neovim with sane defaults.
Installation
> Prerequisites: > > * Make sure you have installed the latest version of Neovim v0.9.0+. > * Have git, make, pip, python, npm, node and cargo installed on your system.
LV_BRANCH='release-1.3/neovim-0.9' bash \<(curl -s https://raw.githubusercontent.com/LunarVim/LunarVim/release-1.3/neovim-0.9/utils/installer/install.sh)
Optional:
sudo npm install -g neovim tree-sitter-cli
sudo pacman -S python-pynvim
Updating LunarVim
- Inside LunarVim
:LvimUpdate - Updating Plugins inside LunarVim
:LvimSyncCorePlugins - From the command-line
lvim +LvimUpdate +q
Post install
LunarVim uses icons from Nerd Fonts. If you don't want to use them set lvim.use_icons to false.
mkdir -p ~/.local/share/fonts
cd ~/.local/share/fonts && curl -fLO https://github.com/ryanoasis/nerd-fonts/raw/HEAD/patched-fonts/DroidSansMono/DroidSansMNerdFont-Regular.otf
After installing your font, you will have to refresh your font cache by doing fc-cache -f -v.
Adding lvim to PATH by adding an alias to .zshrc, .bashrc, etc.
# add lvim & cargo
export PATH="$HOME/.local/bin:$PATH"
export PATH="$HOME/.cargo/bin:$PATH"
Cheat Sheet
Keybinds
| Exiting | Navigating | ||
| :q | Close file | h j k l | Arrow keys |
| :qa | Close all files | <C-U> / <C-D> | Half-page up/down |
| :w | Save | <C-B> / <C-F> | Page up/down |
| :wq / :x | Save and close file | Words | |
| ZZ | Save and quit | b / w | Previous/next word |
| ZQ | Quit without checking changes | ge / e | Previous/next end of word |
| Exiting insert mode | Line | ||
| Esc / <C-[> | Exit insert mode | 0 (zero) | Start of line |
| <C-C> | Exit insert mode, and abort current command | ^ | Start of line (after whitespace) |
| Clipboard | $ | End of line | |
| x | Delete character | Character | |
| dd | Delete line (Cut) | fc | Go forward to character c |
| yy | Yank line (Copy) | Fc | Go backward to character c |
| p | Paste | Document | |
| P | Paste before | gg | First line |
| "*p / "+p | Paste from system clipboard | G | Last line |
| "*y / "+y | Paste to system clipboard | :{number} | Go to line {number} |
| vi( | Select everything inside parenthesis | { | Jump to beginning of paragraph |
| va( | Select everything including parenthesis | } | Jump to end of paragraph |
| ya( | Copy everything including parenthesis | ctrl+d | Jump half page up |
| viw | Select entire word | ctrl+u | Jump half page down |
| viW | Select entire word with included punctuation | zz | Center view port |
| Find & Replace | {number}G | Go to line {number} | |
| :%s/foo/bar/g | Replace foo with bar in whole document | {number}j | Go down {number} lines |
| Editing | {number}k | Go up {number} lines | |
| a | Append | Window | |
| A | Append from end of line | zz | Center this line |
| i | Insert mode | zt | Top this line |
| o | Insert mode on next line | zb | Bottom this line |
| O | Insert mode on previous line | H | Move to top of screen |
| s | Delete char and insert | M | Move to middle of screen |
| S | Delete line and insert | L | Move to bottom of screen |
| C | Delete until end of line and insert | Search | |
| r | Replace one character | n | Next matching search pattern |
| R | Enter Replace mode | N | Previous match |
| u | Undo changes | * | Next whole word under cursor |
| <C-R> | Redo changes | # | Previous whole word under cursor |
| ci( | Delete everything within parenthesis and enter edit mode | ||
| ca" | Delete everything including outer double-quotes and enter edit mode | ||
| Visual mode | Tab pages | ||
| v | Enter visual mode | :tabedit [file] | Edit file in a new tab |
| <leader>+bb | Go to previous tab | ||
| <leader>+bn | Go to next tab | ||
| <C+h> | Move cursor to the left window | ||
| <C+l> | Move cursor to the right window | ||
| <C+j> | Move cursor to the lower window | ||
| <C+k> | Move cursor to the upper window | ||
| <C+> | Toggle terminal on/off | ||
| V | Enter visual line mode | :tabfind [file] | Open file if exists in new tab |
| <C-V> | Enter visual block mode | :tabclose | Close current tab |
In visual mode | :tabs | List all tabs | |
| d / x | Delete selection | :tabfirst | Go to first tab |
| s | Replace selection | :tablast | Go to last tab |
| y | Yank selection (Copy) | :tabn | Go to next tab |
| :tabp | Go to previous tab |
Operators
Operators let you operate in a range of text (defined by motion). These are performed in normal mode:
d: Operatorw: Motion
| Operators list | Examples | Combine operators with motions to use them. | |
|---|---|---|---|
d | Delete | dd | (repeat the letter) Delete current line |
y | Yank (copy) | dw | Delete to next word |
c | Change (delete then insert) | db | Delete to beginning of word |
\> | Indent right | 2dd | Delete 2 lines |
\< | Indent left | dip | Delete a text object (inside paragraph) |
= | Autoindent | (in visual mode) d | Delete selection |
u | Undo | d2w | Delete two words. |
ctrl+r | Redu | ||
g~ | Swap case | ||
gU | Uppercase | ||
gu | Lowercase | ||
! | Filter through external program |
Configuration
You can configure LunarVim by using the configuration file located in:
cat ~/.config/lvim/config.lua

-- Read the docs: https://www.lunarvim.org/docs/configuration
-- Video Tutorials: https://www.youtube.com/watch?v=sFA9kX-Ud_c&list=PLhoH5vyxr6QqGu0i7tt_XoVK9v-KvZ3m6
-- Forum: https://www.reddit.com/r/lunarvim/
-- Discord: https://discord.com/invite/Xb9B4N
For some reason the old default config was removed - I made a copy of it here config.example.lua. To keep this main file lean we can create custom config files in sub-directories, add all configuration there - maybe git-source them - and import those files into main:
mkdir -p ~/.config/lvim/lua/custom
lvim ~/.config/lvim/lua/custom/options.lua //add your config here
Now either use the require() or reload() (for hot-reloading on save) to add your custom configuration to ~/.config/lvim/config.lua:
reload('custom.options')
Custom Keybinds
--move selected line with K or J
vim.keymap.set("v", "K",  ":m '\<-2\<cr\>gv=gv")
vim.keymap.set("v", "J",  ":m '\>+1\<cr\>gv=gv")

--scroll with ctrl-d and ctrl-j while keeping centered
vim.keymap.set("n", "\<C-d\>",  "\<C-d\>zz")
vim.keymap.set("n", "\<C-u\>",  "\<C-u\>zz")

--find next with n and N while keeping centered
vim.keymap.set("n", "n",  "nzzzv")
vim.keymap.set("n", "N",  "Nzzzv")

--use system clipboard when copying with SPACE+y
--you may need to install xclip (X11) or wl-clipboard (wayland)
vim.keymap.set("n", "\<leader\>y", "\"+y")
vim.keymap.set("v", "\<leader\>y", "\"+y")
vim.keymap.set("n", "\<leader\>Y", "\"+Y")
Python
Now we can start adding configuration to our options file - for example for Python development, e.g. a Python Language Server:
lvim.builtin.treesitter.ensure_installed = {
  "python",
}
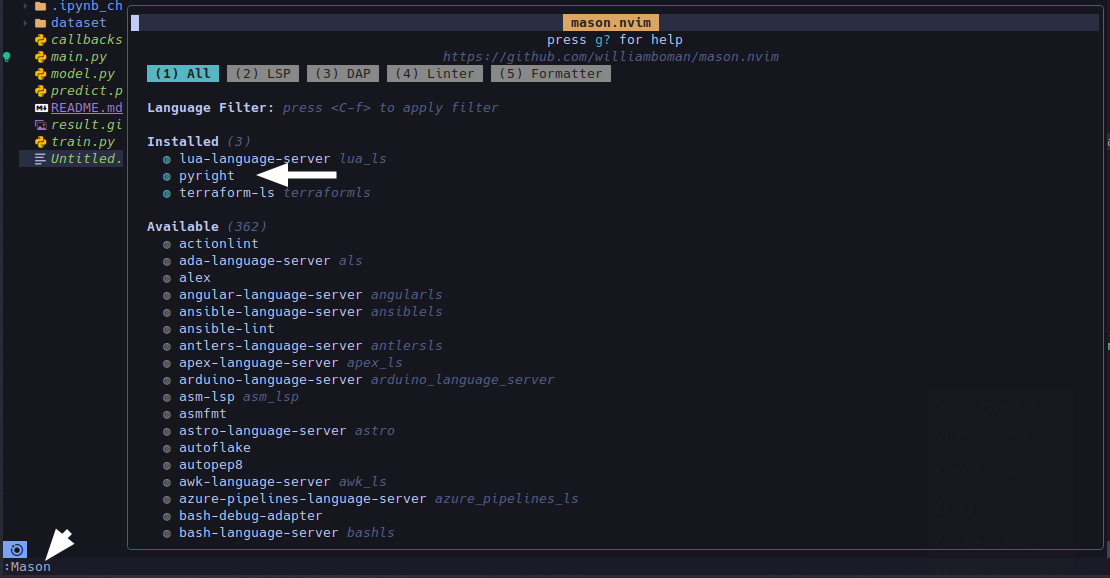
Type in :Mason and verify that pyright has been installed (I had to first open an *.py for the installation to start and I was seeing error messages along the way.)
To add auto-formating we can run :MasonInstall black and add the following configuration:
local formatters = require "lvim.lsp.null-ls.formatters"
formatters.setup { { name = "black" }}
lvim.format_on_save.enabled = true
lvim.format_on_save.pattern = { "*.py" }
For linting we can use flake8 that can be installed with :MasonInstall flake8 with the following configuration:
local linters = require "lvim.lsp.null-ls.linters"
linters.setup { { command = "flake8", args = { "--ignore=E203" }, filetypes = { "python" } } }
<!-- Further, there are two plugins that come recommended - one for switching virtual environments and an eye-candy one:
lvim.plugins = {
  "ChristianChiarulli/swenv.nvim",
  "stevearc/dressing.nvim",
}

require('swenv').setup({
  post_set_venv = function()
    vim.cmd("LspRestart")
  end,
})

lvim.builtin.which_key.mappings["C"] = {
  name = "Python",
  c = { "\<cmd\>lua require('swenv.api').pick_venv()\<cr\>", "Choose Env" },
}
The two configuration below the plugin block make sure that the language server is restarted after switching to a new Python virtual environment and that typing SPACE + C opens a dialogue you can select your environment from.
> Hmmm - switching environments does not work for me - the dialogue does not open. I will have to check later what the issue is. -->
Restart LunarVim and you should see that everything is now loaded when you open a Python file and will start complaining :)
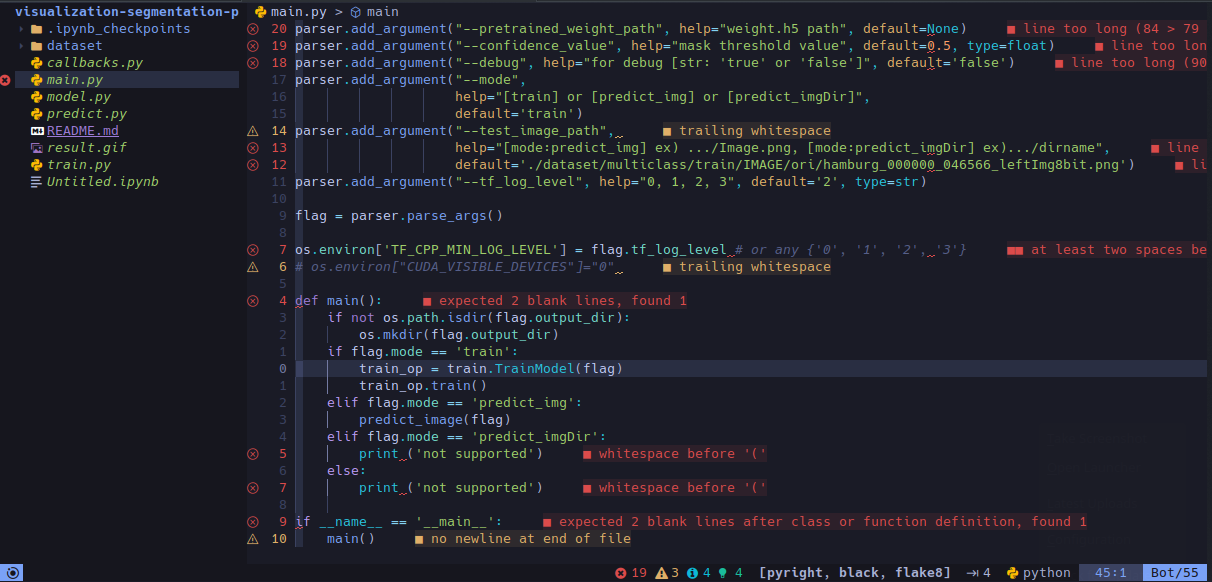
You can auto-format your code with black using SPACE + l + f.
Other
:TSInstall json
:TSInstall javascript
:TSInstall typescript
:TSInstall tsx