MotionEye Video Surveillance

- Debian Installation
- motionEye Installation
- Adding your IP Camera
- Configuring MotionEye
- Accessing MotionEye over HTTPS
Motion is a highly configurable program that monitors video signals from many types of cameras (Network cameras via HTTP, RTSP and RTMP). Set it up to monitor your INSTAR IP camera, watch birds, check in on your pet, create timelapse videos and more.
motionEye is a web frontend for the motion daemon, written in Python.
We are going to install both on a regular Intel Core machine - like an Intel NUC, Asus P-Series or Gigabyte Brix. This decision was made due to the high CPU demands of working with 1080p video.
But we already wrote a tutorial on how to install motionEye on a Raspberry Pi in case that this amount of processing power is sufficient for your use case.
Debian Installation
We choose to install Debian 9 Linux on our mini PC - you can check the motionEye Wiki for more Linux flavours. To create the installation USB stick we downloaded the minimal amd64 image and used the tool Etcher to prepare the USB stick. We used the same approach to prepare a SD card with the openHABian image - you can just follow the steps from that tutorial. Once the USB stick is ready, deactivate secure boot in your mini PC's BIOS and boot from the stick. We are not going to need a desktop environment. But make sure that you install the SSH service - as we are going to use the SSH service to set up the Debian server.
SSH Access
To enable SSH login for a root user on Debian Linux system you need to first configure SSH server. Open /etc/ssh/sshd_config and change the following line:
FROM:
PermitRootLogin without-password
TO:
PermitRootLogin yes
Once you made the above change restart your SSH server:
# /etc/init.d/ssh restart
[ ok ] Restarting ssh (via systemctl): ssh.service.
From now on you will be able to ssh login as a root:
$ ssh root@192.168.2.111
root@192.168.2.111's password:

The programs included with the Debian GNU/Linux system are free software;
the exact distribution terms for each program are described in the
individual files in /usr/share/doc/*/copyright.

Debian GNU/Linux comes with ABSOLUTELY NO WARRANTY, to the extent
permitted by applicable law.
Set a static IP Address
By default, you will find the following configuration within the /etc/network/interfaces network config file:
source /etc/network/interfaces.d/*

# The loopback network interface
auto lo
iface lo inet loopback

# The primary network interface
allow-hotplug eth0
iface eth0 inet static
      address 192.168.2.111
      netmask 255.255.255.0
      gateway 192.168.2.1
Be aware:
In newer versions of Debian the Ethernet interface will not be called eth0 anymore. The file contains the line iface eth0 inet dhcp before you set it from dhcp to static - the identification between iface and inet is the id of your ethernet interface (don't change it to eth0!).
To configure a static DNS edit /etc/resolv.conf file, and include the IP address of your preferred nameserver eg:
nameserver 8.8.8.8
motionEye Installation
All commands require root; use sudo before each command or become root using su.
- Install motion, ffmpeg and v4l-utils:
apt-get install motion ffmpeg v4l-utils
- Install the dependencies from the repositories:
apt-get install python-pip python-dev python-setuptools curl libssl-dev libcurl4-openssl-dev libjpeg-dev libz-dev
- Install motioneye, which will automatically pull Python dependencies (tornado, jinja2, pillow and pycurl):
pip install motioneye
- Prepare the configuration directory:
 mkdir -p /etc/motioneye
 cp /usr/local/share/motioneye/extra/motioneye.conf.sample /etc/motioneye/motioneye.conf
- Prepare the media directory:
mkdir -p /var/lib/motioneye
- Add an init script, configure it to run at startup and start the motionEye server:
  cp /usr/local/share/motioneye/extra/motioneye.systemd-unit-local /etc/systemd/system/motioneye.service
  systemctl daemon-reload
  systemctl enable motioneye
  systemctl start motioneye
- To upgrade to the newest version of motioneye, after it has been released, just issue:
pip install motioneye --upgrade
systemctl restart motioneye
Adding your IP Camera
Open the MotionEye Interface with your web browsers by typing in your Raspberry Pi's IP address followed by the Port 8765 - e.g. http://192.168.2.115:8765. The default login is admin without a password. We already covered how to add JPG, MJPEG and RTSP cameras earlier. Follow the instructions there and add all your INSTAR VGA, HD and Full HD cameras.
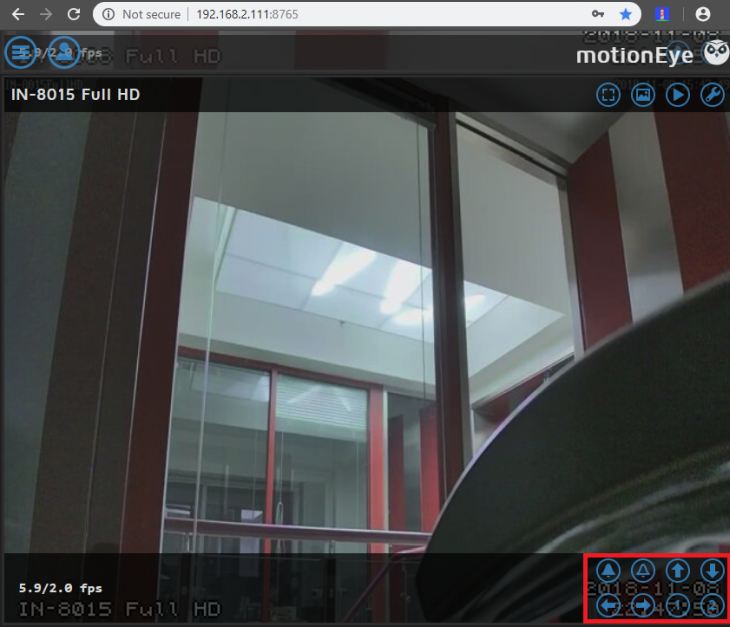
We now want to go a step further and add buttons to control the basic camera functions. MotionEye offers a list of Action Buttons that we can use with our camera's CGI commands. They automatically map to Shell Scripts that we have to put into the /etc/motioneye directory. The following actions are defined:
- lock
- unlock
- light_on
- light_off
- alarm_on
- alarm_off
- up
- right
- down
- left
- zoom_in
- zoom_out
- preset1 to preset9
While the available actions are limited to the above set, the commands executed can be practically anything. We will choose to execute HTTP GET commands to send CGI commands to our cameras.
Enabling Actions
motionEye will look inside its configuration folder /etc/motioneye for executable files named [action]_[cameraid], where action is one of the available actions (listed above) and cameraid is the id of the camera on top of which the action button will be displayed.
For example, on a setup using the default configuration, the presence of the executable file /etc/motioneye/alarm_on_1 tells motionEye to show an alarm bell button for the camera number one. The file will be executed upon pressing the button. Buttons will have distinctive icons that correspond to the name of the action.
HTTP Request Example
Let's say that you want to issue an HTTP request to your INSTAR IP camera when you click the "turn alarm on" button of your first camera (with id 1). Create the following bash script and make it executable:
Alarm - Full HD Models
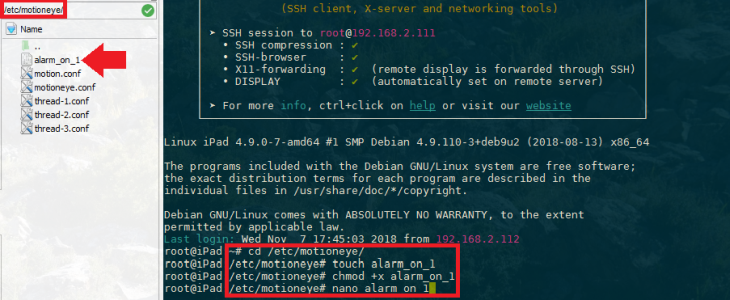
touch /etc/motioneye/alarm_on_1
chmod +x /etc/motioneye/alarm_on_1
nano /etc/motioneye/alarm_on_1
Then type in (or paste) the following contents, save and exit nano (Ctrl-O, Enter, Ctrl-X):
#!/bin/bash

URL="http://admin:instar@192.168.2.113/param.cgi?cmd=setscheduleex&-ename=md&-week0=PPPPPPPPPPPPPPPPPPPPPPPPPPPPPPPPPPPPPPPPPPPPPPPP&-week1=PPPPPPPPPPPPPPPPPPPPPPPPPPPPPPPPPPPPPPPPPPPPPPPP&-week2=PPPPPPPPPPPPPPPPPPPPPPPPPPPPPPPPPPPPPPPPPPPPPPPP&-week3=PPPPPPPPPPPPPPPPPPPPPPPPPPPPPPPPPPPPPPPPPPPPPPPP&-week4=PPPPPPPPPPPPPPPPPPPPPPPPPPPPPPPPPPPPPPPPPPPPPPPP&-week5=PPPPPPPPPPPPPPPPPPPPPPPPPPPPPPPPPPPPPPPPPPPPPPPP&-week6=PPPPPPPPPPPPPPPPPPPPPPPPPPPPPPPPPPPPPPPPPPPPPPPP"
METHOD="GET"
TIMEOUT="5"
curl -X $METHOD --connect-timeout $TIMEOUT "$URL" > /dev/null

We will use the Alarm Schedule CGI Command for an INSTAR Full HD Camera in this example - but the URL can be set to any CGI command that you need!
Note that the command activates the motion alarm detection of your camera 24/7. If you are already using a alarm schedule that deactivates your camera alarm during certain times - just replace some of those P's with N's to reflect your personal schedule and set MotionEye up to switch between Alarm Always ON / Your Alarm Schedule.
To switch the alarm off we repeat those steps for:
touch /etc/motioneye/alarm_off_1
chmod +x /etc/motioneye/alarm_off_1
nano /etc/motioneye/alarm_off_1
Then type in (or paste) the following contents, save and exit nano (Ctrl-O, Enter, Ctrl-X):
#!/bin/bash

URL="http://admin:instar@192.168.2.113/param.cgi?cmd=setscheduleex&-ename=md&-week0=NNNNNNNNNNNNNNNNNNNNNNNNNNNNNNNNNNNNNNNNNNNNNNNN&-week1=NNNNNNNNNNNNNNNNNNNNNNNNNNNNNNNNNNNNNNNNNNNNNNNN&-week2=NNNNNNNNNNNNNNNNNNNNNNNNNNNNNNNNNNNNNNNNNNNNNNNN&-week3=NNNNNNNNNNNNNNNNNNNNNNNNNNNNNNNNNNNNNNNNNNNNNNNN&-week4=NNNNNNNNNNNNNNNNNNNNNNNNNNNNNNNNNNNNNNNNNNNNNNNN&-week5=NNNNNNNNNNNNNNNNNNNNNNNNNNNNNNNNNNNNNNNNNNNNNNNN&-week6=NNNNNNNNNNNNNNNNNNNNNNNNNNNNNNNNNNNNNNNNNNNNNNNN"
METHOD="GET"
TIMEOUT="5"
curl -X $METHOD --connect-timeout $TIMEOUT "$URL" > /dev/null
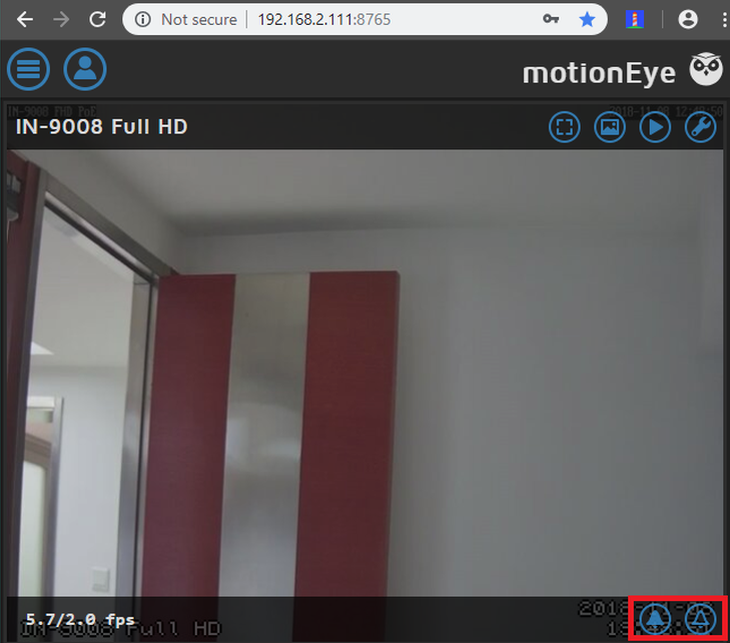
Reload the MotionEye interface - the buttons should now be visible in the camera 1 view port (you might have to click onto the video are once to have them appear). If the buttons are not displayed, make sure that you made the shell scripts executable.
Alarm - VGA Models
touch /etc/motioneye/alarm_on_3
chmod +x /etc/motioneye/alarm_on_3
nano /etc/motioneye/alarm_on_3
Then type in (or paste) the following contents, save and exit nano (Ctrl-O, Enter, Ctrl-X):
#!/bin/bash

URL="http://admin:instar@192.168.2.117/set_alarm.cgi?motion_armed=1"
METHOD="GET"
TIMEOUT="5"
curl -X $METHOD --connect-timeout $TIMEOUT "$URL" > /dev/null
touch /etc/motioneye/alarm_off_3
chmod +x /etc/motioneye/alarm_off_3
nano /etc/motioneye/alarm_off_3
Then type in (or paste) the following contents, save and exit nano (Ctrl-O, Enter, Ctrl-X):
#!/bin/bash

URL="http://admin:instar@192.168.2.117/set_alarm.cgi?motion_armed=0"
METHOD="GET"
TIMEOUT="5"
curl -X $METHOD --connect-timeout $TIMEOUT "$URL" > /dev/null
PTZ - Full HD Models
touch /etc/motioneye/left_2 /etc/motioneye/right_2 /etc/motioneye/down_2 /etc/motioneye/up_2
chmod +x /etc/motioneye/left_2 /etc/motioneye/right_2 /etc/motioneye/down_2 /etc/motioneye/up_2
STEP LEFT
left_2
#!/bin/bash

URL="http://admin:instar@192.168.2.116/ptzctrl.cgi?-step=&-act=left"
METHOD="GET"
TIMEOUT="5"
curl -X $METHOD --connect-timeout $TIMEOUT "$URL" > /dev/null
STEP RIGHT
right_2
#!/bin/bash

URL="http://admin:instar@192.168.2.116/ptzctrl.cgi?-step=&-act=right"
METHOD="GET"
TIMEOUT="5"
curl -X $METHOD --connect-timeout $TIMEOUT "$URL" > /dev/null
STEP DOWN
down_2
#!/bin/bash

URL="http://admin:instar@192.168.2.116/ptzctrl.cgi?-step=&-act=down"
METHOD="GET"
TIMEOUT="5"
curl -X $METHOD --connect-timeout $TIMEOUT "$URL" > /dev/null
STEP UP
up_2
#!/bin/bash

URL="http://admin:instar@192.168.2.116/ptzctrl.cgi?-step=&-act=up"
METHOD="GET"
TIMEOUT="5"
curl -X $METHOD --connect-timeout $TIMEOUT "$URL" > /dev/null
Preset Positions - Full HD Models
touch /etc/motioneye/preset1_2 /etc/motioneye/preset2_2
chmod +x /etc/motioneye/preset1_2 /etc/motioneye/preset2_2
Go to Preset 1
preset1_2
#!/bin/bash

URL="http://admin:instar@192.168.2.116/param.cgi?cmd=preset&-act=goto&-number=0"
METHOD="GET"
TIMEOUT="5"
curl -X $METHOD --connect-timeout $TIMEOUT "$URL" > /dev/null
Go to Preset 2
preset2_2
#!/bin/bash

URL="http://admin:instar@192.168.2.116/param.cgi?cmd=preset&-act=goto&-number=1"
METHOD="GET"
TIMEOUT="5"
curl -X $METHOD --connect-timeout $TIMEOUT "$URL" > /dev/null
Configuring MotionEye
Open the side menu and select the camera you want to edit from the drop down menu 1 - activate the Advanced Settings 2. Let's go through a few interesting menus that MotionEye offers:
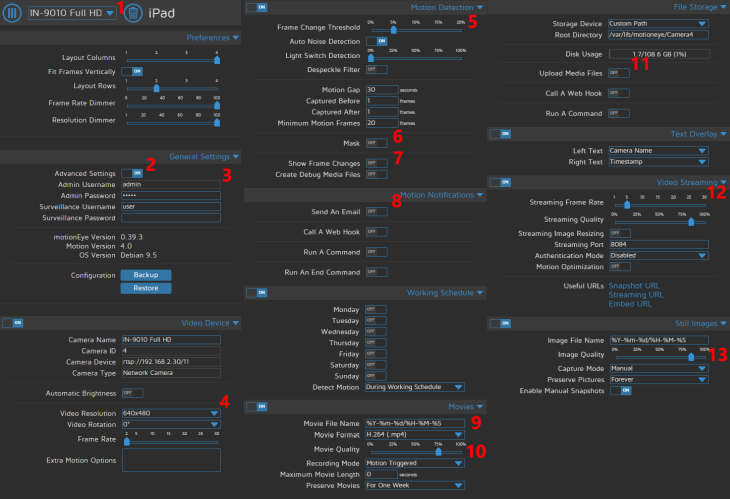
3 MotionEye gives you both a administrator and a regular user account. You should add a password for the admin account here. The regular user will not have access to this part of the menu.
4 We setup MotionEye to grab the 1080p RTSP stream from our camera. Here you can scale down the resolution - to save storage and - of particulate interest if you are using a Raspberry Pi to run MotionEye - to reduce the demand on your CPU. The framerate here is set to 2fps by default - which means that you end up with very choppy video. It again depends on your CPU and the amount of cameras you want to add if you might be able to go higher. You can also rotate your video image in 90 degree increments.
5 Set an upper and lower detection threshold for the integrated motion detection. How much percent of the image has to change to register as an alarm? And do you want to discard the alarm, when more than a set percentage of the image changes - as it will probably just be a light that turned on and does not interest you.
6 Do you have a constant movement in the background of your image that keeps triggering the alarm? Use the mask feature to have MotionEye learn which part of the image it should not use for the motion detection.
7 Have MotionEye draw a box around the change it detects inside the frame - this is useful to debug false alerts. Also looks really fancy.
8 The Email notification is self-explanatory - the fields are identical to SMTP server configuration of an INSTAR IP camera. More interesting is the web hook function below that is identical the Alarmserver of your INSTAR camera.
9 Make sure to set the video recording to h.264 (.mp4) if you want to display the recorded video in the MotionEye user interface! Otherwise you can use the HEVC (.mp4) to apply the highly effective h.265 compression and make your videos as small as possible.
10 Choose between a continuous recording and a recording triggered by motion detection. Alarm videos will continue to record as long as the motion continues. It makes sense to limit the maximum file size - this will create more small videos instead of one huge one that is hard to handle. You can also choose to automatically delete files again after a set time.
11 Upload your alarm videos to an FTP or SFTP Server. Or mirror them to Dropbox or Google Drive.
12 MotionEye re-streams all your camera's video streams in a browser compatible format.
13 A photo camera icon will appear in the camera viewport when you activate the Manual Capture, allowing you to take a quick snapshot.
Accessing MotionEye over HTTPS
If you want to access the MotionEye interface over the internet, it necessary to first protect your server. In the following we want to do two things:
- Close all unnecessary ports with a firewall
- Install a web proxy that enables us to add SSL encryption
We are going to use FirewallD as firewall and NGINX as web proxy. Running behind the Nginx webserver (using Nginx as a reverse proxy) can be useful when:
- you want to use HTTPS with motionEye
- you want to serve multiple websites (including motionEye) on the same webserver (accessible at the same IP address over port 80)
- you want to take advantage of various Nginx modules (such as rate limiting or HTTP authentication)
Installation of FirewallD on Debian
Install FirewallD by running the following commands:
apt-get update
apt-get install firewalld
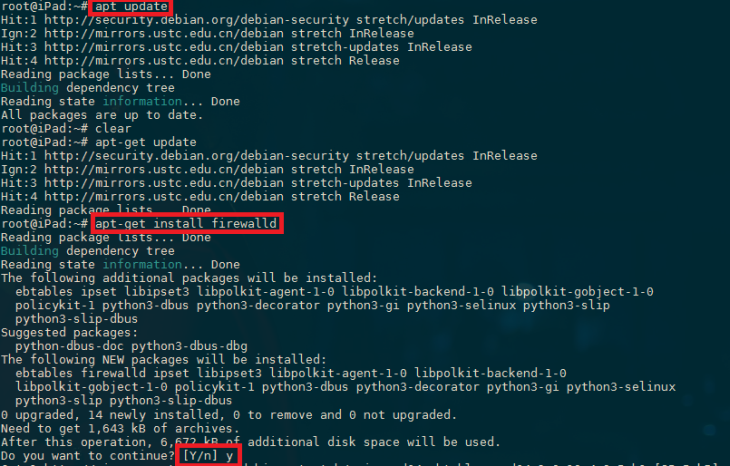
To open the default http and https ports run the following commands:
firewall-cmd --permanent --zone=public --add-service=https --add-service=http
firewall-cmd --reload
firewall-cmd --list-all

If you now try to access the MotionEye interface on port 8765 you will see that it is going to timeout - as the request will be blocked by FirewallD. We can temporarily open all ports that MotionEye uses - in my case this is the main UI port 8765 and the streaming ports for three cameras 8081, 8082, 8083.
firewall-cmd --permanent --zone=public --add-port=8765/tcp --add-port=8081-8083/tcp
firewall-cmd --reload
firewall-cmd --list-all
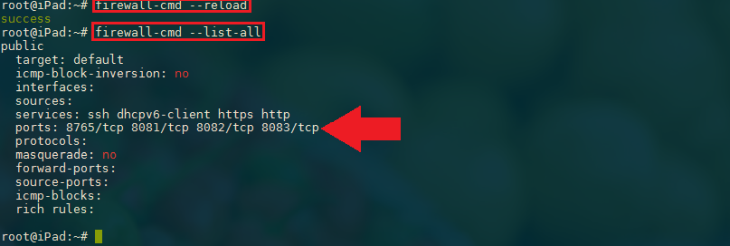
You should now be able to access the MotionEye interface again - be aware that this command did not use the --permanent flag. That means, when you restart your server, or reload the firewall, those rules will be discarded.
Installation of NGINX on Debian
apt-get install nginx
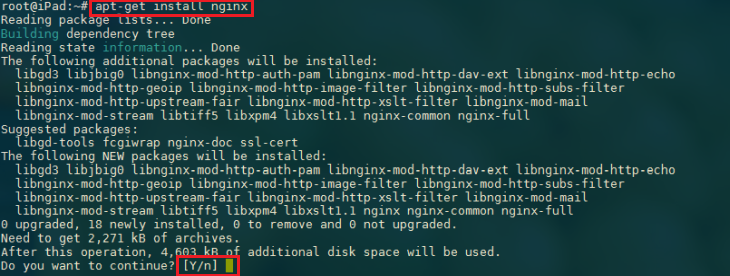
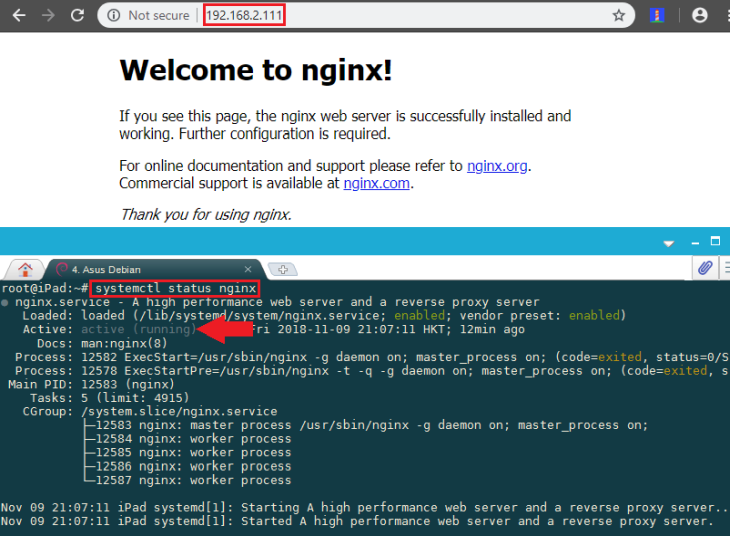
At the end of the installation process, Debian 9 starts Nginx. The web server should already be up and running. We can check with the systemd init system to make sure the service is running by typing:
systemctl status nginx
When you have your server's IP address, enter it into your browser's address bar. You should see the default Nginx landing page:
Set up a Virtual Host for MotionEye
Here's the content of a sample virtual host file that normally goes to /etc/nginx/sites-enabled/motioneye.local:
touch /etc/nginx/sites-enabled/motioneye.local
nano /etc/nginx/sites-enabled/motioneye.local

motioneye.local
server {
    listen 80;
    listen [::]:80;
    location /dashboard/ {
        proxy_pass            http://127.0.0.1:8765/;
        proxy_read_timeout    1800;
        proxy_connect_timeout 1800;
        access_log off;
    }
}

Make sure that your NGINX configuration passes the test and reload the service:
nginx -t
service nginx reload

Your MotionEye UI will be available at http://192.168.2.111/dashboard/ (this has to be changed to the IP address of your MotionEye server!). It's important to note the trailing slashes at location /dashboard/ and at http://127.0.0.1:8765/. They make sure paths are correctly passed around when forwarding the HTTP requests to motionEye.
Create the SSL Certificate
We can create a self-signed key and certificate pair with OpenSSL in a single command:
openssl req -x509 -nodes -days 365 -newkey rsa:2048 -keyout /etc/ssl/private/nginx-selfsigned.key -out /etc/ssl/certs/nginx-selfsigned.crt
These options will create both a key file and a certificate. We will be asked a few questions about our server in order to embed the information correctly in the certificate.
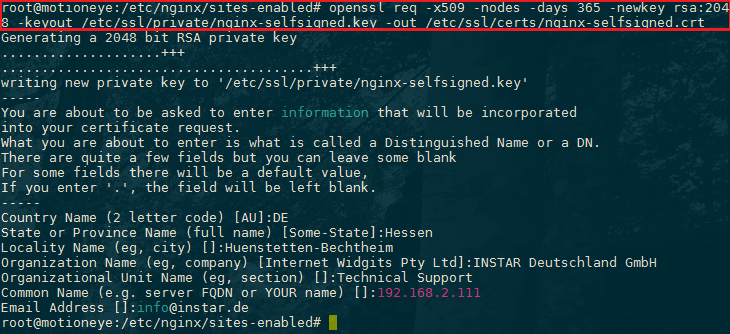
Both of the files you created will be placed in the appropriate subdirectories of the /etc/ssl directory.
While we are using OpenSSL, we should also create a strong Diffie-Hellman group, which is used in negotiating Perfect Forward Secrecy with clients.
We can do this by typing:
openssl dhparam -out /etc/ssl/certs/dhparam.pem 2048
This may take a few minutes, but when it's done you will have a strong DH group at /etc/ssl/certs/dhparam.pem that we can use in our configuration.

Configure Nginx to Use SSL
We have created our key and certificate files under the /etc/ssl directory. Now we just need to modify our Nginx configuration to take advantage of these.
We will make a few adjustments to our configuration:
- We will create a configuration snippet containing our SSL key and certificate file locations.
- We will create a configuration snippet containing strong SSL settings that can be used with any certificates in the future.
- We will adjust our Nginx server blocks to handle SSL requests and use the two snippets above.
First, let's create a new Nginx configuration snippet in the /etc/nginx/snippets directory:
nano /etc/nginx/snippets/self-signed.conf
Within this file, we just need to set the ssl_certificate directive to our certificate file and the ssl_certificate_key to the associated key. In our case, this will look like this:
ssl_certificate /etc/ssl/certs/nginx-selfsigned.crt;
ssl_certificate_key /etc/ssl/private/nginx-selfsigned.key;

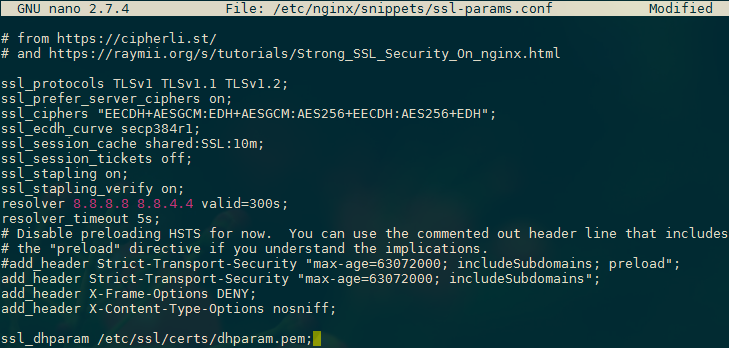
Next, we will create another snippet that will define some SSL settings. This will set Nginx up with a strong SSL cipher suite and enable some advanced features that will help keep our server secure.
The parameters we will set can be reused in future Nginx configurations, so we will give the file a generic name:
nano /etc/nginx/snippets/ssl-params.conf
# from https://cipherli.st/
# and https://raymii.org/s/tutorials/Strong_SSL_Security_On_nginx.html

ssl_protocols TLSv1 TLSv1.1 TLSv1.2;
ssl_prefer_server_ciphers on;
ssl_ciphers "EECDH+AESGCM:EDH+AESGCM:AES256+EECDH:AES256+EDH";
ssl_ecdh_curve secp384r1;
ssl_session_cache shared:SSL:10m;
ssl_session_tickets off;
ssl_stapling on;
ssl_stapling_verify on;
resolver 8.8.8.8 8.8.4.4 valid=300s;
resolver_timeout 5s;
# Disable preloading HSTS for now.  You can use the commented out header line that includes
# the "preload" directive if you understand the implications.
#add_header Strict-Transport-Security "max-age=63072000; includeSubdomains; preload";
add_header Strict-Transport-Security "max-age=63072000; includeSubdomains";
add_header X-Frame-Options DENY;
add_header X-Content-Type-Options nosniff;

ssl_dhparam /etc/ssl/certs/dhparam.pem;
Because we are using a self-signed certificate, the SSL stapling will not be used. Nginx will simply output a warning, disable stapling for our self-signed cert, and continue to operate correctly.
Adjust the Nginx Configuration to Use SSL
Now that we have our snippets, we can adjust our Nginx configuration to enable SSL.
In this guide we are using the default server block file in the /etc/nginx/sites-available directory. If you are using a different server block file, substitute its name in the below commands. Before we go any further, let's back up our current server block file:
cp /etc/nginx/sites-available/default /etc/nginx/sites-available/default.bak
Now, open the server block file to make adjustments:
nano /etc/nginx/sites-available/default

We will be modifying this configuration so that unencrypted HTTP requests are automatically redirected to encrypted HTTPS. This offers the best security for our sites. If you want to allow both HTTP and HTTPS traffic, use the alternative configuration that follows.
Next, we need to start a new server block directly below to contain the remaining configuration. We can uncomment the two listen directives that use port 443. We can add http2 to these lines in order to enable HTTP/2 within this block. Afterwards, we just need to include the two snippet files we set up:
server {
	listen 80 default_server;
  listen [::]:80 default_server;
	return 301 https://$server_name$request_uri;

	# SSL configuration
	#
	listen 443 ssl http2 default_server;
	listen [::]:443 ssl http2 default_server;
	include snippets/self-signed.conf;
	include snippets/ssl-params.conf;

Now we have to add the SSL configuration to our MotionEye server block in /etc/nginx/sites-enabled/motioneye.local:
server {
    listen 80;
    return 301 https://$server_name$request_uri;
}

server {
    listen 443 ssl http2;
	  server_name 192.168.2.111;
    include snippets/self-signed.conf;
    include snippets/ssl-params.conf;
    location /dashboard/ {
        proxy_pass            http://127.0.0.1:8765/;
        proxy_read_timeout    1800;
        proxy_connect_timeout 1800;
        access_log off;
    }
}
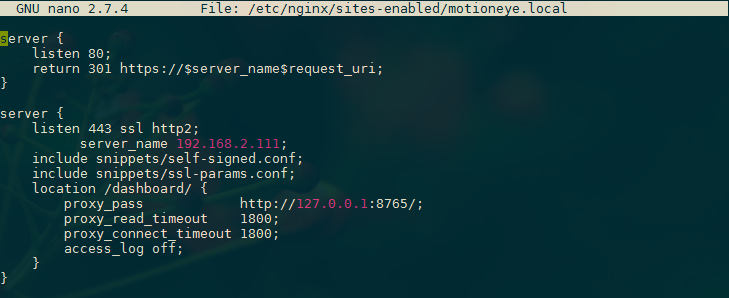
Now we can restart Nginx to implement our new changes:
nginx -t

Notice the warning in the beginning. As noted earlier, this particular setting throws a warning since our self-signed certificate can't use SSL stapling. This is expected and our server can still encrypt connections correctly.
If your output matches the above, your configuration file has no syntax errors. We can safely restart Nginx to implement our changes:
service nginx reload
