Zabbix Agent

Adding New Hosts
Updates
See Update below for Zabbix Agent 2
Option1 Zabbix Agent Container
Zabbix agent is not available (for 3m)
For passive only agents, host availability is used with 3m as time threshold
Get value from agent failed: cannot connect to [[127.0.0.1]:10050]: [111] Connection refused
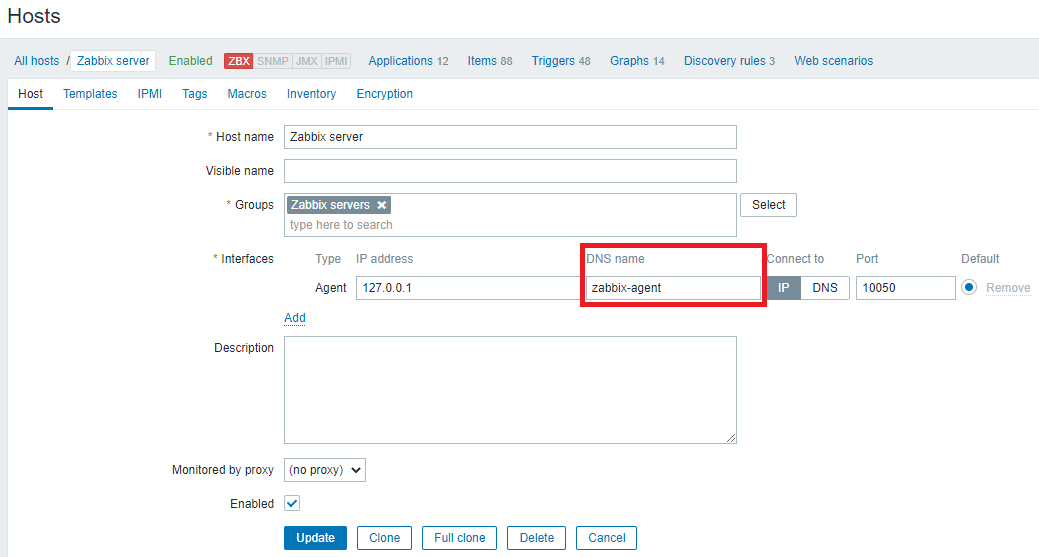
Information about configured hosts in Zabbix is available in Configuration → Hosts. There is already one pre-defined host, called Zabbix server, but we want to learn adding another. To add a new host, click on Create host. This will present us with a host configuration form.
All hosts that you want to monitor have to have the [Zabbix Agent] installed. I will use the official Docker image to do that on my host machine:
docker run --name some-zabbix-agent -e ZBX_HOSTNAME="some-hostname" -e ZBX_SERVER_HOST="some-zabbix-server" -d zabbix/zabbix-agent:tag
Where some-zabbix-agent is the name you want to assign to your container, some-hostname is the hostname, it is Hostname parameter in Zabbix agent configuration file, some-zabbix-server is IP or DNS name of Zabbix server or proxy and tag is the tag specifying the version you want. See the list above for relevant tags, or look at the full list of tags.
docker run -p 10050:10050 -d --privileged --name ubuntuAsus-zabbix-agent -e ZBX_HOSTNAME="ubuntuAsus" -e ZBX_SERVER_HOST="192.168.2.110" zabbix/zabbix-agent:latest
Option2 Zabbix Agent Package
Run the below command to install Zabbix Agent on your host.
# Install Zabbix Agent DEB based system # #
sudo apt-get install zabbix-agent
Modify Zabbix Agent Configuration
Open zabbix_agentd.conf file and make below necessary changes (Add your Zabbix Server IP and add Zabbix Agent hostname) and save + Exit.
nano /etc/zabbix/zabbix_agentd.conf
Server=192.168.2.110
ServerActive=192.168.2.110
Hostname=ubuntuMaster
Restart Zabbix Agent
# For Systemd Systeme #
systemctl restart zabbix-agent.service
Adding New host in Zabbix server
Login to Zabbix Server web interface.
Step 1
- Go to Configuration Main menu
- Click Hosts Sub menu
- Then, Create Host button
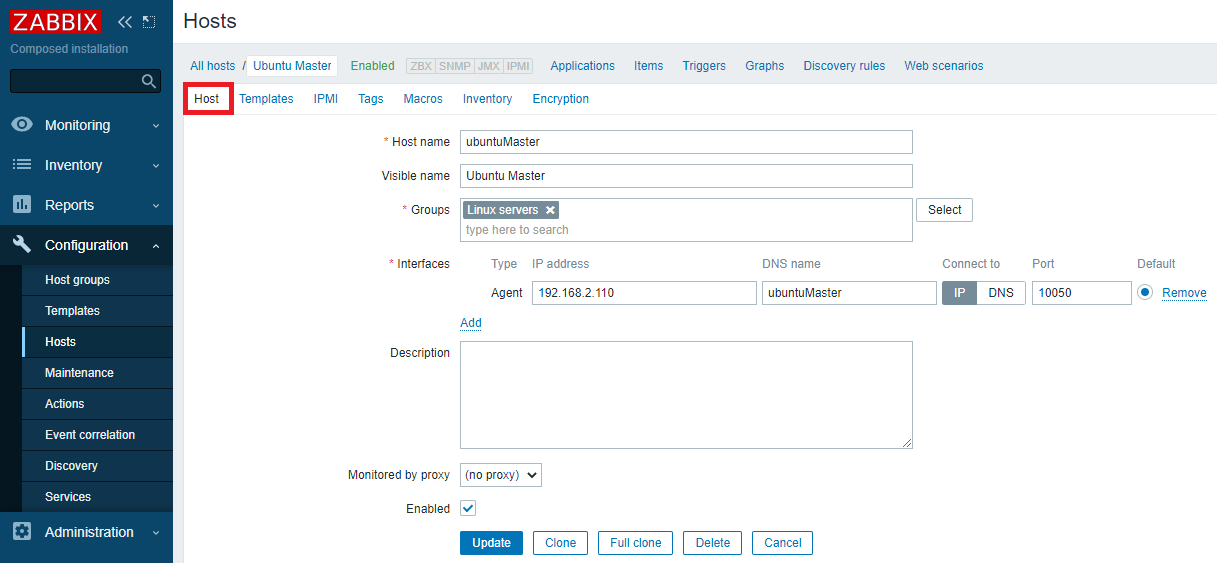
Step 2
- Enter your Original Host Name
- Enter visible name which you want to show the host
- Add Linux Servers group
- Add Zabbix Server IP
- Tick Enabled Check box to monitor the host
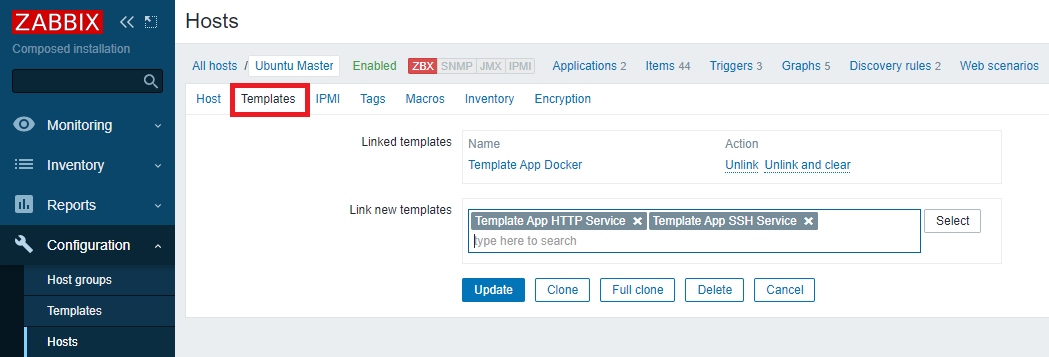
- Click Templates
- Click Select to add new template
- Choose
Template App Docker(A list of all available templates can be found under Configuration/Templates) - Add button to add the Template to new hosts
- Click Update to complete the process
Adding Encryption for Remote Hosts
For encryption we have an option to use PSK-based encryption. The secret should be minimum a 128-bit (16-byte PSK, entered as 32 hexadecimal digits) up to 2048-bit (256-byte PSK, entered as 512 hexadecimal digits). You can generate a 256 bit PSK secret on your server with openssl using the command:
mkdir /opt/zabbix
cd /opt/zabbix
openssl rand -hex 32 > agent_tls.psk
Now we have to add a user called zabbix and assign this file to him - so we don't run into permission error once we mount it into the Zabbix Agent container:
useradd -r -s /bin/false zabbix
chown zabbix:zabbix agent_tls.psk
We now have to restart the Zabbix Agent container with the following arguments:
docker run -p 10050:10050 -d \
  --privileged \
  --restart=unless-stopped \
  --name wiki-zabbix-agent \
  -v /opt/zabbix:/var/lib/zabbix/enc \
  -e ZBX_HOSTNAME=wiki \
  -e ZBX_SERVER_HOST=78.46.152.197 \
  -e ZBX_TLSCONNECT=psk \
  -e ZBX_TLSACCEPT=psk \
  -e ZBX_TLSPSKIDENTITY=wiki_server \
  -e ZBX_TLSPSKFILE=./agent_tls.psk \
  zabbix/zabbix-agent:latest
Note that the path for the TLS PSK File mounts into
/var/lib/zabbix/enc. To point to our PSK file we have to set the variable toZBX_TLSPSKFILE=./agent_tls.pskand NOTZBX_TLSPSKFILE=/var/lib/zabbix/enc/agent_tls.psk!
Our Zabbix Server will now loose it's connection:
active check configuration update from [zabbix_server:10051] started to fail (TCP successful, cannot establish TLS to [[zabbix_server]:10051]: SSL_connect() set result code to SSL_ERROR_SSL: file ssl/record/rec_layer_s3.c line 1543: error:14094410:SSL routines:ssl3_read_bytes:sslv3 alert handshake failure: SSL alert number 40: TLS read fatal alert "handshake failure")
   101:20200819:142514.648 failed to accept an incoming connection: from zabbix_server: unencrypted connections are not allowed
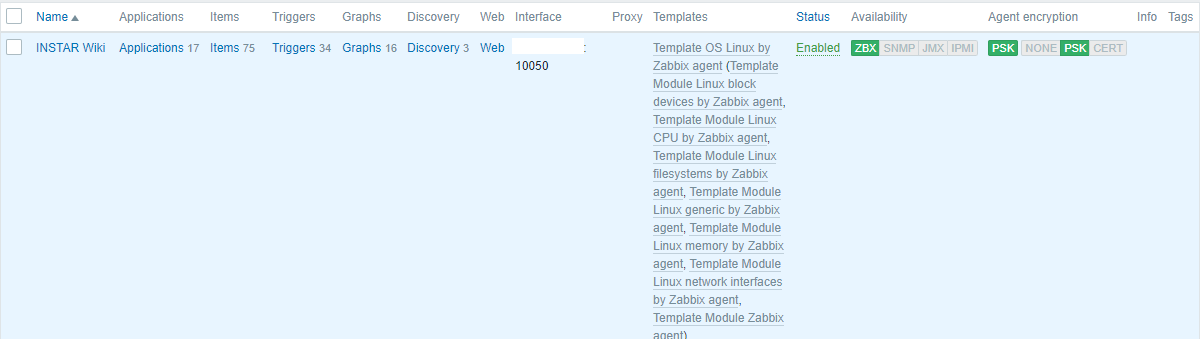
Copy your generated pre-shared key cat /opt/zabbix/agent_tls.psk and the TLS Identity you set above ZBX_TLSPSKIDENTITY into the host configuration in Zabbix Dashboard:
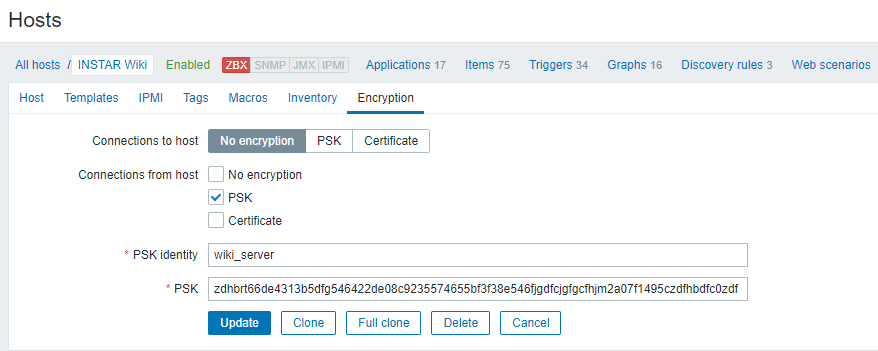
The connection should now show up as encrypted a short while afterwards:
Zabbix User Management
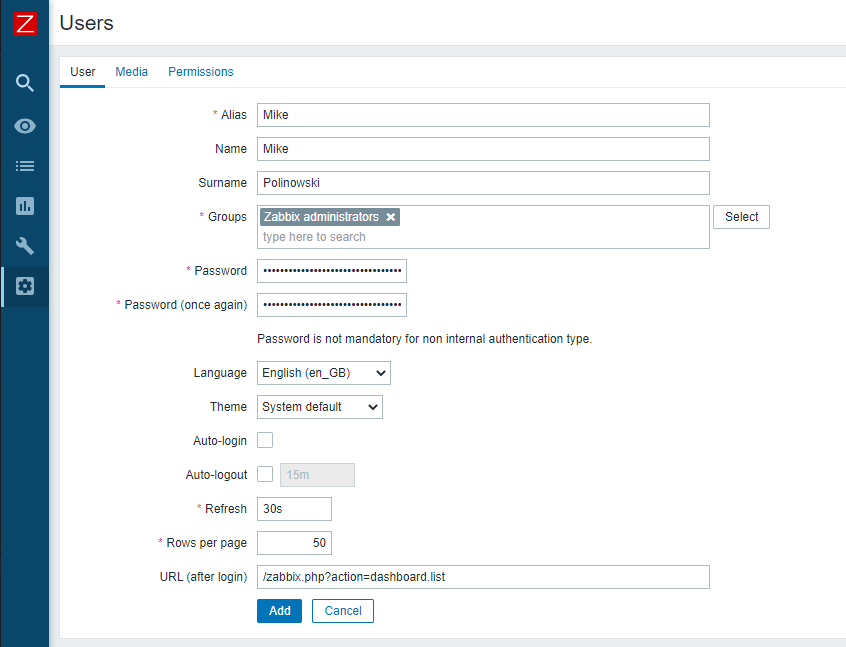
Go to Administration → Users and click on Create user. In the new user form, make sure to add your user to one of the existing user groups, for example Zabbix administrators:
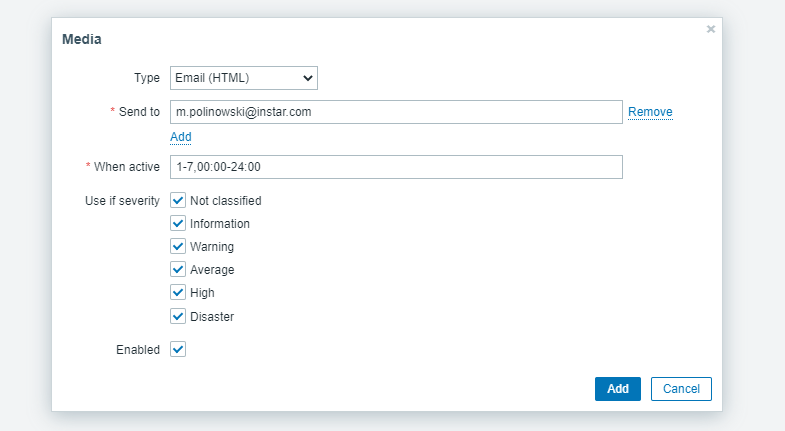
By default, new users have no media (notification delivery methods) defined for them. To create one, go to the Media tab and click on Add:
Adding Permissions
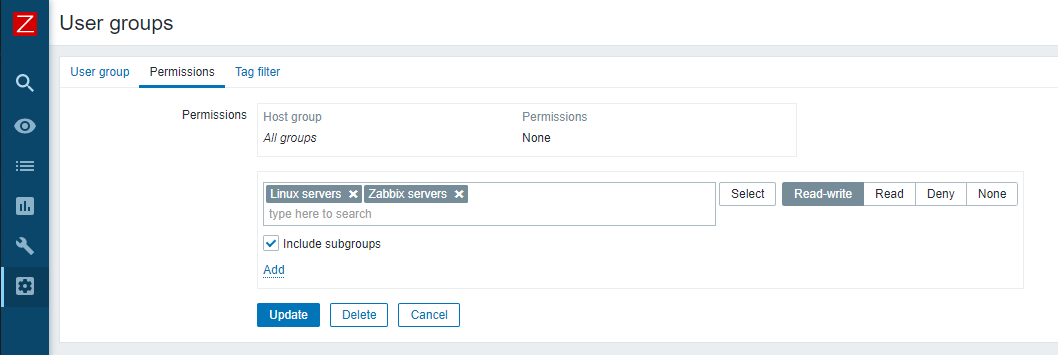
By default, a new user has no permissions to access hosts. To grant the user rights, click on the group of the user in the User Groups administration menu (in this case - Zabbix administrators). In the group properties form, go to the Permissions tab.
In this pop-up, mark the checkbox next to Linux servers, then click Select. Linux servers should be displayed in the selection field. Click the Read button to set permission level and then Add to add the group to the list of permissions. In the user group properties form, click Update.
Zabbix Agent 2
Zabbix Agent2 is a drop-in replacement for an old Zabbix agent. Then new agent provides very wide functionality and possibilities to develop plugins for extended monitoring. Agent2 is written in Go language and supports custom plugins that you can write as per your needs and tasks.
Install from Repository
Debian Buster
wget https://repo.zabbix.com/zabbix/5.0/debian/pool/main/z/zabbix-release/zabbix-release_5.0-1+buster_all.deb
dpkg -i zabbix-release_5.0-1+buster_all.deb
apt update
apt install zabbix-agent2
Ubuntu Xenial
wget https://repo.zabbix.com/zabbix/5.0/ubuntu/pool/main/z/zabbix-release/zabbix-release_5.0-1%2Bxenial_all.deb
dpkg -i zabbix-release_5.0-1+xenial_all.deb
apt update
apt install zabbix-agent


/etc/zabbix/zabbix_agentd.conf
/var/log/zabbix/zabbix_agentd.log
systemctl restart zabbix-agent.service
Debian Jessie
wget https://repo.zabbix.com/zabbix/5.0/debian/pool/main/z/zabbix-release/zabbix-release_5.0-1%2Bjessie_all.deb
dpkg -i zabbix-release_5.0-1+jessie_all.deb
apt update
apt install zabbix-agent


nano /etc/zabbix/zabbix_agentd.conf
cat /var/log/zabbix/zabbix_agentd.log
systemctl restart zabbix-agent.service
Ubuntu Bionic
wget https://repo.zabbix.com/zabbix/5.0/ubuntu/pool/main/z/zabbix-release/zabbix-release_5.0-1%2Bbionic_all.deb
dpkg -i zabbix-release_5.0-1+bionic_all.deb
apt update
apt install zabbix-agent2
Debian Stretch
wget https://repo.zabbix.com/zabbix/5.0/debian/pool/main/z/zabbix-release/zabbix-release_5.0-1%2Bstretch_all.deb
dpkg -i zabbix-release_5.0-1+stretch_all.deb
apt update
apt install zabbix-agent2
CentOS8
Pick the newest package and install it:
dnf install https://repo.zabbix.com/zabbix/5.4/rhel/8/x86_64/zabbix-agent-5.4.7-1.el8.x86_64.rpm
Note: It seems that Zabbix has dropped support for CentOS - I was not able to find the Agent v2 anymore.
After installing yum repository packages in our system. Use the following command to install the Zabbix agent on your CentOS 8 or RHEL 8 systems using the package management tool. Note that the configuration file is the following - the rest of the configuration is identical to Debian:
nano /etc/zabbix/zabbix_agentd.conf
After configuration run the service with:
systemctl enable zabbix-agent --now
systemctl status zabbix-agent
ERROR: zabbix-agent.service: Can't open PID file /run/zabbix/zabbix_agentd.pid (yet?) after start: No su...
Edit /usr/lib/tmpfiles.d/zabbix-agent.conf and change:
d /run/zabbix 0755 zabbix zabbix - -
to:
d /var/run/zabbix 0755 zabbix zabbix - -
Modify Zabbix Agent Configuration
mkdir /opt/zabbix
cd /opt/zabbix
openssl rand -hex 32 > agent_tls.psk
cat agent_tls.psk
Open zabbix_agent2.conf file and make below necessary changes (Add your Zabbix Server IP and add Zabbix Agent hostname) and save + Exit.
nano /etc/zabbix/zabbix_agent2.conf
Restart Zabbix Agent
# For Systemd Systems #
systemctl restart zabbix-agent2.service
iptables -I INPUT -p tcp -m multiport --destination-port 18015:10051 -j ACCEPT
du -sh *
find / -printf '%s %p\n'| sort -nr | head -10
find . -type f -exec sh -c '>"{}"' \;
iptables -L

-A INPUT -p tcp -m tcp --dport 10050 -j ACCEPT
-A OUTPUT -p tcp -m tcp --dport 10051 -j ACCEPT
cat /var/log/zabbix/zabbix_agent2.log
Install from Docker
docker pull zabbix/zabbix-agent2:latest

docker run --name some-zabbix-agent --link some-zabbix-server:zabbix-server -v /dev/sdc:/dev/sdc -d zabbix/zabbix-agent2:latest
Environment Variables
When you start the zabbix-agent2 image, you can adjust the configuration of the Zabbix agent 2 by passing one or more environment variables on the docker run command line.
ZBX_HOSTNAME | This variable is unique, case sensitive hostname. By default, value is hostname of the container. It is Hostname parameter in zabbix_agent2.conf. |
ZBX_SERVER_HOST | This variable is IP or DNS name of Zabbix server or Zabbix proxy. By default, value is zabbix-server. It is Server parameter in zabbix_agent2.conf. It is allowed to specify Zabbix server or Zabbix proxy port number using ZBX_SERVER_PORT variable. It make sense in case of non-default port for active checks. |
ZBX_PASSIVE_ALLOW | This variable is boolean (true or false) and enables or disables feature of passive checks. By default, value is true. |
ZBX_PASSIVESERVERS | The variable is comma separated list of allowed Zabbix server or proxy hosts for connections to Zabbix agent 2 container. |
ZBX_ACTIVE_ALLOW | This variable is boolean (true or false) and enables or disables feature of active checks. By default, value is true. |
ZBX_ACTIVESERVERS | The variable is comma separated list of allowed Zabbix server or proxy hosts for connections to Zabbix agent 2 container. You may specify port of Zabbix server or Zabbix proxy in such syntax: zabbix-server:10061,zabbix-proxy:10072. |
ZBX_TIMEOUT | The variable is used to specify timeout for processing checks. By default, value is 3. |
ZBX_DEBUGLEVEL | The variable is used to specify debug level. By default, value is 3. It is DebugLevel parameter in zabbix_agent2.conf. Allowed values are listed below: |
0- basic information about starting and stopping of Zabbix processes;1- critical information2- error information3- warnings4- for debugging (produces lots of information)5- extended debugging (produces even more information)
Additionally the image allows to specify many other environment variables listed below:
ZBX_ENABLEPERSISTENTBUFFER=false# Available since 5.0.0ZBX_PERSISTENTBUFFERPERIOD=1h# Available since 5.0.0ZBX_ENABLESTATUSPORT=ZBX_SOURCEIP=ZBX_ENABLEREMOTECOMMANDS=0# Deprecated since 5.0.0ZBX_LOGREMOTECOMMANDS=0ZBX_STARTAGENTS=3ZBX_HOSTNAMEITEM=system.hostnameZBX_METADATA=ZBX_METADATAITEM=ZBX_REFRESHACTIVECHECKS=120ZBX_BUFFERSEND=5ZBX_BUFFERSIZE=100ZBX_MAXLINESPERSECOND=20ZBX_LISTENIP=ZBX_UNSAFEUSERPARAMETERS=0ZBX_TLSCONNECT=unencryptedZBX_TLSACCEPT=unencryptedZBX_TLSCAFILE=BX_TLSCRLFILE=ZBX_TLSSERVERCERTISSUER=ZBX_TLSSERVERCERTSUBJECT=ZBX_TLSCERTFILE=ZBX_TLSKEYFILE=ZBX_TLSPSKIDENTITY=ZBX_TLSPSKFILE=ZBX_DENYKEY=system.run[*]# Available since 5.0.0ZBX_ALLOWKEY=# Available since 5.0.0
Default values of these variables are specified after equal sign.
The allowed variables are identical of parameters in official zabbix_agent2.conf configuration file. For example, ZBX_REFRESHACTIVECHECKS = RefreshActiveChecks.
Allowed Volumes
/etc/zabbix/zabbix_agentd.d | The volume allows include *.conf files and extend Zabbix agent 2 using UserParameter feature. |
/var/lib/zabbix/enc | The volume is used to store TLS related files. These file names are specified using ZBX_TLSCAFILE, ZBX_TLSCRLFILE, ZBX_TLSKEY_FILE and ZBX_TLSPSKFILE variables. |
/var/lib/zabbix/buffer | The volume is used to store the file, where Zabbix Agent2 should keep SQLite database. To enable the feature specify ZBX_ENABLEPERSISTENTBUFFER=true. Available since 5.0.0. |
docker run -p 10050:10050 \
--privileged \
--restart=unless-stopped \
--name zabbix-agent2 \
-v /opt/zabbix-wd:/var/lib/zabbix/enc \
-e ZBX_HOSTNAME=salt-minion \
-e ZBX_SERVER_HOST=192.168.2.110 \
-e ZBX_SERVER_PORT=10051 \
-e ZBX_TLSCONNECT=psk \
-e ZBX_TLSACCEPT=psk \
-e ZBX_TLSPSKIDENTITY=salt-minion \
-e ZBX_TLSPSKFILE=agent_tls.psk \
zabbix/zabbix-agent2:latest
openssl rand -hex 32 > /opt/zabbix-wd/agent_tls.psk