MLOps with ZenML
Installation
ZenML Server with Docker-Compose
Docker compose offers a simpl way of managing multi-container setups on your local machine, which is the case for instance if you are looking to deploy the ZenML server container and connect it to a MySQL database service also running in a Docker container.
docker-compose.yml
version: "3.9"

services:
  mysql:
    image: mysql:8.0
    ports:
      - 3306:3306
    volumes:
      - type: bind
        source: ./data
        target: /var/lib/mysql
    environment:
      - MYSQL_ROOT_PASSWORD=password
  zenml:
    image: zenmldocker/zenml-server
    ports:
      - "8888:8080"
    environment:
      - ZENML_STORE_URL=mysql://root:password@host.docker.internal/zenml
      - ZENML_DEFAULT_USER_NAME=admin
      - ZENML_DEFAULT_USER_PASSWORD=zenml
    links:
      - mysql
    depends_on:
      - mysql
    extra_hosts:
      - "host.docker.internal:host-gateway"
    restart: on-failure
Note: Changes I made to this file - compared to the official documentation are that I mounted a directory into the MySQL container to persist my data. And I had to change the outer server port
8080used by the ZenML Server to8888to avoid a port conflict on my server.
docker-compose -p zenml up -d
Verify that the ZenML interface is up and running by signing in - the dashboard will be hosted on your Servers IP on the outer port you defined in the compose file above (in my case port 8888). The admin login is the default user name and password from the compose file:

ZenML Client Python Package
ZenML is a Python package that can be installed directly via pip:
pip install zenml
To be able to use ZenML with the ML Framework of our choice we need to install the corresponding Integration, e.g.:
zenml integration install sklearn
Which works a bit like a package manager checking if you have all packages installed ZenML lists as a requirement when when working with SKLearn models.
You can connect your ZenML client using the following command:
zenml connect --url http://my-server:8888 --username admin --password zenml
And initialize the project pipeline:
rm -rf .zen
zenml init
Run the Classifier using a ZenML Pipeline
Define Steps
Define the classifier in 3 ZenML Pipeline steps - Data Loading, Model Training and Model Evaluation.
import numpy as np
from sklearn.base import ClassifierMixin
from sklearn.svm import SVC
from sklearn.datasets import load_digits
from sklearn.model_selection import train_test_split
from zenml import step
from typing_extensions import Annotated
from typing import Tuple
@step
def importer() -> Tuple[
    Annotated[np.ndarray, "X_train"],
    Annotated[np.ndarray, "X_test"],
    Annotated[np.ndarray, "y_train"],
    Annotated[np.ndarray, "y_test"],
]:
    """Load the digits dataset as numpy arrays."""
    digits = load_digits()
    data = digits.images.reshape((len(digits.images), -1))
    X_train, X_test, y_train, y_test = train_test_split(
        data, digits.target, test_size=0.2, shuffle=False
    )
    return X_train, X_test, y_train, y_test
@step
def svc_trainer(
            X_train: np.ndarray,
            y_train: np.ndarray
        ) -> ClassifierMixin:
    """Train the SVC classifier."""
    model = SVC(gamma=0.001)
    model.fit(X_train, y_train)

    return model
@step
def evaluator(
    X_test: np.ndarray,
    y_test: np.ndarray,
    model: ClassifierMixin
) -> float:
    """Calculate the model accuracy using the test set."""
    score = model.score(X_test, y_test)
    print(f"Test Accuracy: {score}")

    return score
Define Pipeline of Steps
from zenml import pipeline
@pipeline
def digits_classifier():
    """SVC digits classifier pipeline"""
    X_train, X_test, y_train, y_test = importer()
    model = svc_trainer(X_train, y_train=y_train)
    evaluator(X_test=X_test, y_test=y_test, model=model)
Initialize Pipeline
classifier = digits_classifier()
Initiating a new run for the pipeline: digits_classifier. Registered new version: (version 1). Executing a new run. Using user: admin Using stack: default orchestrator: default artifact_store: default Step importer has started. Step importer has finished in 3.163s. Step svc_trainer has started. Step svc_trainer has finished in 0.644s. Step evaluator has started. Test Accuracy: 0.9583333333333334 Step evaluator has finished in 0.582s. Run digits_classifier-2023_09_27-08_22_04_011726 has finished in 6.684s. Dashboard URL: http://my-server:8888/workspaces/default/pipelines/32b2fbc0-765b-48d9-badd-75d60e1f46fa/runs/a9ffc4c6-5a2b-4560-bb8b-beab259b4bf1/dag32b2fbc0-765b-48d9-badd-75d60e1f46fa/runs/a9ffc4c6-5a2b-4560-bb8b-beab259b4bf1/dag
Visualize the Results
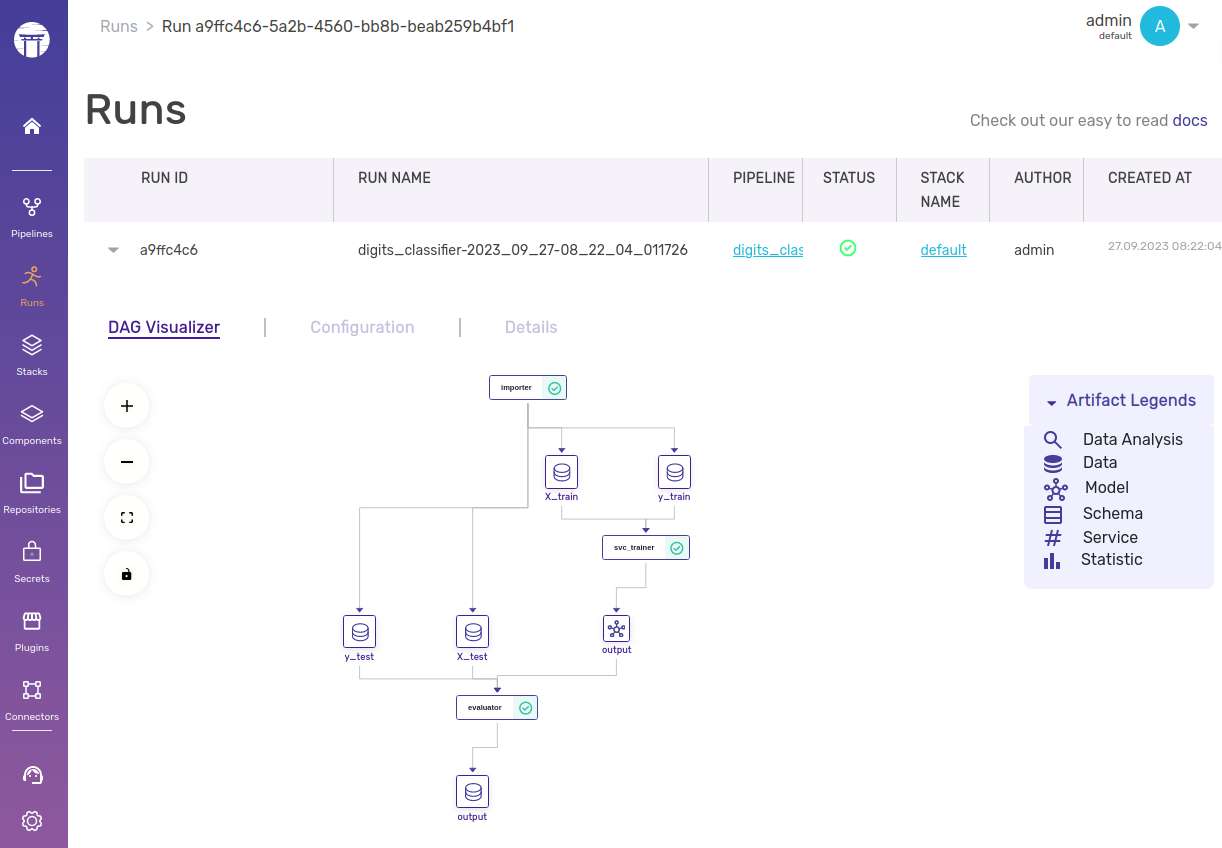
Head over to the dashboard URL given above to see the visualization of the pipeline run:
