JavaScript and Getting Started with APIs and AJAX

Prerequisite
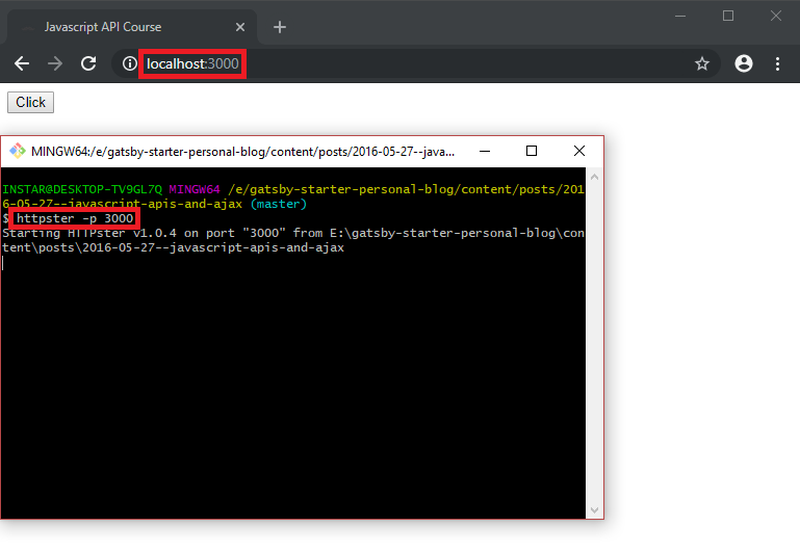
We are going to write Javascript files in this course that we cannot simply execute inside our web broser. For this I am going to use the Node.js Mini Webserver httpster - this way I am able to serve my files with a simple command from the directory where I stored my files:
httpster -p 3000
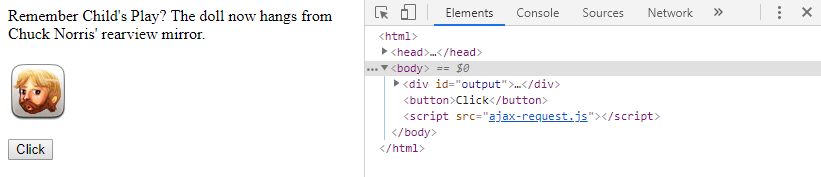
We only need a simple HTML Boilerplate to wrap our Javascript files in with the name index.html:
<html>
    <title>Javascript API Course</title>
    <body>
        <div id='output'></div>
        <button>Click</button>
        <script src='ajax-request.js'></script>
    </body>
</html>
Now I can open my web browser on localhost:3000 to see my website:
XHR Requests
XMLHttpRequest (XHR) is an API available to web browser scripting languages such as JavaScript. It is used to send HTTP or HTTPS requests to a web server and load the server response data back into the script.
An Ajax call is an asynchronous request initiated by the browser that does not directly result in a page transition. An Ajax ('Asynchronous Javascript and XML') request is sometimes called an XHR request ('XmlHttpRequest'), which is the name most browsers give the object used to send an Ajax request, because at least initially Ajax calls involved the sending and receiving of XML but now it's just as common to send/receive JSON, plain text or HTML.
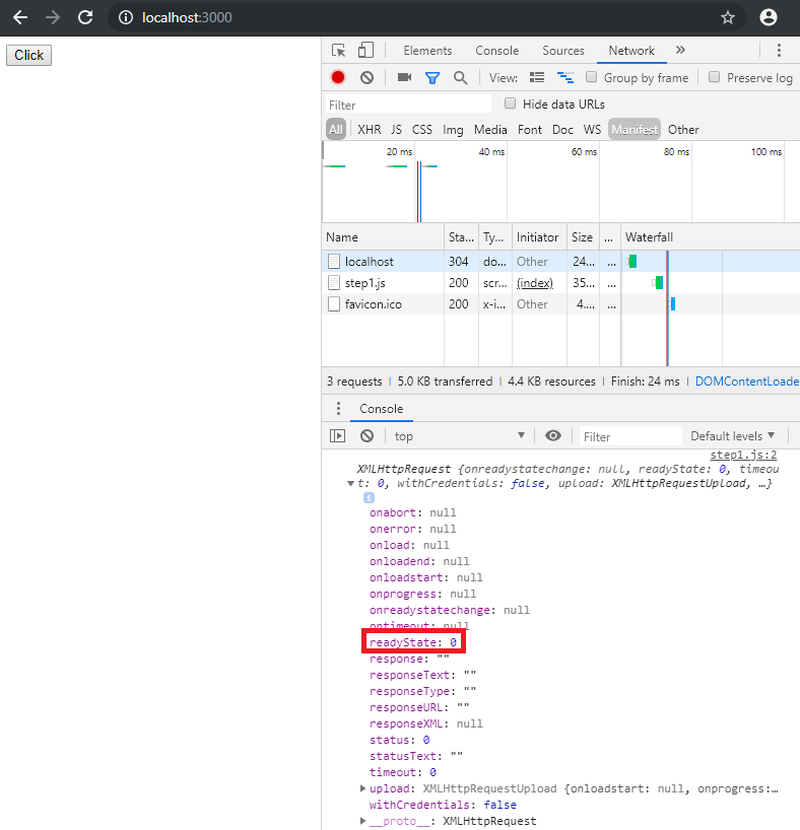
Ok then, let's start with creating an XMLHttpRequest Object inside the file ajax-request.js that we linked into our HTML page above:
const xhr = new XMLHttpRequest();
console.log(xhr);
The XMLHttpRequest.readyState property returns the state an XMLHttpRequest client is in. Since we created it but not yet called open() it is currently UNSENT or 0:
The open() call for the request takes 2 arguments. First the kind of request we want to make - we need a HTTP GET request. And secondly we need to say what URL we want to connect to. For the latter we can use the Chuck Norris API that is free to use:
const xhr = new XMLHttpRequest();
const url = 'https://api.chucknorris.io/jokes/random';
xhr.open('GET', url);
console.log(xhr);
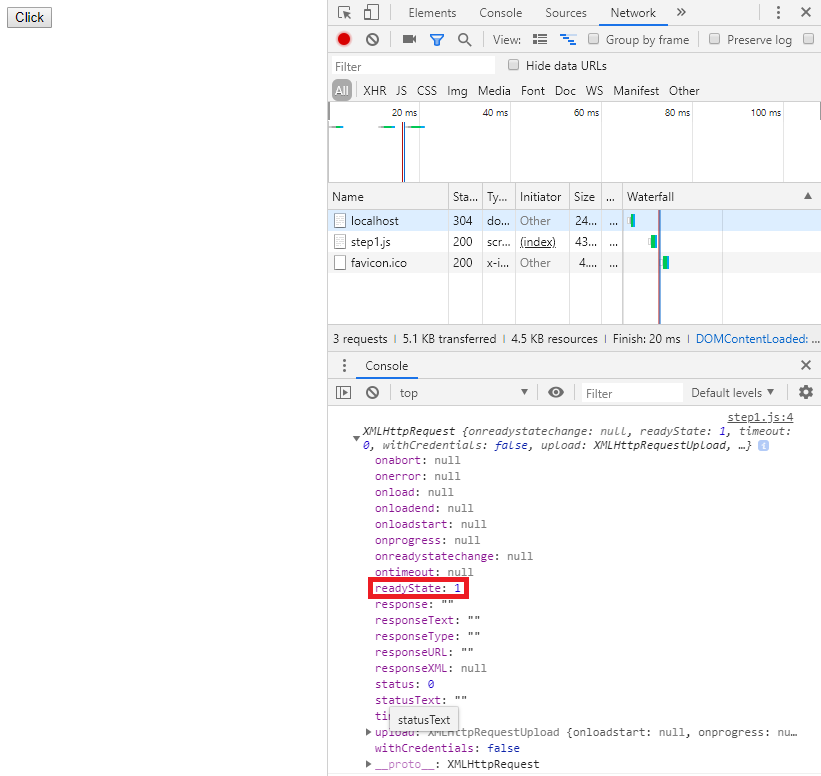
The open() method has been invoked and the readyState is now OPENED or 1 - meaning that the connection to the API has been established. During this state, the send() method can be called which will initiate the fetch. We can record the steps with the onreadystatechange method:
const xhr = new XMLHttpRequest();
const url = 'https://api.chucknorris.io/jokes/random';

xhr.onreadystatechange = function() {
    console.log(
        xhr.readyState
    );
}
xhr.open('GET', url);
xhr.send();

console.log(xhr);
We can see that the Request was received by the API and we are getting a HTTP Status of 200 - meaning that the resource of the GET request has been fetched and is transmitted in the message body.
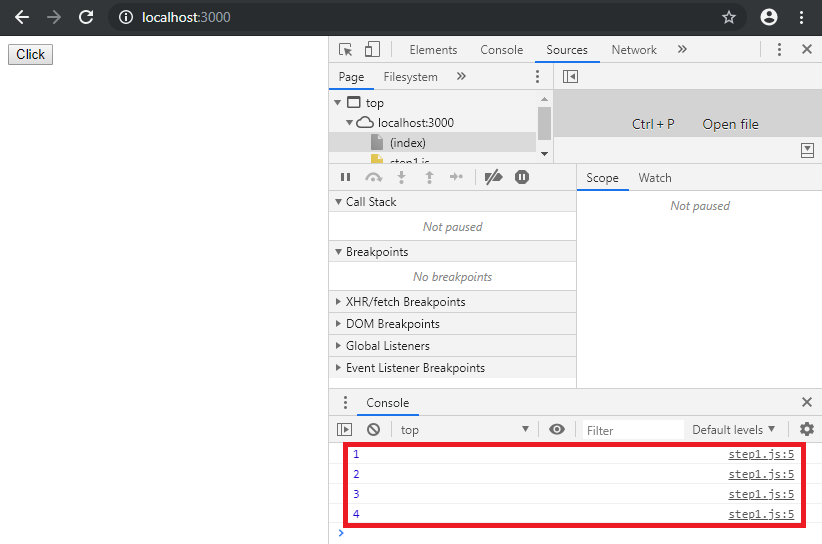
The state changes from 1-4 representing the XMLHttpRequest readyState:
- OPENED
- HEADERS_RECEIVED
- LOADING
- DONE
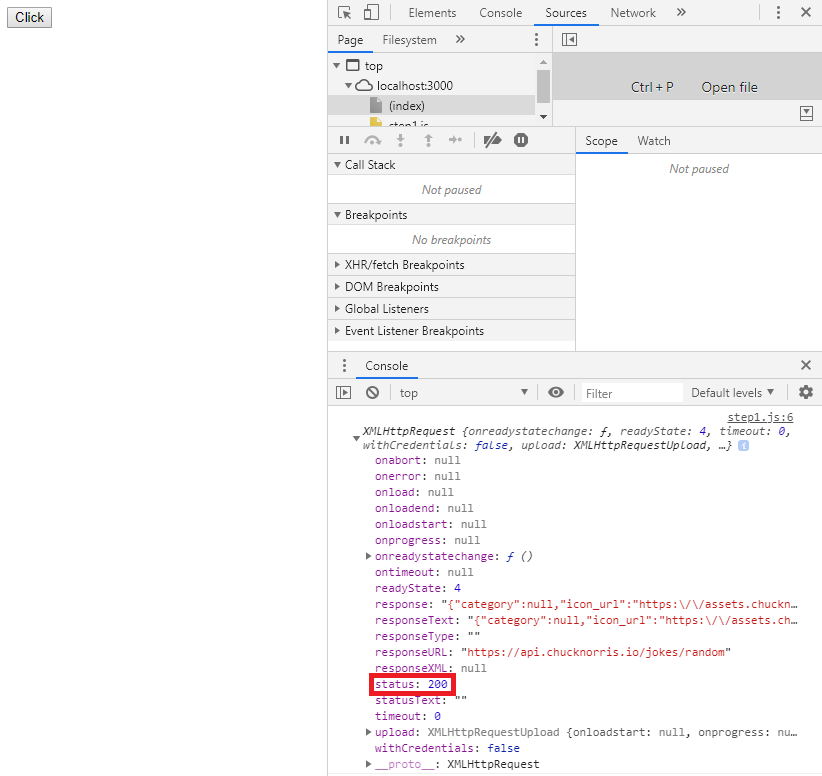
The data that we receive from our API is only available after we reached the readyState 4 on our API call and the request gave us a HTTP Status 200! We can use an if-statement to make sure that we do not request the xhr response before this is assured:
const xhr = new XMLHttpRequest();
const url = 'https://api.chucknorris.io/jokes/random';

xhr.onreadystatechange = function() {
    if(xhr.readyState == 4 && xhr.status == 200) {
        console.log(xhr.response);
    }
}
xhr.open('GET', url);
xhr.send();
Right now we won't get anything if back if the request fails - we can change this by adding an else statement that throws us an error.
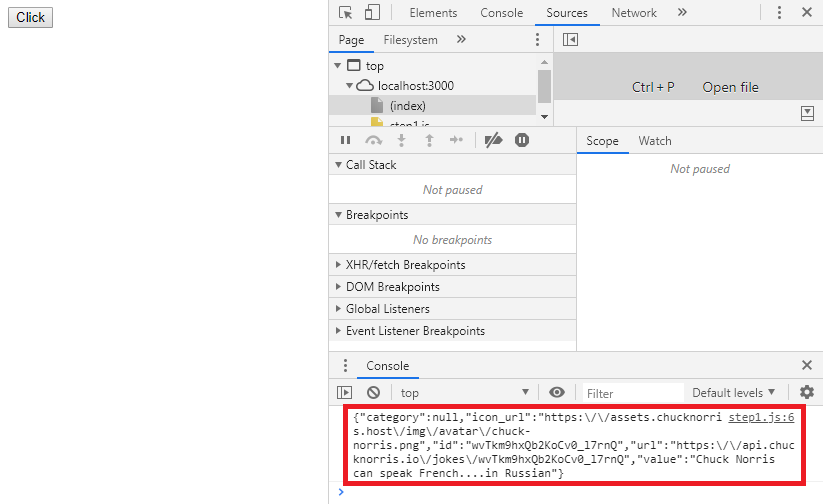
We can format the JSON response of our API using the Javascript JSON.parse() method. The JSON.parse() method parses a JSON string, constructing the JavaScript value or object described by the string.
const xhr = new XMLHttpRequest()
const url = 'https://api.chucknorris.io/jokes/random'

xhr.onreadystatechange = function() {
    if(xhr.readyState === 4){
        if(xhr.status === 200) {
        const str = xhr.responseText
        const obj = JSON.parse(str)
        console.log(obj)
    } else {
        output.innerHTML = 'ERROR'
    }
   }
}

xhr.open('GET', url)
xhr.send()
We are now able to work with the Javascript object we created and display the Chuck Norris quote in our website when we request the value of the API response and also add the image URL that corresponds with icon_url. For this we will use the DIV container we created with the id: output:
const output = document.querySelector('#output')
const xhr = new XMLHttpRequest()
const url = 'https://api.chucknorris.io/jokes/random'

xhr.onreadystatechange = function() {
    if(xhr.readyState === 4){
        if(xhr.status === 200) {
        const str = xhr.responseText
        const obj = JSON.parse(str)
        output.innerHTML = obj.value + '<br/><br/><img src=''+obj.icon_url+''><br/><br/>'
    } else {
        output.innerHTML = 'ERROR'
    }
   }
}

xhr.open('GET', url)
xhr.send()
Excellent! Now we can map our button to refresh the request every time we click it:
const btn = document.querySelector('button')
const output = document.querySelector('#output')

btn.addEventListener('click', getJoke)

function getJoke() {
  const xhr = new XMLHttpRequest()
  const url = 'https://api.chucknorris.io/jokes/random'

  xhr.onreadystatechange = function () {
    if (xhr.readyState === 4) {
      if (xhr.status === 200) {
        const str = xhr.responseText
        const obj = JSON.parse(str)
        output.innerHTML = obj.value + '<br/><br/><img src='' + obj.icon_url + ''><br/><br/>'
      } else {
        output.innerHTML = 'ERROR'
      }
    }
  }
  xhr.open('GET', url)
  xhr.send()
}

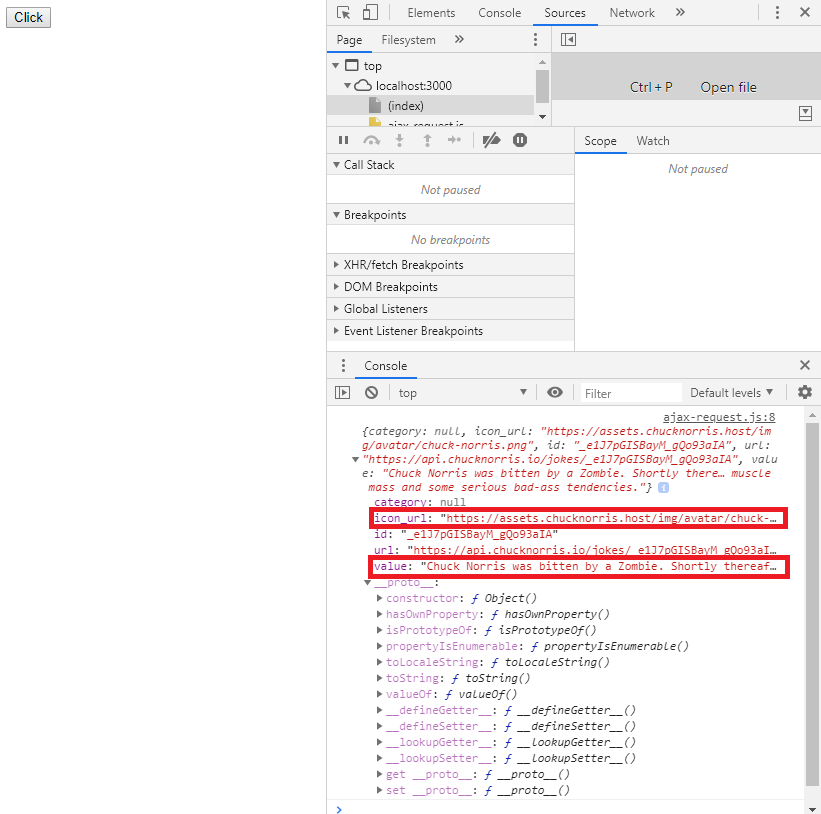
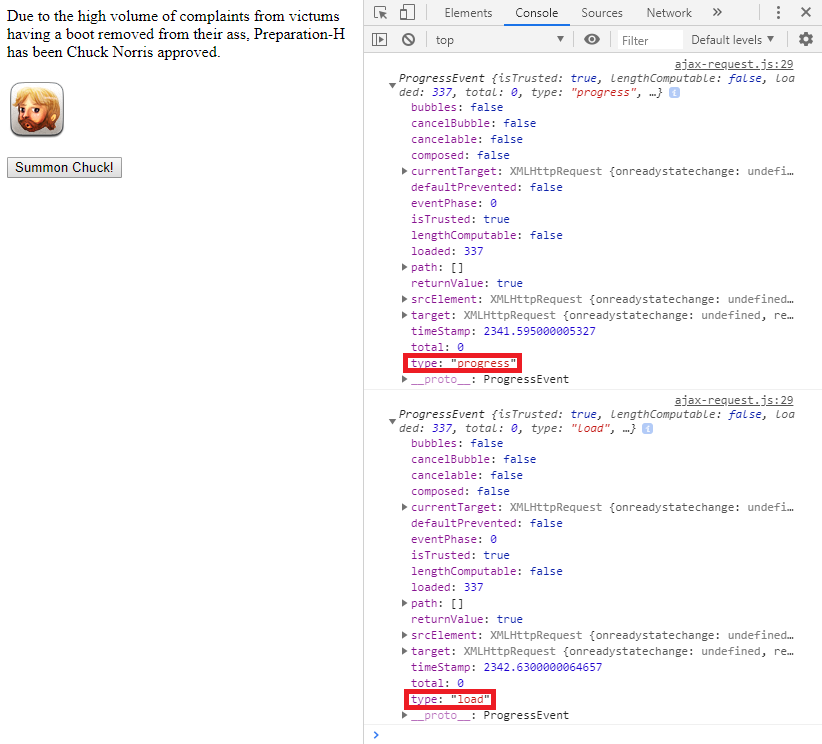
We can now add a few EventListeners to our Ajax request to get some more insights into the mechanics of it:
const btn = document.querySelector('button')
const output = document.querySelector('#output')

btn.addEventListener('click', getJoke)

function getJoke() {
  const xhr = new XMLHttpRequest()
  const url = 'https://api.chucknorris.io/jokes/random'

  xhr.onreadystatechange = function () {
    if (xhr.readyState === 4) {
      if (xhr.status === 200) {
        const obj = JSON.parse(xhr.responseText)
        output.innerHTML = obj.value + '<br/><br/><img src='' + obj.icon_url + ''><br/><br/>'
      } else {
        output.innerHTML = 'ERROR'
      }
    }
  }
  xhr.open('GET', url)
  xhr.send()

  xhr.addEventListener('progress', callBackfn)
  xhr.addEventListener('load', callBackfn)
  xhr.addEventListener('error', callBackfn)
}

function callBackfn(e) {
    console.log(e)
}
XHR Requests Parameters
We will start this with a new HTML template that gives us both an input field and a button:
<html>
    <title>Javascript API Course</title>
    <body>
        <input type='number'>
        <button>Click</button>
        <div id='output'></div>
        <script src='xhr-parameter.js'></script>
    </body>
</html>
The Javascript file that is linked in here adds an EventListener to the button and console logs the numeric value of the input field when the button is clicked:
const btn = document.querySelector('button');
const output = document.querySelector('#output');
const intake = document.querySelector('input');
btn.addEventListener('click', getInput);

function getInput() {
    console.log(intake.value);
}

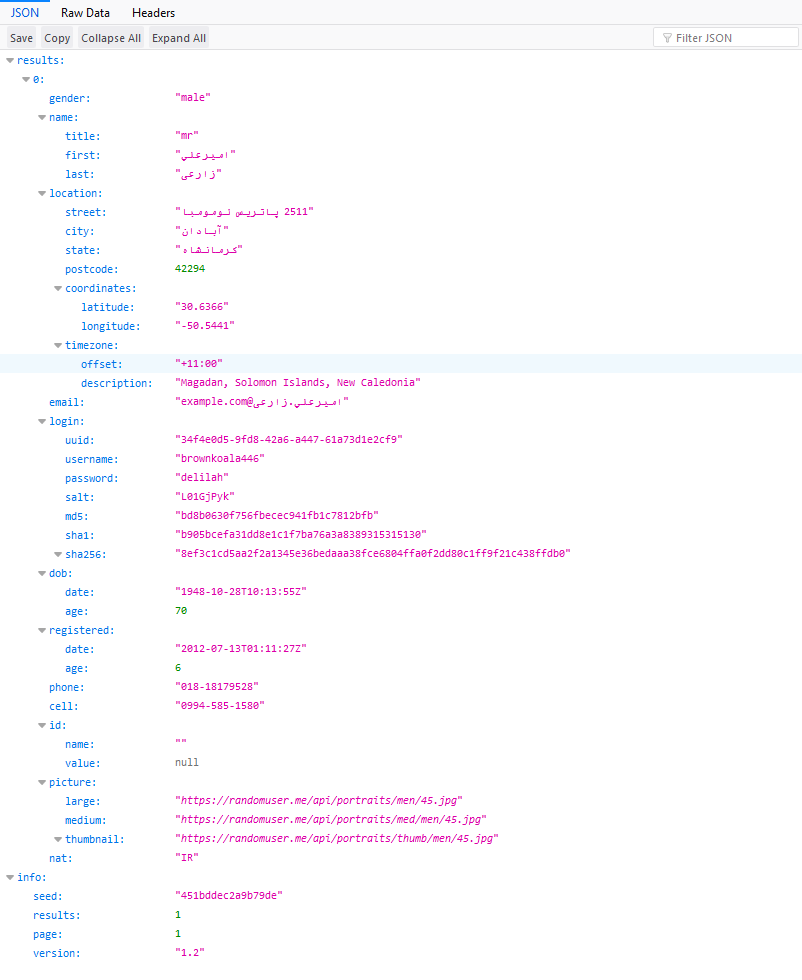
Great! We can now start with our work of connecting this to an API. In this part we going to use the open Random User API that can be reached over the following URL (that allows us to specify the amount of random user profiles we want to see returned to us):
https://randomuser.me/api/?results=1
The result for such an request is a JSON response from the API looking like this:
Let's add the xhr request to our JS file:
const btn = document.querySelector('button')
const output = document.querySelector('#output')
const intake = document.querySelector('input')

const url = 'https://randomuser.me/api/'

btn.addEventListener('click', getInput)


function getInput() {
  const xhr = new XMLHttpRequest()
  xhr.open('GET', url)
  xhr.onload = function (data) {
    console.log(data)
  }
  xhr.send()
}
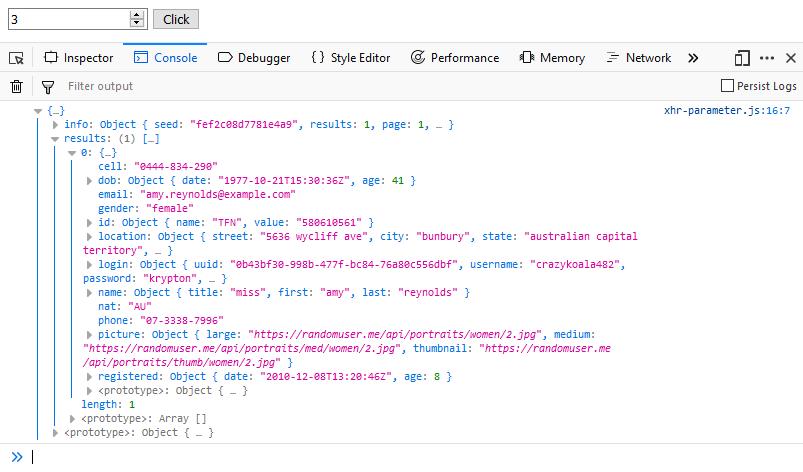
This code opens a connection to the API and retrieves a response onload:
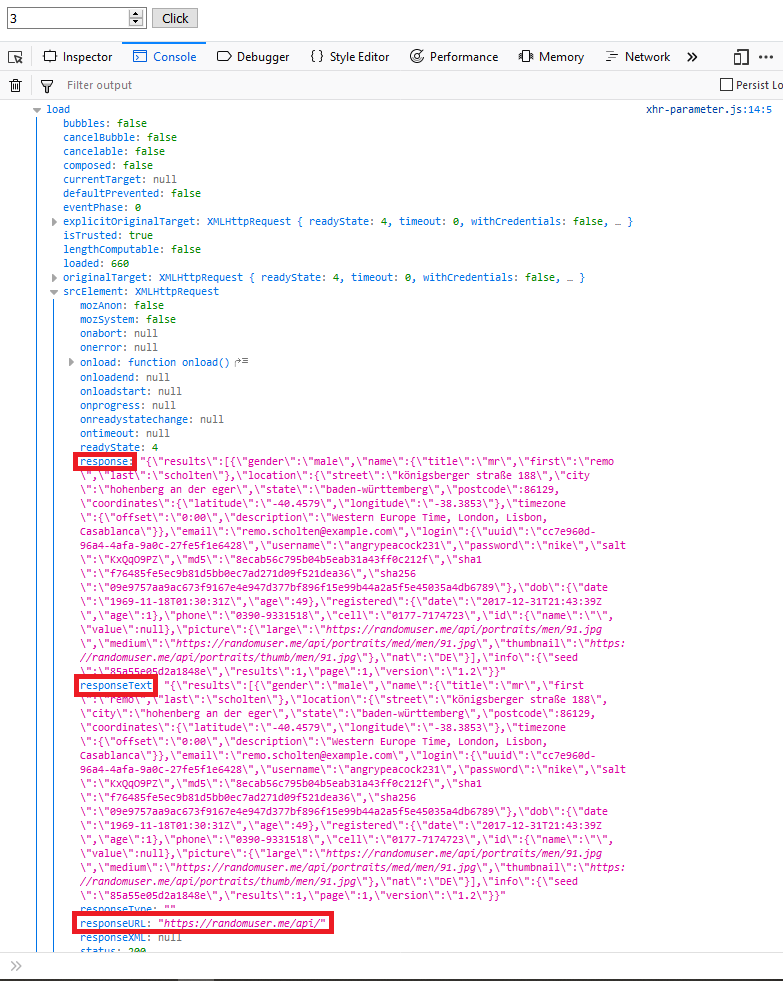
The xhr request is working. We can see that the information that we need can be found under responseText - let's modify our request accordingly and add the same error checks we used before before:
function getInput() {
  const xhr = new XMLHttpRequest()
  xhr.open('GET', url)
  xhr.onload = function () {
    if(xhr.readyState === 4 && xhr.status == '200') {
      let data = JSON.parse(xhr.responseText)
      console.log(data)
    } else {
      console.log('error')
    }
  }
  xhr.send()
}
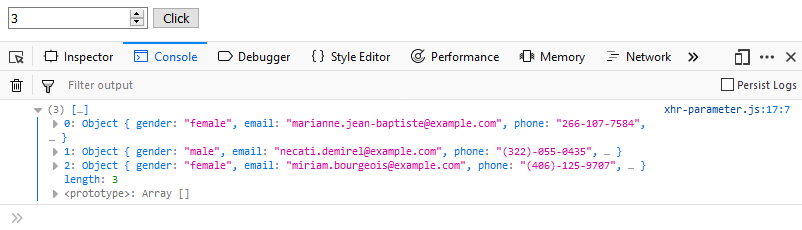
The console log now contains the JSON parsed data that we will need further on:
But we can further refine that we only need the result object of the response by modifying the line:
let data = JSON.parse(xhr.responseText).results
As we have seen before, we are able to specify the amount of users that we want to be returned from the API by adding a parameter to the URL. If we want to be able to set the number of users from the input field, this will look like this:
function getInput() {
  const xhr = new XMLHttpRequest()
  let tempVal = intake.value
  let tempURL = url + '?results=' +tempVal
  xhr.onload = function () {
    if(xhr.readyState === 4 && xhr.status == '200') {
      let data = JSON.parse(xhr.responseText).results
      console.log(data)
    } else {
      console.log('error')
    }
  }
  xhr.open('GET', tempURL)
  xhr.send()
}
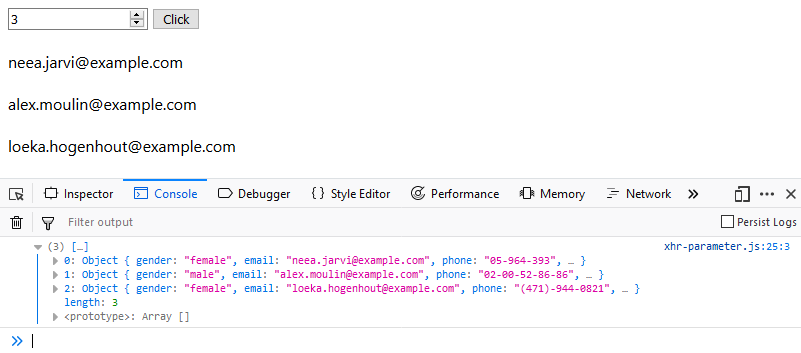
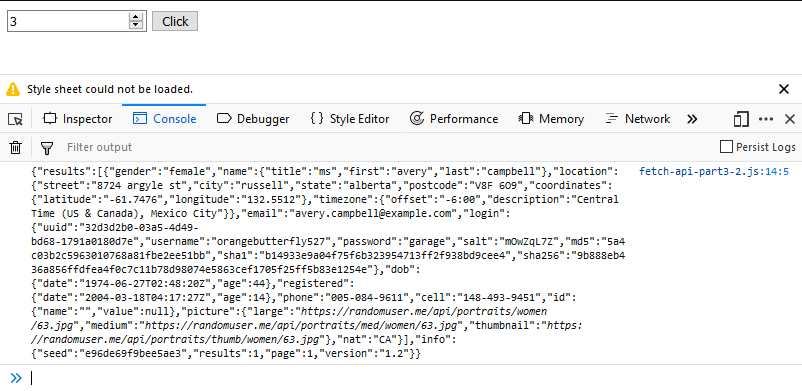
We creating a temporary value from the intake of the input field and add it to the base URL of the API - when we have the number 3 inside the input field and hit the Click button, we will now receive 3 user from the API response:
To print out this information, we can add another function outputHTML(data), loop over the array that we receive from the response and call that function from the xhr.onload function above:
function getInput() {
  const xhr = new XMLHttpRequest()
  let tempVal = intake.value
  let tempURL = url + '?results=' +tempVal
  xhr.onload = function () {
    if(xhr.readyState === 4 && xhr.status == '200') {
      let data = JSON.parse(xhr.responseText).results
      outputHTML(data)
    } else {
      console.log('error')
    }
  }
  xhr.open('GET', tempURL)
  xhr.send()
}

function outputHTML(data) {
  console.log(data)
  for(let i=0; i<data.length; i++) {
    output.innerHTML += '<br>' + data[i].email + '<br>'
  }
}
Javascript Fetch and Promises
The Fetch API supersedes the previously used XMLHttpRequest in ES6. It provides a JavaScript interface for accessing and manipulating parts of the HTTP pipeline, such as requests and responses. It also provides a global fetch() method that provides an easy, logical way to fetch resources asynchronously across the network.
The Promise returned from fetch() won’t reject on HTTP error status even if the response is an HTTP 404 or 500. Instead, it will resolve normally (with ok status set to false), and it will only reject on network failure or if anything prevented the request from completing.
By default, fetch won't send or receive any cookies from the server, resulting in unauthenticated requests if the site relies on maintaining a user session. A basic fetch request is really simple to set up. Have a look at the following code:
fetch('http://example.com/data.json')
  .then(function(response) {
    return response.json();
  })
  .then(function(myJson) {
    console.log(JSON.stringify(myJson));
  });
The fetch() requests a response and then works with promises for the following steps. We can now start to re-write our previous example using the Fetch API:
const btn = document.querySelector('button')
const output = document.querySelector('#output')
const intake = document.querySelector('input')

const url = 'https://randomuser.me/api/'

btn.addEventListener('click', getInput)


function getInput() {
  fetch(url)
    .then(function (response) {
      console.log(response);
    })
}
We can now add another promise and simply return the response from the first to be further worked on by the second:
function getInput() {
  fetch(url)
    .then(function (response) {
      return response.json();
    })
    .then(function(data) {
        console.log(data.results);
    })
}
The first promise receive the response from the API and transforms it into a Javascript object. The second promise receives the result as data and logs the result object to our console.
We can now add the API parameter again to be able to specify the number of results we want to get:
function getInput() {
    let userNumber = intake.value;
    let url = baseUrl + '?results=' + userNumber;
  fetch(url)
    .then(function (response) {
      return response.json();
    })
    .then(function(data) {
        console.log(data.results);
    })
}
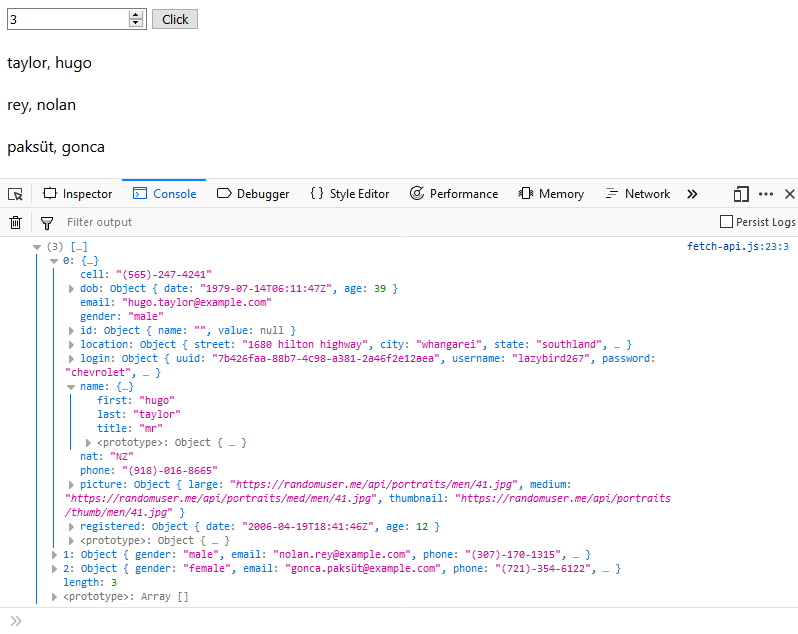
Now we need to add the loop back in to display our results:
function getInput() {
  let userNumber = intake.value;
  let url = baseUrl + '?results=' + userNumber;
  fetch(url)
    .then(function (response) {
      return response.json();
    })
    .then(function (data) {
      outputHTML(data);
    })
}

function outputHTML(data) {
  console.log(data.results)
  for (let i = 0; i < data.results.length; i++) {
    output.innerHTML += '<br>' + data.results[i].name.last + ', ' + data.results[i].name.first + '<br>'
  }
}
Fetch Response Methods
Using the Fetch API for Text Responses
If all we need is a text output, we can use the Fetch API in the following way:
const btn = document.querySelector('button')
const output = document.querySelector('#output')
const intake = document.querySelector('input')

const baseUrl = 'https://randomuser.me/api/'

btn.addEventListener('click', getInput)


function getInput() {
  fetch(baseUrl).then(function (response) {
    return response.text();
  }).then(function (data) {
    console.log(data);
  })
}
Using the Fetch API for Images
We can use the Javascript Fetch API to add images to our webpage. For this you need to add an image tag with an empty source to your html <img src=''> and rewrite the code from the previous step as follows:
const btn = document.querySelector('button')
const output = document.querySelector('#output')
const intake = document.querySelector('input')

btn.addEventListener('click', getInput)


function getInput() {
  let url = 'photo-34475542491_9069464269_o-cover.jpg';
  fetch(url).then(function (response) {
    return response.blob();
  }).then(function (data) {
    console.log(data);
    let pathImage = URL.createObjectURL(data);
    document.querySelector('img').src = pathImage;
  })
}
This code is fetching an image from the same directory our JS file is in with the name photo-34475542491_9069464269_o-cover.jpg. Here we have to change the response type from json to blob and use the createObjectURL( method to create a file URL, that is then added to the source of our empty image tag.
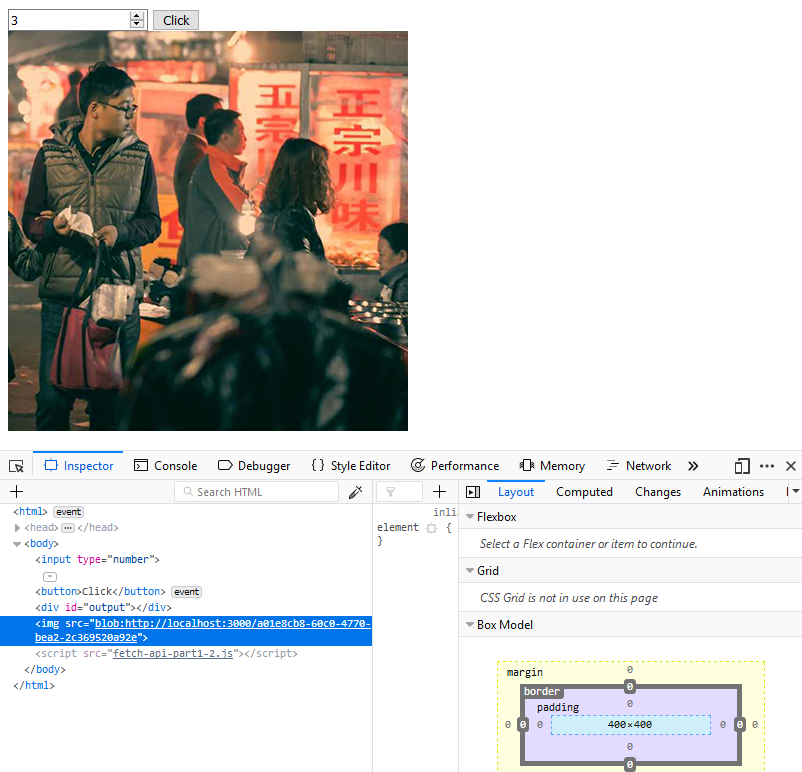
Note that the image URL is created and does not represent the location on our filesystem - in my case it is:
blob:http://localhost:3000/a01e8cb8-60c0-4770-bea2-2c369520a92e
Fetch Error Handling
The Fetch API offers the catch() method to help us with error handling - that is much neater than the if-else syntax we had before. To test it, we can create the following script:
const btn = document.querySelector('button')
const output = document.querySelector('#output')
const intake = document.querySelector('input')

const baseUrl = 'https://randomuser.me/apis/'

btn.addEventListener('click', getInput)


function getInput() {
  fetch(baseUrl).then(function (response) {
    return response.json();
  }).then(function (data) {
    console.log(data);
  })
  .catch(function(error) {
    console.log(error);
  })
}
Note that we introduced an error to the baseURL - it should be api not apis:
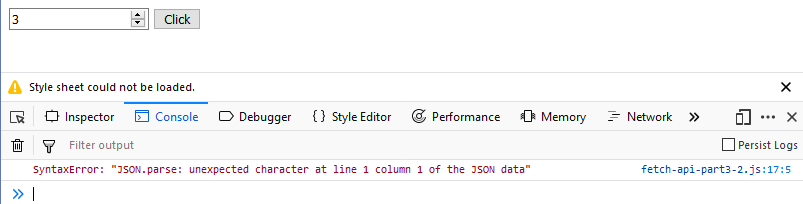
The error is caught and the error message printed to console.
Fetch Working with Headers
If our API requiers us to set specific header information for the request, we can create them in form of a Request Object that is then used by the fetch() method. We will start with the previous code and add the following:
const btn = document.querySelector('button')
const output = document.querySelector('#output')
const intake = document.querySelector('input')

const baseUrl = 'https://randomuser.me/api/'

btn.addEventListener('click', getInput)


function getInput() {
  let params = new Request(baseUrl, {
    method: 'GET',
    mode: 'cors',
    headers: new Headers(),
    cache: 'default'
  })
  fetch(params).then(function (response) {
    return response.json();
  }).then(function (data) {
    console.log(data);
  })
  .catch(function(error) {
    console.log(error);
  })
}
Fetch Working with JSON Endpoints
The website myjson.com allows you to store JSON data and access it through an URL. Just type a valid JSON object into the input field and press Save to be given an URL you can retrieve this information from:
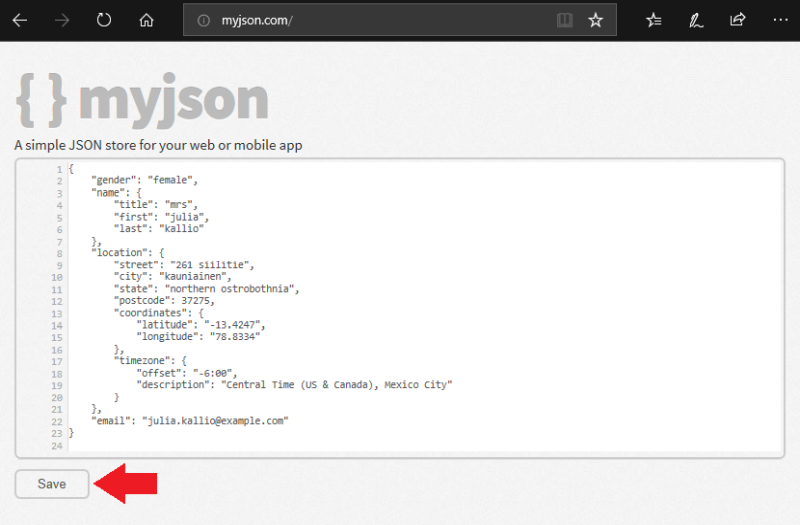
After clicking on save, the following URL was generated for me: https://api.myjson.com/bins/m1l12. Accessing this URL returns the JSON data as an text output. We can now use this URL for our fetch request:
const btn = document.querySelector('button')
const output = document.querySelector('#output')
const intake = document.querySelector('input')

const url = 'https://api.myjson.com/bins/m1l12'

btn.addEventListener('click', getInput)


function getInput() {
  fetch(url).then(function (response) {
    return response.json();
  }).then(function (data) {
    console.log(data);
  }).catch(function (error) {
    console.log(error);
  })
}
Running the script inside our browser will return the information in form of a Javascript object:

We can also add a new addition to Javascript to clean up our function - the Arrow Function:
function getInput() {
  fetch(url).then(res => res.json())
  .then(json => console.log(json))
  .catch(error => console.log(error))
}
We can write a JSON object that contains an array that allows us to loop through the API response:
{
    'results': [{
        'gender': 'male',
        'name': {
            'title': 'mr',
            'first': 'hellmut',
            'last': 'merz'
        }
    }, {
        'gender': 'female',
        'name': {
            'title': 'ms',
            'first': 'یسنا',
            'last': 'رضاییان'
        }
    }, {
        'gender': 'female',
        'name': {
            'title': 'mrs',
            'first': 'elsa',
            'last': 'simon'
        }
    }]
}
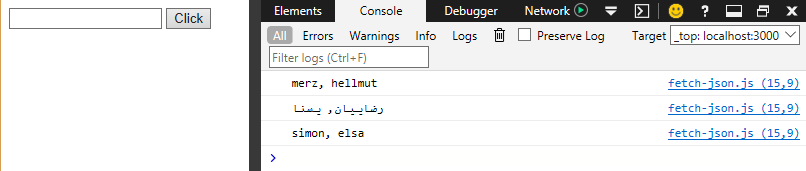
Adding the following for loop to the fetch request will give us the list of three names:
function getInput() {
  fetch(url).then(res => res.json())
    .then(function (data) {
      for (let i = 0; i < data.results.length; i++) {
        console.log(data.results[i].name.last + ', ' + data.results[i].name.first)
      }
    })
    .catch(error => console.log(error))
}
Fetch Working with JSON Endpoints Part II
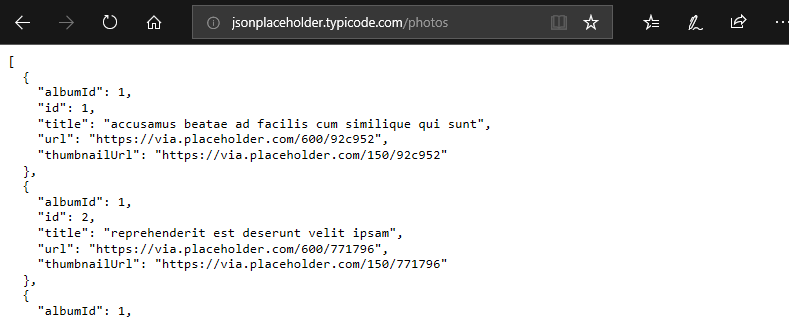
Another place to test your Javascript against a fake REST API is JSONPlaceholder. For example the URL http://jsonplaceholder.typicode.com/photos will give you a result of 5000 photos in an JSON array:
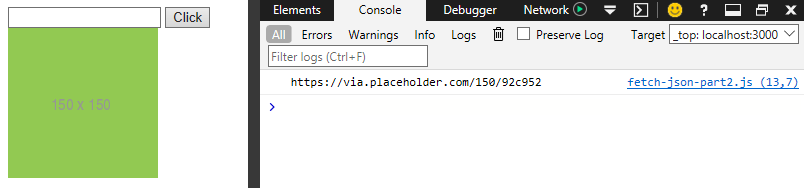
The following script will log the URL to the first thumbnail image to your browser console and will set the source for the empty image tag <img src=''> inside your html to this URL:
const btn = document.querySelector('button')
const output = document.querySelector('#output')
const intake = document.querySelector('input')

const url = 'http://jsonplaceholder.typicode.com/photos'

btn.addEventListener('click', getInput)


function getInput() {
  fetch(url).then(res => res.json())
    .then(function (data) {
      console.log(data[0].thumbnailUrl)
      document.querySelector('img').src=data[0].thumbnailUrl;
    })
    .catch(error => console.log(error))
}
Fetch Working with JSON Endpoints Part III
Yet another API to use is Swapi, the Star Wars API. We can connect to it using the following script:
const btn = document.querySelector('button')
const output = document.querySelector('#output')
const intake = document.querySelector('input')

const url = 'https://swapi.co/api/'

btn.addEventListener('click', getInput)


function getInput() {
  fetch(url).then(res => res.json())
    .then(function (data) {
      console.log(data)
    })
    .catch(error => console.log(error))
}
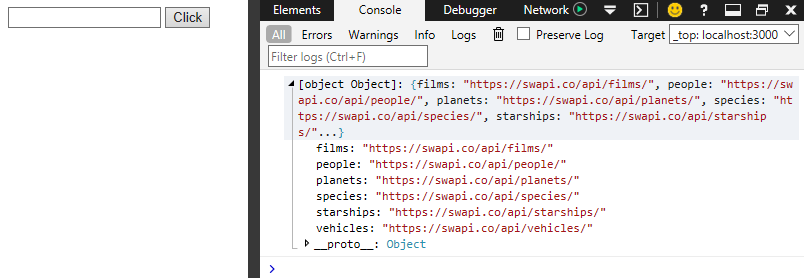
Testing the script shows us that there are sub categories that we can query - for example, we can just fetch information about planets in the Star Wars Universe by changing the Fetch URL to https://swapi.co/api/planets.
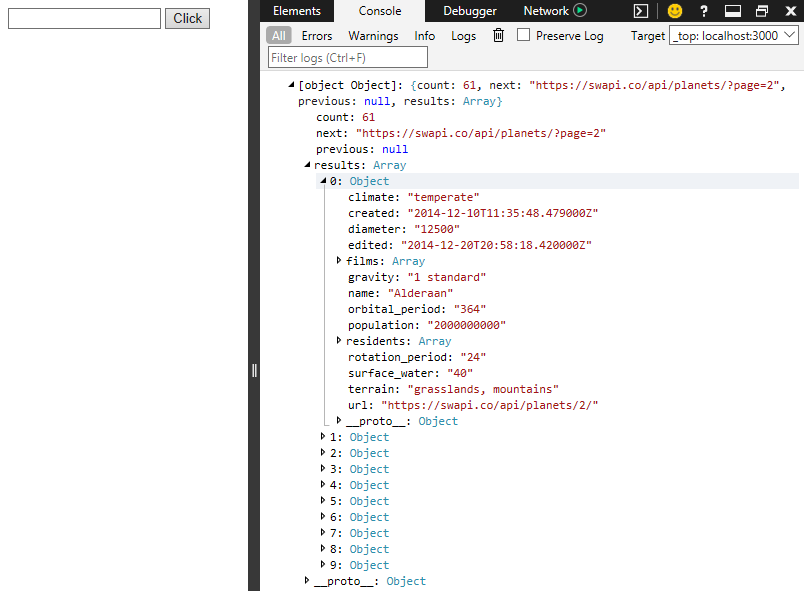
We can see that the database found us 61 planets but only returned 10 of them + an URL to get the next 10 https://swapi.co/api/planets/?page=2 - making it easy to paginate through large amount of data.
To get the name of a specific planet - lets say the ninths from the array - we just need to change the console.log() to console.log(data.results[8].name):

Building a Mini Application to interact with REST APIs
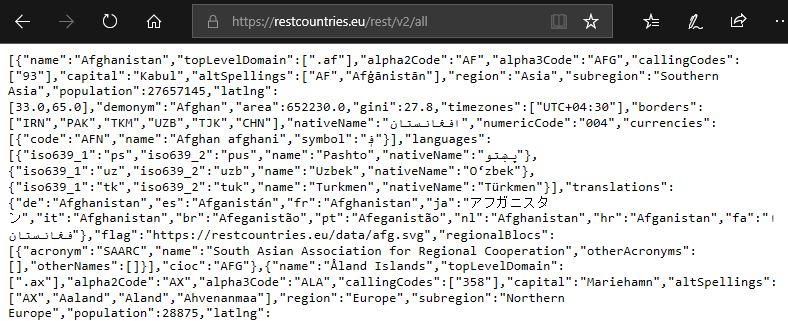
And another API - this time one called REST Countries that gives us access to a large quantity of information about countries - capital cities, language spoken, currency, etc. The complete set of data can be queried with the following URL https://restcountries.eu/rest/v2/all:
We can start by checking the API response with the following script:
const btn = document.querySelector('button')
const output = document.querySelector('#output')
const intake = document.querySelector('input')

const url = 'https://restcountries.eu/rest/v2/all'

btn.addEventListener('click', getInput)


function getInput() {
  fetch(url).then(res => res.json())
    .then(function (data) {
      console.log(data)
    })
    .catch(error => console.log(error))
}
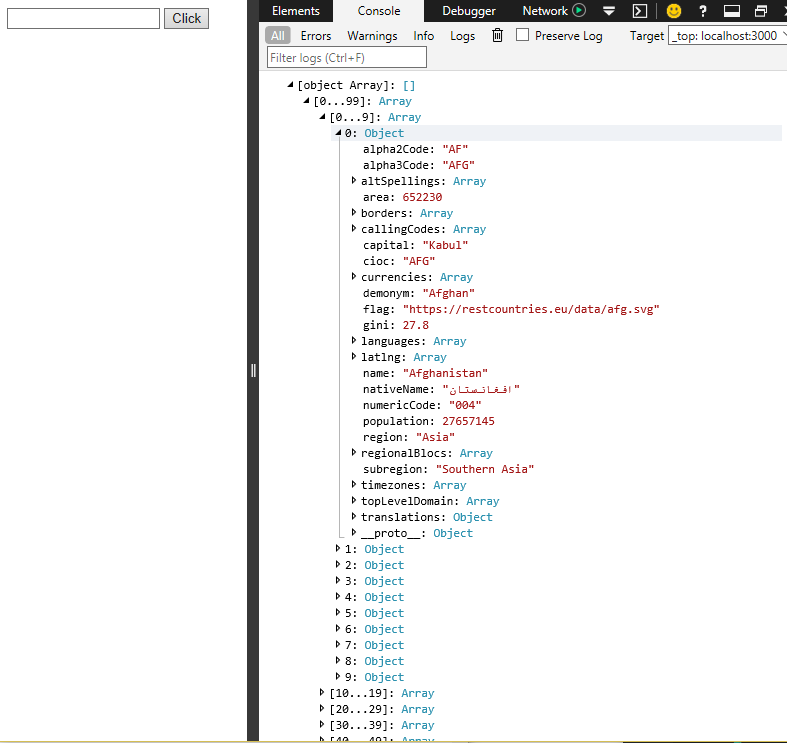
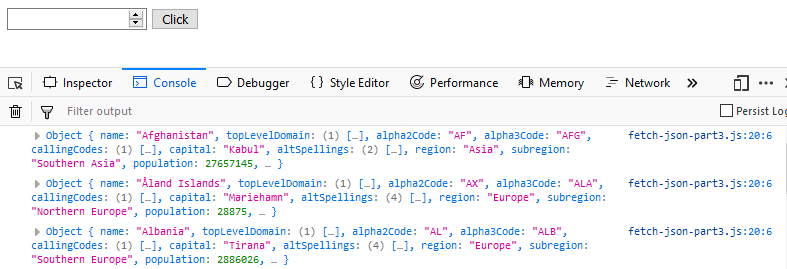
This returns to us the result we have seen earlier in form of a Javascript object that contains the first 250 countries:
We can now make a change to our script to no longer console.log() the result but instead writing the result into an object we call responseObject. We will create it first as an empty object and then add the data from the API response to it:
const btn = document.querySelector('button')
const output = document.querySelector('#output')
const intake = document.querySelector('input')

const url = 'https://restcountries.eu/rest/v2/all'
let responseObject = {}

fetch(url).then(res => res.json())
  .then(function (data) {
    responseObject = data;
  })
  .catch(error => console.log(error));
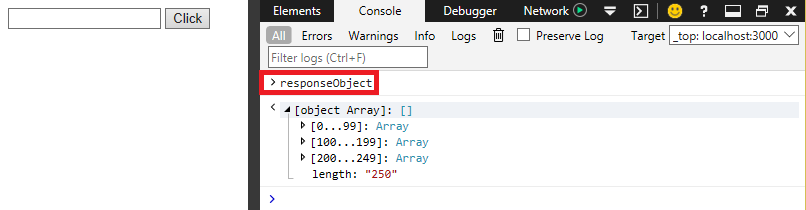
You will be able to query the responseObject after you refreshed the page - it does contain the API data.
We can now use a helper function to split up every country into it's own object and prepare it to be inserted into a select element on our page:
fetch(url).then(res => res.json())
  .then(function (data) {
    responseObject = data;
    buildSelect(data);
  })
  .catch(error => console.log(error));


 function buildSelect(data) {
   let select = document.createElement('select');
   data.forEach(function(item) {
     let option = document.createElement('option');
     console.log(item);
   })
 }
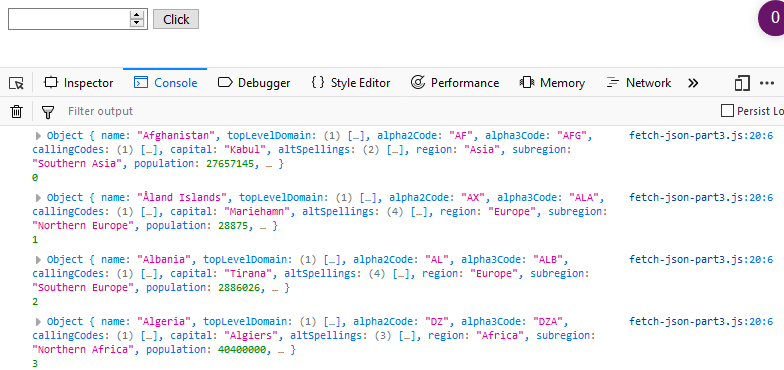
We can additionally output the index number of each country to be able to reference them:
 function buildSelect(data) {
   let select = document.createElement('select');
   data.forEach(function(item, index) {
     let option = document.createElement('option');
     console.log(item, index);
   })
 }
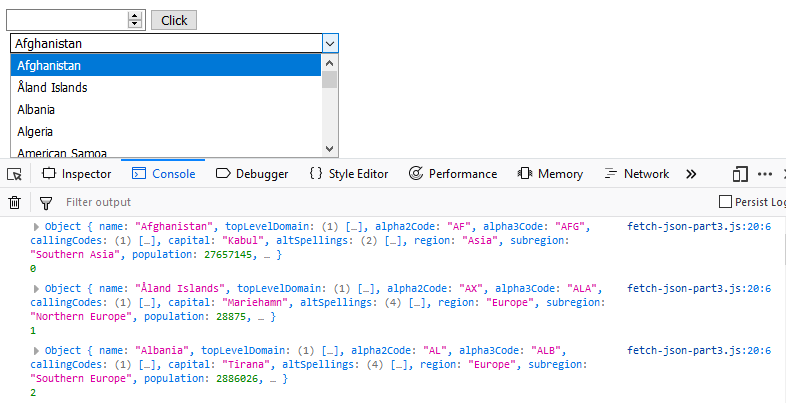
Now we need to assign each country to an option from the select drop-down menu using the index number and use the country name as textContent:
 function buildSelect(data) {
   let select = document.createElement('select');
   data.forEach(function(item, index) {
     let option = document.createElement('option');
     console.log(item, index);
     option.value = index;
     option.textContent = item.name;
     select.appendChild(option);
   })
   document.querySelector('body').appendChild(select);
 }
We can now get rid of the input field and click button and instead add an event listener that detects when the user selects an option and displays the corresponding country information below the drop down menu. We will start with adding the eventListener that reacts to Change and console.log() the event with another helper function:
function buildSelect(data) {
   let select = document.createElement('select');
   data.forEach(function(item, index) {
     let option = document.createElement('option');
     console.log(item, index);
     option.value = index;
     option.textContent = item.name;
     select.appendChild(option);
   })
   select.addEventListener('change', outputData)
   document.querySelector('body').appendChild(select);
 }


 function outputData(e) {
   console.log(e);
 }
From this event log we now need to record the target value - which corresponds to the index number of the selected country. This number can then be used to select the country out of the responseObject:
function buildSelect(data) {
let select = document.createElement('select');
data.forEach(function(item, index) {
let option = document.createElement('option');
console.log(item, index);
option.value = index;
option.textContent = item.name;
select.appendChild(option);
})
select.addEventListener('change', outputData)
document.querySelector('body').appendChild(select);
}
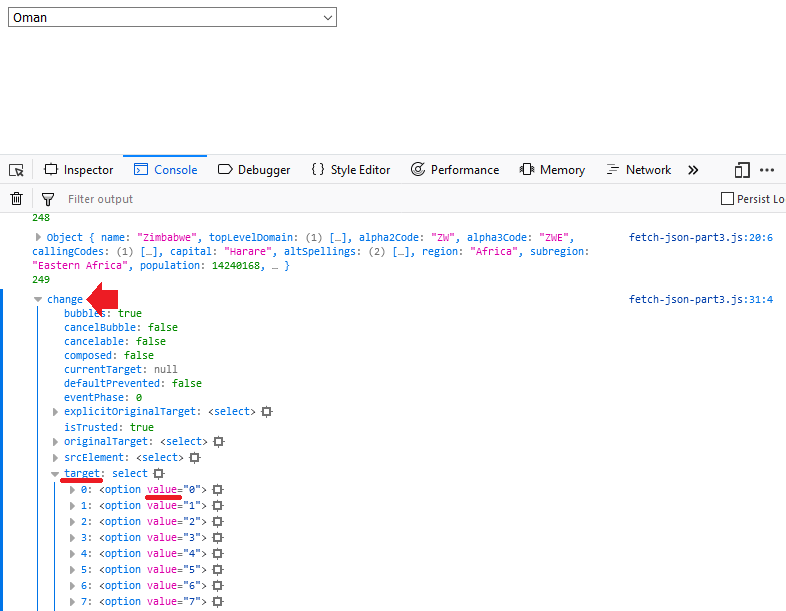
function outputData(e) {
console.log(e.target.value);
console.log(responseObject[e.target.value]);
}
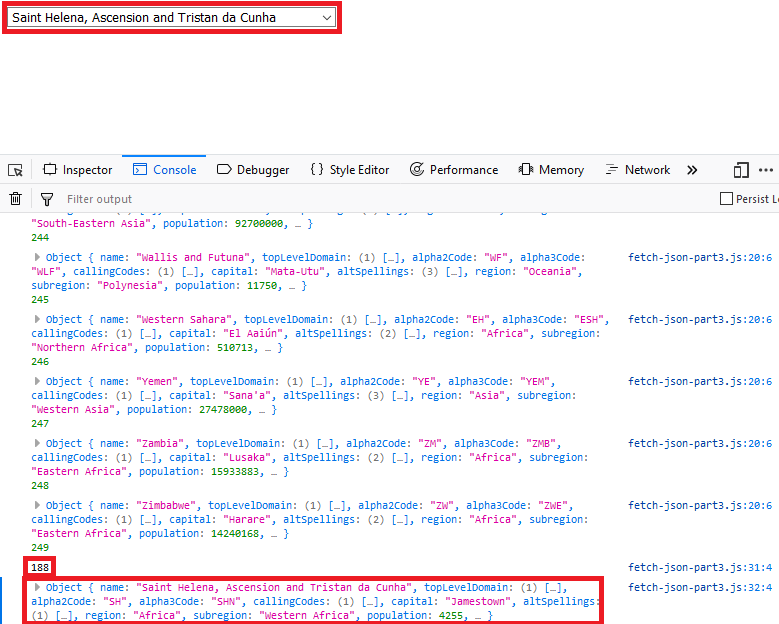
In this example I selected the 188 out of the drop-down menu. Comparing this number to the index number of our responseObject gives us all country information of Saint Helena, Ascension and Tristan da Cunha.
We can now clean this function up a little and add an HTML output to it, to be able to display the information on our web site:
<html>
    <title>Javascript API Course</title>
    <body>
        <div id='output'></div>
        <img src='' style='max-width: 100px;'>
        <script src='fetch-json'></script>
    </body>
</html>
const output = document.querySelector('#output');
const url = 'https://restcountries.eu/rest/v2/all';
let responseObject = {};
fetch(url).then(res => res.json())
.then(function (data) {
responseObject = data;
buildSelect(data);
})
.catch(error => console.log(error));
function buildSelect(data) {
let select = document.createElement('select');
data.forEach(function (item, index) {
let option = document.createElement('option');
option.value = index;
option.textContent = item.name;
select.appendChild(option);
})
select.addEventListener('change',outputData);
document.querySelector('body').appendChild(select);
}
function outputData(e){
let country = responseObject[e.target.value];
console.log(country);
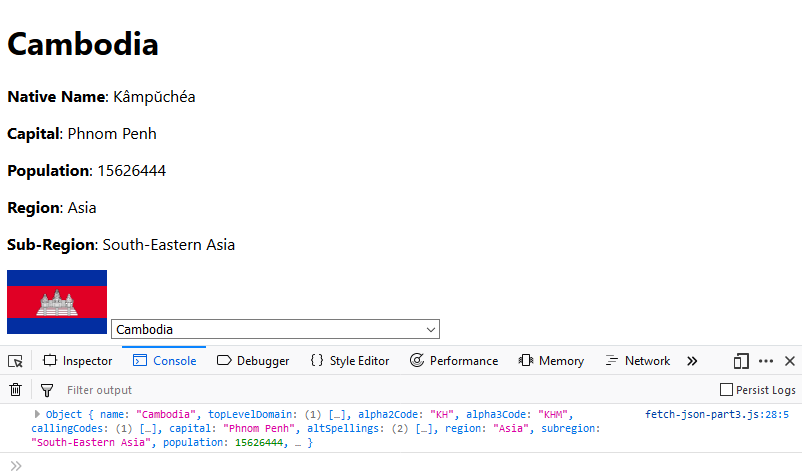
output.innerHTML = '<h1>'+country.name+'</h1>';
output.innerHTML += '<p><strong>Native Name</strong>: '+country.nativeName+'</p>';
output.innerHTML += '<p><strong>Population</strong>: '+country.population+'</p>';
document.querySelector('img').src = country.flag;
output.innerHTML += '<p><strong>Capital</strong>: '+country.capital+'</p>';
output.innerHTML += '<p><strong>Region</strong>: '+country.region+'</p>';
output.innerHTML += '<p><strong>Sub-Region</strong>: '+country.subregion+'</p>';
}