React TODO List

Source Code Github
Source Medium
Every web-dev should have one or two of them on Github ~
- 01 create-react-app
- 02 Set Initial State
- 03 JSX, Font-Awesome and Bootstrap
- 04 Add Remove TODO function
- 05 Add a Add TODO function
01 create-react-app
n the following tutorial we’ll use create-react-app to bootstrap our application. It’s an opinionated zero-configuration starter kit for React introduced by Facebook in 2016. We can install create-react-app by using npm:
npm install -g create-react-app
Having completed the installation successfully we're able to use create-react-app to initiate a new React project:
create-react-app obligatory-react-todo-list-2017
This creates a new initial React project in the folder obligatory-react-todo-list-2017. Dependencies are installed automatically. Change into the folder and start the app with npm start on localhost:3000.
02 Set Initial State
Now open the file ./src/App.js inside your code editor and add some Todo's right below the import statements (delete the <App /> component, that was created below):
// add initial data model array
var todos = [
  {
    todoTitle: 'Do some coding',
    todoResponsible: 'Me',
    todoDescription: 'Todo description',
    todoPriority: 'medium'
  },
  {
    todoTitle: 'Drink Coffee',
    todoResponsible: 'Me',
    todoDescription: 'Todo description',
    todoPriority: 'high'
  },
  {
    todoTitle: 'Do some more coding',
    todoResponsible: 'Me',
    todoDescription: 'Todo description',
    todoPriority: 'low'
  }
]
Now add the todos array to the state of app component. This is done by introducing a class constructor where we can set the initial component state like you can see in the following:
class App extends Component {

  // set initial component state to todos array
  constructor(props) {
    super(props);
    this.state = {
      todos
    };
  }
 [...]
 }
03 JSX, Font-Awesome and Bootstrap
We want to use Bootstrap CSS for our rendered app, which we include via CDN links (see getbootstrap.com) inside the public/index.html page.
<head>
  <link rel='stylesheet' href='https://maxcdn.bootstrapcdn.com/bootstrap/4.0.0-beta/css/bootstrap.min.css' integrity='sha384-/Y6pD6FV/Vv2HJnA6t+vslU6fwYXjCFtcEpHbNJ0lyAFsXTsjBbfaDjzALeQsN6M' crossorigin='anonymous'>
</head>

<body>
  <script src='https://code.jquery.com/jquery-3.2.1.slim.min.js' integrity='sha384-KJ3o2DKtIkvYIK3UENzmM7KCkRr/rE9/Qpg6aAZGJwFDMVNA/GpGFF93hXpG5KkN' crossorigin='anonymous'></script>
  <script src='https://cdnjs.cloudflare.com/ajax/libs/popper.js/1.11.0/umd/popper.min.js' integrity='sha384-b/U6ypiBEHpOf/4+1nzFpr53nxSS+GLCkfwBdFNTxtclqqenISfwAzpKaMNFNmj4' crossorigin='anonymous'></script>
  <script src='https://maxcdn.bootstrapcdn.com/bootstrap/4.0.0-beta/js/bootstrap.min.js' integrity='sha384-h0AbiXch4ZDo7tp9hKZ4TsHbi047NrKGLO3SEJAg45jXxnGIfYzk4Si90RDIqNm1' crossorigin='anonymous'></script>
</body>
Now we can use bootstrap classNames directly inside the render statement of our <App /> component in src/app.js.
For Font Awesome, we download the zip archive from fontawesome.io and copy only the *.css and web-font files to src/fonts. All web-font files are referenced inside font-awesome.css - the relative path has to be changed from ../fonts/[filename] to ./[filename]! Font-Awesome can now be added to our JSX code inside the render method - but remember to change class to className!
<i className='fa fa-user-circle-o' aria-hidden='true'></i>
Our render function now looks like this, giving us a beautiful Bootstrap UI with some Font-Awesome goodness:
render() {
return (
<div className='container'>
<nav className='navbar fixed-top navbar-dark bg-dark'>
<img src={logo} className='App-logo' alt='logo' />
<h4 className='navbar-brand'>
Todo Count: <span className='badge badge-pill badge-primary'>{this.state.todos.length}</span>
</h4>
</nav>
<div className='row mt-5'>
<div className='col'>
<ul className='list-group'>
{ this.state.todos.map((todo, index) =>
<li className='list-group-item' key={index}>
<h4 className='list-group-item-heading'>{todo.todoTitle} <small><span className='badge badge-secondary'>{todo.todoPriority}</span></small></h4>
<p><i className='fa fa-user-circle-o' aria-hidden='true'></i> {todo.todoResponsible}</p>
<p className='text-justify'>{todo.todoDescription}</p>
<button className='btn btn-danger btn-sm float-right' onClick={this.handleRemoveTodo.bind(this, index)}><span><i className='fa fa-trash-o' aria-hidden='true'></i></span> Delete</button>
</li>
)}
</ul>
</div>
</div>
</div>
);
}
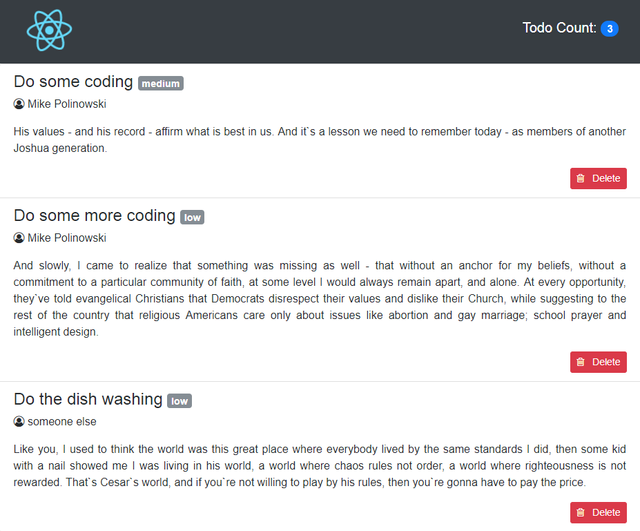
The app should automatically reload inside of your browser and display the basic bootstrap layout of our app, using the data from the todos-array:
04 Add Remove TODO function
Now we want to add a Delete function to the Delete button we added above. We do this, by adding an onClick event handler to the button:
<button className='btn btn-danger btn-sm float-right' onClick={this.handleRemoveTodo.bind(this, index)}>
<span>
<i className='fa fa-trash-o' aria-hidden='true'></i>
</span> Delete</button>
Then we have to define the handleRemoveTodo function inside src/App.js above the render method of <App />:
handleRemoveTodo(index) {
  this.setState({
    todos: this.state.todos.filter(function(e, i) {
      return i !== index;
    })
  })
}
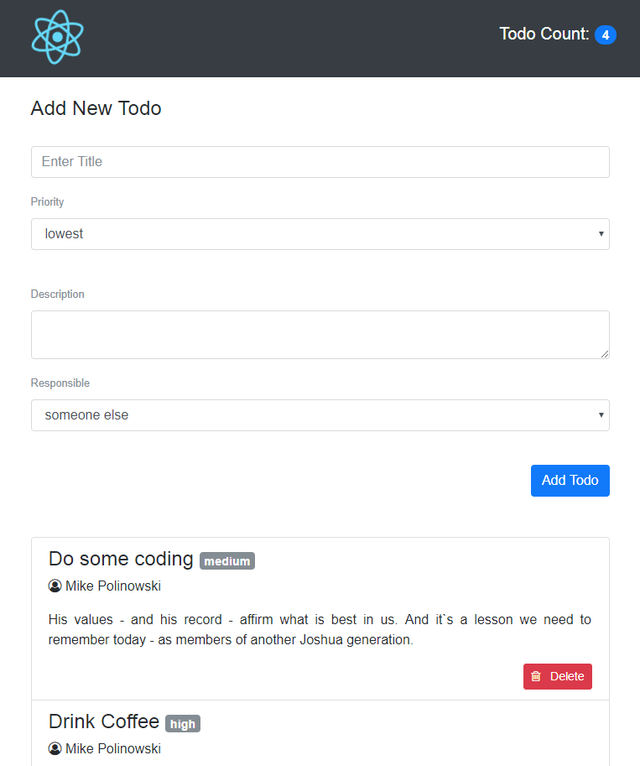
05 Add a Add TODO function
For now we just want to add a method to add TODOs to our list - so we create a new function below <App /> called <TodoInput />
class TodoInput extends Component {
  constructor(props) {
    super(props);

    this.state = {
      todoTitle: '',
      todoResponsible: '',
      todoDescription: '',
      todoPriority: 'lowest'
    }
   }

  render() {
    return (
      <div className='col'>
        <br/><br/><br/>
        <h4>Add New Todo</h4><br/>
        <form onSubmit={this.handleSubmit}>
          <div className='form-group'>
            <input  name='todoTitle'
                    type='text'
                    className='form-control'
                    id='inputTodoTitle'
                    value={this.state.todoTitle}
                    onChange={this.handleInputChange}
                    aria-describedby='Todo Title'
                    placeholder='Enter Title'></input>
            </div>
            <div className='form-group'>
              <label htmlFor='inputTodoPriority' className='control-label text-muted'><small>Priority</small></label>
              <select   name='todoPriority'
                        type='text'
                        className='form-control'
                        id='inputTodoPriority'
                        value={this.state.todoPriority}
                        onChange={this.handleInputChange}
                        aria-describedby='Todo Priority'>
                <option>lowest</option>
                <option>low</option>
                <option>medium</option>
                <option>high</option>
                <option>emergency</option>
              </select><br/>
            </div>
            <div className='form-group'>
              <label htmlFor='inputTodoDescription' className='control-label text-muted'><small>Description</small></label>
              <textarea   name='todoDescription'
                          type='text'
                          className='form-control'
                          id='inputTodoDescription'
                          value={this.state.todoDescription}
                          onChange={this.handleInputChange}
                          aria-describedby='Todo Description'></textarea>
            </div>
            <div className='form-group'>
              <label htmlFor='inputTodoResponsible' className='control-label text-muted'><small>Responsible</small></label>
              <select   name='todoResponsible'
                        type='text'
                        className='form-control'
                        id='inputTodoResponsible'
                        value={this.state.todoResponsible}
                        onChange={this.handleInputChange}
                        aria-describedby='Todo Responsible'>
                <option>someone else</option>
                <option>Mike Polinowski</option>
                <option>Micro Aggressions</option>
                <option>Vladimir Putin</option>
                <option>Climate Change</option>
              </select><br/>
            </div>
            <div className='form-group'>
              <button type='submit' className='btn btn-primary float-right'>Add Todo</button>
            </div>
        </form>
      </div>
    )
  }
}
Now we have to define handleInputChange and handleSubmit above the render method:
handleInputChange(event) {
  const target = event.target;
  const value = target.value;
  const name = target.name;

  this.setState({
    [name]: value
  })
}

handleSubmit(event) {
  event.preventDefault();
  this.props.onAddTodo(this.state);
  this.setState({
    todoTitle: '',
    todoResponsible: '',
    todoDescription: '',
    todoPriority: 'lowest'
  })
}
And bind this to those functions inside the constructor - so we get access to the state of todos:
constructor(props) {
  super(props);

  this.state = {
    todoTitle: '',
    todoResponsible: '',
    todoDescription: '',
    todoPriority: 'lowest'
  }

  this.handleInputChange = this.handleInputChange.bind(this);
  this.handleSubmit = this.handleSubmit.bind(this);
 }
Now we just need to pass down the state of todo via props in <App />:
<TodoInput onAddTodo={this.handleAddTodo}/>
Define the handleAddTodo method above the render call:
handleAddTodo(todo) {
this.setState({todos: [...this.state.todos, todo]});
And bind this inside the constructor:
constructor(props) {
  super(props);
  this.state = {
    todos
  };
  this.handleAddTodo = this.handleAddTodo.bind(this);
}