HAProxy Loadbalancing and Websockets

Following along a tutorial by hnasr to check out how to use web proxies / load-balancing in front of applications that use websocket connections.
Project Structure
├── app
│   ├── index.mjs
│   └── package.json
├── docker-compose.yml
├── Dockerfile
└── haproxy
    └── haproxy.cfg
Build the Docker Image
Build the chat app image with the following Dockerfile:
FROM node:13
WORKDIR /home/node/app
COPY app /home/node/app
RUN npm install
CMD npm run app
docker build -t wsapp .

[+] Building 63.7s (10/10) FINISHED
 => [internal] load build definition from Dockerfile                                                               0.1s
 => => transferring dockerfile: 130B                                                                               0.0s
 => [internal] load .dockerignore                                                                                  0.1s
 => => transferring context: 2B                                                                                    0.0s
 => [internal] load metadata for docker.io/library/node:13                                                        10.4s
 => [auth] library/node:pull token for registry-1.docker.io                                                        0.0s
 => [1/4] FROM docker.io/library/node:13@sha256:70d4fffcab39a1f9f7161d58e674ddcc56c7f0724196b68d52a87bab15cb4a04  46.0s
 => => resolve docker.io/library/node:13@sha256:70d4fffcab39a1f9f7161d58e674ddcc56c7f0724196b68d52a87bab15cb4a04   0.0s
 => => sha256:1c6172af85ee14a8db5a3a51d406b768dfa94d196c06d0d06d591507cf8199f0 45.38MB / 45.38MB                   7.6s
 => => sha256:b194b0e3c928807cfabf081055a117585ba5bf6697f65b2fede02225a5d73ad2 10.80MB / 10.80MB                   6.0s
 => => sha256:70d4fffcab39a1f9f7161d58e674ddcc56c7f0724196b68d52a87bab15cb4a04 1.21kB / 1.21kB                     0.0s
 => => sha256:1e8d7127072cdbaae1935656444c3ec2bef8882c8c14d459e3a92ca1dd313c28 2.21kB / 2.21kB                     0.0s
 => => sha256:2b9604a36e4911d15d2916dac4f1d853e2da612e9bb77df1016f8a51b3e333a1 7.88kB / 7.88kB                     0.0s
 => => sha256:1f5ec00f35d5b2d1db6b8e925a3005c1a285365775028db0339903ddaeec4763 4.34MB / 4.34MB                     4.0s
 => => sha256:93b1353672b6861da5f1b58b0eca02ec10373a25d2898bddafa1b4bae2271c55 50.08MB / 50.08MB                  19.0s
 => => sha256:3d7f38db3cca2c74df9a146d8419f5bf79d79b18de9eaee6351dccde16ab1f4a 214.91MB / 214.91MB                34.5s
 => => sha256:21e102f9fe89a18627c0ce50945bd1e0a11d0fecd4800bbbd999944d3940efc6 4.16kB / 4.16kB                     8.5s
 => => extracting sha256:1c6172af85ee14a8db5a3a51d406b768dfa94d196c06d0d06d591507cf8199f0                          2.6s
 => => sha256:d5431b24825a3297da35afe3d32786e01ec3fe7a8d1685adf59f82138e916e10 34.44MB / 34.44MB                  19.1s
 => => extracting sha256:b194b0e3c928807cfabf081055a117585ba5bf6697f65b2fede02225a5d73ad2                          0.5s
 => => extracting sha256:1f5ec00f35d5b2d1db6b8e925a3005c1a285365775028db0339903ddaeec4763                          0.2s
 => => extracting sha256:93b1353672b6861da5f1b58b0eca02ec10373a25d2898bddafa1b4bae2271c55                          3.3s
 => => sha256:f780e3352c1809c08a5e6e4168206425ce703018baae8d6efd8d18efb101405b 2.38MB / 2.38MB                    22.3s
 => => sha256:4d28937582d0e76cbe8ed78ed921823a349a8a0755f91e13648e7636c974b0b6 295B / 295B                        21.1s
 => => extracting sha256:3d7f38db3cca2c74df9a146d8419f5bf79d79b18de9eaee6351dccde16ab1f4a                          8.6s
 => => extracting sha256:21e102f9fe89a18627c0ce50945bd1e0a11d0fecd4800bbbd999944d3940efc6                          0.0s
 => => extracting sha256:d5431b24825a3297da35afe3d32786e01ec3fe7a8d1685adf59f82138e916e10                          1.7s
 => => extracting sha256:f780e3352c1809c08a5e6e4168206425ce703018baae8d6efd8d18efb101405b                          0.1s
 => => extracting sha256:4d28937582d0e76cbe8ed78ed921823a349a8a0755f91e13648e7636c974b0b6                          0.0s
 => [internal] load build context                                                                                  0.1s
 => => transferring context: 2.65kB                                                                                0.0s
 => [2/4] WORKDIR /home/node/app                                                                                   1.2s
 => [3/4] COPY app /home/node/app                                                                                  0.1s
 => [4/4] RUN npm install                                                                                          5.7s
 => exporting to image                                                                                             0.2s
 => => exporting layers                                                                                            0.2s
 => => writing image sha256:1d2f01e0f5cabc7d8fa5c453c16546f2bf192daf8dfec351797562052b861026                       0.0s
 => => naming to docker.io/library/wsapp
This will download the Node.js v13 Docker image as a base and install/run the content of the folder app inside the container. This folder contains a package.json file with our app dependencies:
{
  "name": "app",
  "version": "1.0.0",
  "description": "",
  "main": "index.mjs",
  "scripts": {
    "app": "node index.mjs"
  },
  "keywords": [],
  "author": "",
  "license": "ISC",
  "dependencies": {
    "http": "0.0.1-security",
    "redis": "^3.0.2",
    "websocket": "^1.0.31"
  }
}
And execute the file index.mjs with the Websocket Server code as soon as the Container is run:
import http from "http";
import ws from "websocket"
import redis from "redis";
const APPID = process.env.APPID;
let connections = [];
const WebSocketServer = ws.server

// Clients will be connected to different instances of our service. To allow them to interact we need to connect our app to a Redis database "redistribute" our app state, i.e. messages written on server 1 will be available on server 2 since all apps store their messages in a single place from where all instances can read incoming updates.

const subscriber = redis.createClient({
  port      : 6379,
  host      : 'rds'} );

const publisher = redis.createClient({
  port      : 6379,
  host      : 'rds'} );


// Subscribe the app to the Redis backend

subscriber.subscribe("livechat");

// When a subscription is successful publish a success message

subscriber.on("subscribe", function(channel, count) {
  console.log(`Server ${APPID} subscribed successfully to livechat`)
  publisher.publish("livechat", "a message");
});

// If a message comes in to Redis "livechat" subscription publish it to all active websocket connections

subscriber.on("message", function(channel, message) {
  try{
  //when we receive a message I want t
  console.log(`Server ${APPID} received message in channel ${channel} msg: ${message}`);
  connections.forEach(c => c.send(APPID + ":" + message))

  }
  catch(ex){
    console.log("ERR::" + ex)
  }
});


// Create a raw http server that will negotiate the websocket connection
const httpserver = http.createServer()

// Pass the httpserver object to the WebSocketServer library
const websocket = new WebSocketServer({
    "httpServer": httpserver
})


httpserver.listen(8080, () => console.log("My server is listening on port 8080"))

//when a legit websocket request comes in establish a connection
websocket.on("request", request=> {

    const con = request.accept(null, request.origin)
    con.on("open", () => console.log("opened"))
    con.on("close", () => console.log("CLOSED!!!"))
    con.on("message", message => {
        //publish the message to redis
        console.log(`${APPID} Received message ${message.utf8Data}`)
        publisher.publish("livechat", message.utf8Data)
    })

    setTimeout(() => con.send(`Connected successfully to server ${APPID}`), 5000)
    connections.push(con)


})

//client code
//let ws = new WebSocket("ws://localhost:8080");
//ws.onmessage = message => console.log(`Received: ${message.data}`);
//ws.send("Hello! I'm client")


/*
    //code clean up after closing connection
    subscriber.unsubscribe();
    subscriber.quit();
    publisher.quit();
    */
Docker Compose
The entire app will consist of a HAProxy haproxy that will divide the incoming traffic over all instances of our Websocket Chat App that we build above (I limited it to 2 instances ws1 and ws2 - you can start as many as you need). Since every connecting users might be connected to different chat servers we need to add a database redis in the background that all servers are connected to and exchange their state. This allows users to interact with each other - no matter what server they are connected to:
version : '3'

services:
    lb:
        image: haproxy
        ports:
            - "8080:8080"
        volumes:
            - ./haproxy:/usr/local/etc/haproxy
    ws1:
        image: wsapp
        environment:
            - APPID=1111
    ws2:
        image: wsapp
        environment:
            - APPID=2222
    rds:
        image: redis
The HAProxy container loads in a simple configuration file from the ./haproxy directory telling it that it should expect incoming traffic on port 8080 and distribute them over our two chat apps:
frontend http
    bind *:8080
    mode http
    timeout client 1000s
    use_backend all

backend all
    mode http
    timeout server 1000s
    timeout connect 1000s
    server s1 ws1:8080
    server s2 ws2:8080
To spin everything up run:
docker-compose up

Creating network "websocket_default" with the default driver
Creating websocket_ws1_1 ... done
Creating websocket_ws2_1 ... done
Creating websocket_lb_1  ... done
Creating websocket_rds_1 ... done
Attaching to websocket_ws1_1, websocket_rds_1, websocket_ws2_1, websocket_lb_1
rds_1  | 1:C 23 Sep 2021 06:29:49.716 # oO0OoO0OoO0Oo Redis is starting oO0OoO0OoO0Oo
rds_1  | 1:C 23 Sep 2021 06:29:49.716 # Redis version=6.2.5, bits=64, commit=00000000, modified=0, pid=1, just started
rds_1  | 1:C 23 Sep 2021 06:29:49.716 # Warning: no config file specified, using the default config. In order to specify a config file use redis-server /path/to/redis.conf
rds_1  | 1:M 23 Sep 2021 06:29:49.717 * monotonic clock: POSIX clock_gettime
rds_1  | 1:M 23 Sep 2021 06:29:49.718 * Running mode=standalone, port=6379.
rds_1  | 1:M 23 Sep 2021 06:29:49.718 # Server initialized
rds_1  | 1:M 23 Sep 2021 06:29:49.718 # WARNING overcommit_memory is set to 0! Background save may fail under low memory condition. To fix this issue add 'vm.overcommit_memory = 1' to /etc/sysctl.conf and then reboot or run the command 'sysctl vm.overcommit_memory=1' for this to take effect.
rds_1  | 1:M 23 Sep 2021 06:29:49.718 * Ready to accept connections
lb_1   | [NOTICE]   (1) : New worker #1 (8) forked
ws2_1  |
ws2_1  | > app@1.0.0 app /home/node/app
ws2_1  | > node index.mjs
ws2_1  |
ws1_1  |
ws1_1  | > app@1.0.0 app /home/node/app
ws1_1  | > node index.mjs
ws1_1  |
ws2_1  | My server is listening on port 8080
ws2_1  | Server 2222 subscribed successfully to livechat
ws2_1  | Server 2222 received message in channel livechat msg: a message
ws1_1  | My server is listening on port 8080
ws1_1  | Server 1111 subscribed successfully to livechat
ws2_1  | Server 2222 received message in channel livechat msg: a message
ws1_1  | Server 1111 received message in channel livechat msg: a message
Testing
I started up the service on a server on my network with the IP address 192.168.2.111. So I can now open up the Chrome developer tools, switch to the Console tab and connect to the service:
let ws = new WebSocket("ws://192.168.2.111:8080");
ws.onmessage = message => console.log(`Received: ${message.data}`);
ws.send("Hello! I'm client")
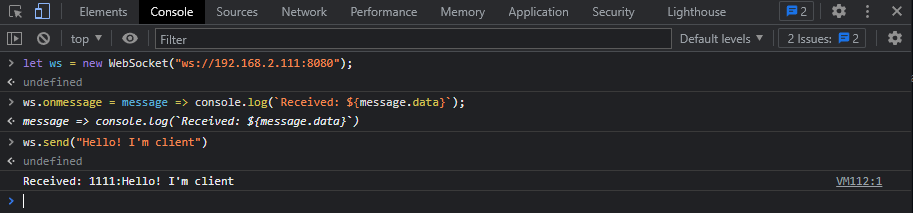
You can see that the response I am getting from the service is:
Received: 1111:Hello! I'm client
This means that I am connected to the Websocket Chat App with the APPID 1111. Opening up a second browser and going to the same steps again will connect me to APPID 2222 in a round-robin fashion:
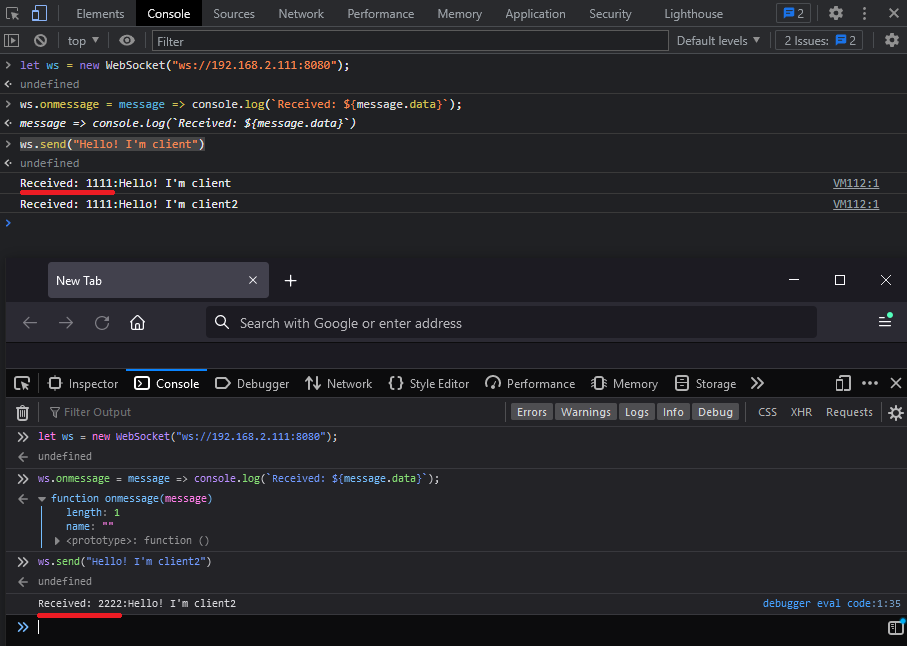
Received: 2222:Hello! I'm client2
It works!
WSS Adding TLS Encryption
Create a PEM Certificates
cd ./haproxy
Generate a unique private key (KEY)
openssl genrsa -out ws_haproxy.key 2048
Generate a Certificate Signing Request (CSR)
openssl req -new -key ws_haproxy.key -out ws_haproxy.csr

You are about to be asked to enter information that will be incorporated
into your certificate request.
What you are about to enter is what is called a Distinguished Name or a DN.
There are quite a few fields but you can leave some blank
For some fields there will be a default value,
If you enter '.', the field will be left blank.
-----
Country Name (2 letter code) [AU]:
State or Province Name (full name) [Some-State]:
Locality Name (eg, city) []:
Organization Name (eg, company) [Internet Widgits Pty Ltd]:
Organizational Unit Name (eg, section) []:
Common Name (e.g. server FQDN or YOUR name) []:192.168.2.111
Email Address []:

Please enter the following 'extra' attributes
to be sent with your certificate request
A challenge password []:
An optional company name []:
Create a Self-Signed Certificate (CRT)
openssl x509 -req -days 365 -in ws_haproxy.csr -signkey ws_haproxy.key -out ws_haproxy.crt

Signature ok
subject=C = AU, ST = Some-State, O = Internet Widgits Pty Ltd, CN = 192.168.2.111
Getting Private key
Append KEY and CRT to ws_haproxy.pem
bash -c 'cat ws_haproxy.key ws_haproxy.crt >> ws_haproxy.pem'
Specify PEM in haproxy config
nano haproxy.cfg
listen haproxy
  bind 0.0.0.0:443 ssl crt /etc/ssl/private/ws_haproxy.pem
HAProxy Configuration
./haproxy/haproxy_ssl.cfg
frontend ws
    mode http
    bind *:80
    bind *:443 ssl crt /etc/ssl/private/ws_haproxy.pem
    timeout client 1000s
    default_backend wsbackend

backend wsbackend
    mode http
    server s1 ws1:8080
    server s2 ws2:8080
    timeout connect 1000s
    timeout server 1000s
Spin up the Docker Composition
version : '3'

services:
    lb:
        image: haproxy
        ports:
            - "80:80"
            - "443:443"
        volumes:
            - ./haproxy/haproxy_ssl.cfg:/usr/local/etc/haproxy/haproxy.cfg
            - ./haproxy/ws_haproxy.pem:/etc/ssl/private/ws_haproxy.pem
    ws1:
        image: wsapp
        environment:
            - APPID=1111
    ws2:
        image: wsapp
        environment:
            - APPID=2222
    rds:
        image: redis
docker-compose up

Recreating websocket_lb_1 ... done
Starting websocket_rds_1  ... done
Starting websocket_ws2_1  ... done
Starting websocket_ws1_1  ... done
Attaching to websocket_rds_1, websocket_ws2_1, websocket_ws1_1, websocket_lb_1
rds_1  | 1:C 24 Sep 2021 05:42:47.109 # oO0OoO0OoO0Oo Redis is starting oO0OoO0OoO0Oo
rds_1  | 1:C 24 Sep 2021 05:42:47.109 # Redis version=6.2.5, bits=64, commit=00000000, modified=0, pid=1, just started
rds_1  | 1:C 24 Sep 2021 05:42:47.109 # Warning: no config file specified, using the default config. In order to specify a config file use redis-server /path/to/redis.conf
rds_1  | 1:M 24 Sep 2021 05:42:47.110 * monotonic clock: POSIX clock_gettime
rds_1  | 1:M 24 Sep 2021 05:42:47.110 * Running mode=standalone, port=6379.
rds_1  | 1:M 24 Sep 2021 05:42:47.110 # Server initialized
rds_1  | 1:M 24 Sep 2021 05:42:47.110 # WARNING overcommit_memory is set to 0! Background save may fail under low memory condition. To fix this issue add 'vm.overcommit_memory = 1' to /etc/sysctl.conf and then reboot or run the command 'sysctl vm.overcommit_memory=1' for this to take effect.
rds_1  | 1:M 24 Sep 2021 05:42:47.111 * Loading RDB produced by version 6.2.5
rds_1  | 1:M 24 Sep 2021 05:42:47.111 * RDB age 74 seconds
rds_1  | 1:M 24 Sep 2021 05:42:47.111 * RDB memory usage when created 0.85 Mb
rds_1  | 1:M 24 Sep 2021 05:42:47.111 * DB loaded from disk: 0.000 seconds
rds_1  | 1:M 24 Sep 2021 05:42:47.111 * Ready to accept connections
lb_1   | [NOTICE]   (1) : New worker #1 (9) forked
ws2_1  |
ws2_1  | > app@1.0.0 app /home/node/app
ws2_1  | > node index.mjs
ws2_1  |
ws1_1  |
ws1_1  | > app@1.0.0 app /home/node/app
ws1_1  | > node index.mjs
ws1_1  |
ws1_1  | My server is listening on port 8080
ws2_1  | My server is listening on port 8080
ws1_1  | Server 1111 subscribed successfully to livechat
ws1_1  | Server 1111 received message in channel livechat msg: a message
ws2_1  | Server 2222 subscribed successfully to livechat
ws1_1  | Server 1111 received message in channel livechat msg: a message
ws2_1  | Server 2222 received message in channel livechat msg: a message
Testing
let ws = new WebSocket("ws://192.168.2.111:80");
ws.onmessage = message => console.log(`Received: ${message.data}`);
ws.send("Hello! This chat is not secure");

let ws = new WebSocket("wss://192.168.2.111:443");
ws.onmessage = message => console.log(`Received: ${message.data}`);
ws.send("Hello! This chat is secure");
But I cannot get a connection over a secure websocket:
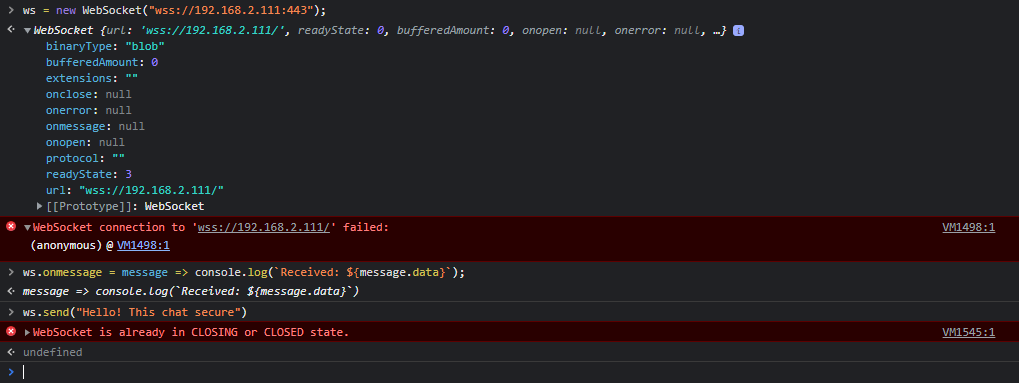
I thought this might be an issue with the self-signed certificate and found the option in Firefox about:config to set network.websocket.allowInsecureFromHTTPS to true:

But it still refused to connect hmmm. I checked the container everything is running. Also when I try accessing https://192.168.2.111 I am getting the typical warning that this site uses a self-signed cert. So HAProxy is working but I am still not getting wss connection...
Debugging
I am going to use Wireshark to see what is happening here:
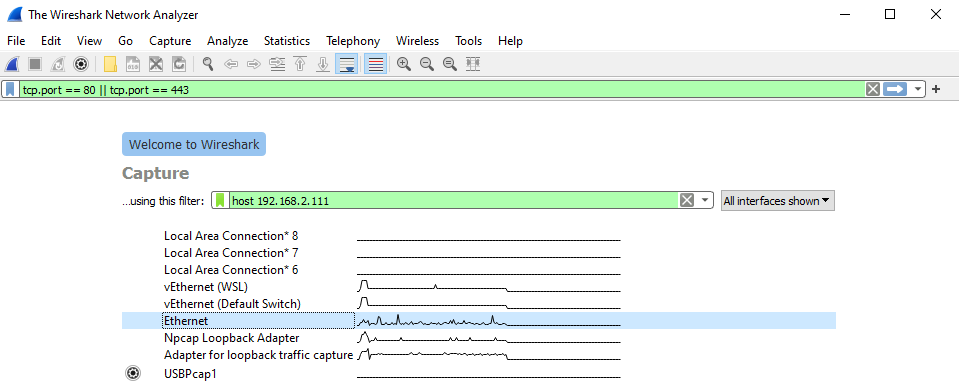
For the non-TLS connection I can see the HTTP GET with Upgrade Header. And the acknowledgement from the server to switch to Websockets:
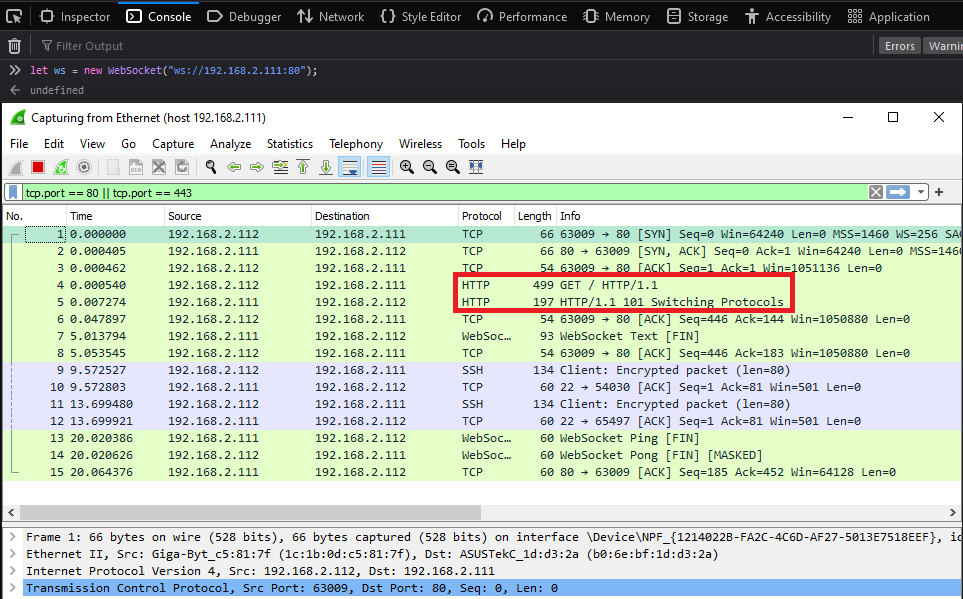
I can see the message that I send and a little bit below (below the SSH packages) the response from the server:

But when I switch to TLS all I see is the client handshaking the server - but the 3rd step does not seem to work, the server re-transmits the acknowledgement but my client (on IP 192.168.2.112) replies with a TCP ZeroWindow - which afaik is a "Shut up, I am not listening":
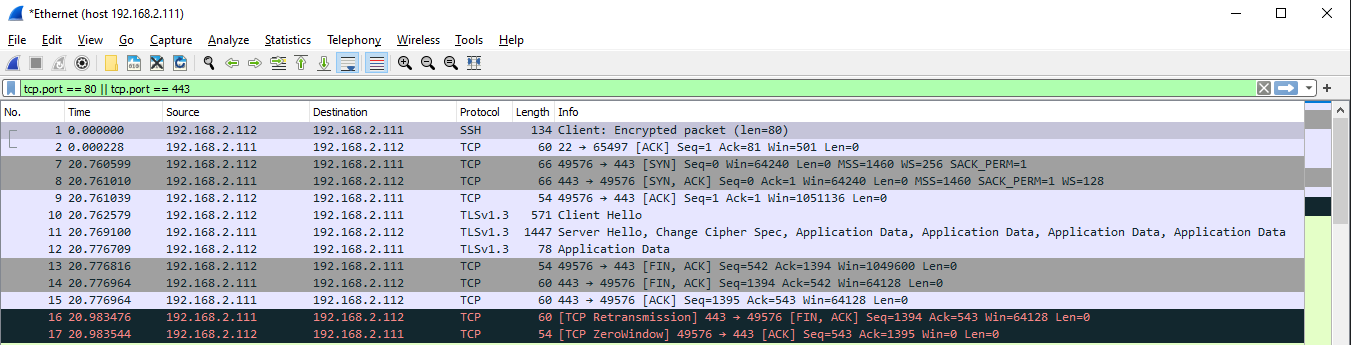
I think I will have to try this on an online server, with a CA Cert and rule out that my local IP + self-signed cert aren't the issue why this is blocked.