WebRTC Introduction - Realtime Chat

WIP
- WebRTC Introduction - Websockets
- WebRTC Introduction - Client Side Signalling
- WebRTC Introduction - Interactive Connectivity Establishment
Resources:
WebRTC
With WebRTC, you can add real-time communication capabilities to your application that works on top of an open standard. It supports video, voice, and generic data to be sent between peers, allowing developers to build powerful voice- and video-communication solutions.
- Signalling Server: For signaling intend and to negotiate the connection parameter.
- STUN Server: Provides a tool for hosts to discover the presence of a network address translator, and to discover the mapped Internet Protocol (IP) address and port number.
- TURN Server: Traversal Using Relay NAT - Server required for relaying the traffic between peers, since a direct socket is often not possible between the clients.
Protocols
- Signalling
- SDP: Session Description Protocol
- Connecting
- ICE: Interactive Connectivity Establishment
- Media Communication
- Security
SDP
Signaling is the initial bootstrapping that makes a call possible. After these values are exchanged, the WebRTC agents can communicate directly with each other. WebRTC uses an existing protocol called the Session Description Protocol. Via this protocol, the two WebRTC Agents will share all the state required to establish a connection.
key = value
With the following keys:
v: Version, should be equal to0.o: Origin, contains a unique ID useful for renegotiations.s: Session Name, should be equal to-.t: Timing, should be equal to0 0.m: Media Description (m=<media> <port> <proto> <fmt>...).a: Attribute, a free text field. This is the most common line in WebRTC.c: Connection Data, should be equal toIN IP4 0.0.0.0.
Full Example:
v=0
o=- 0 0 IN IP4 127.0.0.1
s=-
c=IN IP4 127.0.0.1
t=0 0
m=audio 4000 RTP/AVP 111
a=rtpmap:111 OPUS/48000/2
m=video 4002 RTP/AVP 96
a=rtpmap:96 VP8/90000
v,o,s,c,tare defined, but they do not affect the WebRTC session.- You have two Media Descriptions. One of type audio and one of type video.
ICE
ICE (Interactive Connectivity Establishment) is how WebRTC connects two Agents. ICE is a protocol for establishing connectivity. It determines all the possible routes between the two peers and then ensures you stay connected. This is where STUN and TURN come into play with ICE. These addresses can be your local IP Address plus a port, NAT mapping, or Relayed Transport Address. Each side gathers all the addresses they want to use, exchanges them, and then attempts to connect.
RTP & RTCP
WebRTC allows you to send and receive an unlimited amount of audio and video streams. You can add and remove these streams at anytime during a call.
RTP (Real-time Transport Protocol) is the protocol that carries the media. It was designed to allow for real-time delivery of video. RTP gives you streams, so you can run multiple media feeds over one connection. It also gives you the timing and ordering information you need to feed a media pipeline.
RTCP (RTP Control Protocol) is the protocol that communicates metadata about the call. This is used to communicate statistics about the call. It is also used to handle packet loss and to implement congestion control. It gives you the bi-directional communication necessary to respond to changing network conditions.
SCTP
WebRTC uses the Stream Control Transmission Protocol (SCTP) which is a transport layer protocol that was intended as an alternative to TCP or UDP. SCTP gives you streams and each stream can be configured independently. SCTP is the real power behind WebRTC data channels. It provides all these features of the data channel:
- Multiplexing
- Reliable delivery using a TCP-like retransmission mechanism
- Partial-reliability options
- Congestion Avoidance
- Flow Control
DTLS & SRTP
Every WebRTC connection is authenticated and encrypted.
DTLS (Datagram Transport Layer Security) allows two peers to establish secure communication with no pre-existing configuration. For a DTLS Client and a Server to communicate, they need to agree on a cipher and the key. They determine these values by doing a DTLS handshake. During the handshake, the messages are in plaintext. When a DTLS Client/Server has exchanged enough details to start encrypting it sends a Change Cipher Spec. After this message, each subsequent message will be encrypted.
SRTP (Secure Real-time Transport Protocol) is a protocol designed specifically for encrypting RTP packets. To start an SRTP session you specify your keys and cipher. Unlike DTLS it has no handshake mechanism. All the configuration and keys were generated during the DTLS handshake.
Bi-Directional Communication - Websocket Signalling
Establishing a bidirectional link between two clients -> Express & Socket.io:
const express = require("express");
const socket = require("socket.io");

const port = 8888

var app = express();

var server = app.listen(port, function () {
    console.log('INFO :: Webserver is running on ::  http://localhost:' + port)
});

app.use(express.static("public"));

var upgradedServer = socket(server);

upgradedServer.on("connection", function (socket) {
  console.log("INFO :: Websocket connection established :: ", socket.id);
});
And add the following to your web client to establish a bidirectional websocket connection
<script src="https://cdnjs.cloudflare.com/ajax/libs/socket.io/4.5.3/socket.io.js" integrity="sha512-iWPnCISAd/J+ZacwV2mbNLCaPGRrRo5OS81lKTVPtRg1wGTC20Cfmp5Us5RcbLv42QLdbAWl0MI57yox5VecQg==" crossorigin="anonymous" referrerpolicy="no-referrer"></script>
<script src="./chat.js"></script>
With chat.js:
let socket = io.connect("http://localhost:8888");
Starting the web server with node index.js:
npm start

> webrtc-intro@1.0.0 start
> node index.js

INFO :: Webserver is running on ::  http://localhost:8888
INFO :: Websocket connection established ::  g96wjUg0JtWL71FoAAAB
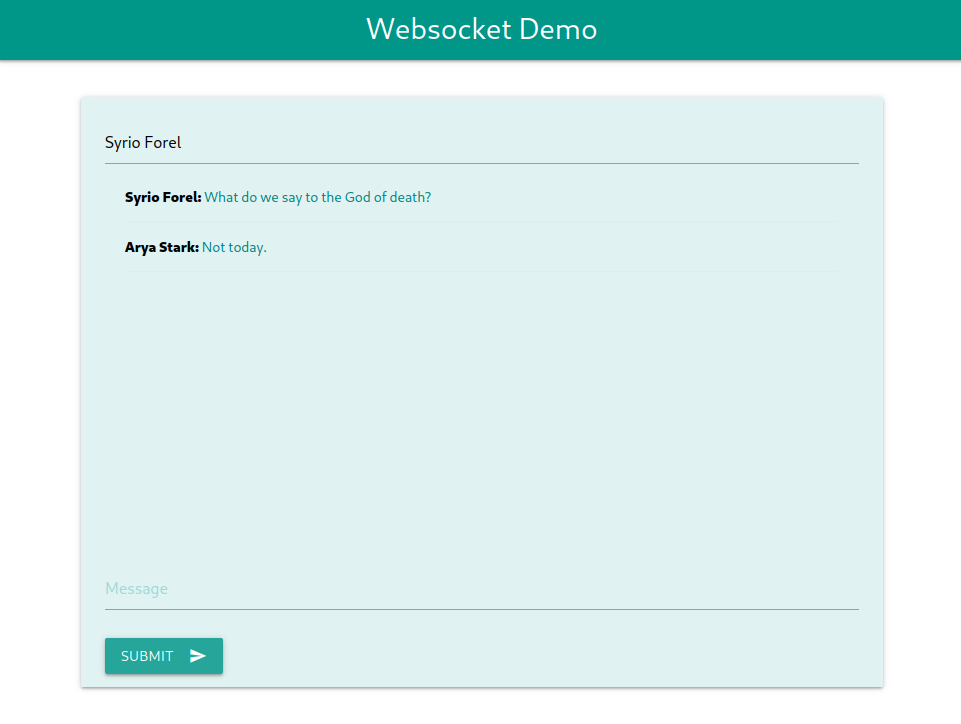
We can now get the HTML elements in chat.js and send their values to our backend to trigger a broadcast function when a new message arrives:
var username = document.getElementById("username")
var output = document.getElementById("output")
var message = document.getElementById("message")
var button = document.getElementById("send")

button.addEventListener('click', function() {
    socket.emit('sendMessage', {
        'message': message.value,
        'username': username.value
    })
})

socket.on('broadcastMessage', function(data) {
    output.innerHTML += '<p><strong>' + data.username + ': </strong>' + data.message + '</p>'
})
The Express server then has to broadcast those values to every chat client:
upgradedServer.on("connection", function (socket) {
  socket.on("sendMessage", function (data) {
    upgradedServer.emit("broadcastMessage", data);
  });

  console.log("INFO :: Websocket connection established :: ", socket.id);
});