MQTT Webfrontend with React.js

Setup your Project
Creating new React applications with Create React App:
npx create-react-app mqtt-frontend
Add MQTT.js to your project:
cd mqtt-frontend
npm install mqtt
I am going to work with React Sample by EMQX that is using the AntD Design system - so I will install it as well:
npm install antd
Adding an MQTT Starter
I added the src/component folder from the EMQX example repository to my src folder and linked those MQTT components into src/App.js:
import React from 'react'
import './App.css'
import HookMqtt from './components/MQTT_Hook/'

function App() {
  return (
    <div className="App">
      <HookMqtt />
    </div>
  )
}

export default App
And changed the src/App.css file to use the AntD Design system:
@import '~antd/dist/antd.css';

.App {
  background-color: #282c34;
  min-height: 100vh;
  padding: 40px;
  display: flex;
  flex-direction: column;
  align-items: center;
  justify-content: center;
  font-size: calc(10px + 2vmin);
  color: white;
}

.App .ant-card {
  width: 100%;
  max-width: 850px;
  margin-bottom: 20px;
}

.ant-form-inline .ant-form-item {
  margin-bottom: 20px;
}
Configuring the MQTT Components
The src/components/Connection component has some lines in it that allow you to hard code a default MQTT broker:
const Connection = ({ connect, disconnect, connectBtn }) => {
  const [form] = Form.useForm();
  const record = {
    host: '192.168.2.77',
    clientId: `mqttjs_ + ${Math.random().toString(16).substr(2, 8)}`,
    port: 1883,
    username: 'admin',
    password: 'instar'
  };

  ...

}
But once you start up the application you will have input fields to change those values on the fly. So nothing much to do here.
Setting up the MQTT Broker
First I will try out using the Mosquitto Broker on Debian:
apt update
apt-cache search mosquitto
apt install mosquitto
And Mosquitto was successfully installed and is listening on the default port 1883:
netstat -tlnp

Active Internet connections (only servers)
Proto Recv-Q Send-Q Local Address           Foreign Address         State       PID/Program name
tcp        0      0 0.0.0.0:22              0.0.0.0:*               LISTEN      464/sshd: /usr/sbin
tcp        0      0 127.0.0.1:1883          0.0.0.0:*               LISTEN      1692/mosquitto
tcp6       0      0 :::22                   :::*                    LISTEN      464/sshd: /usr/sbin
tcp6       0      0 ::1:1883                :::*                    LISTEN      1692/mosquitto
For the basic configuration of the Mosquitto Broker see Mosquitto MQTT Cheat Sheet
Activating Websockets
To be able to connect to our broker with a web client, we will have to activate the Websocket support first:
nano /etc/mosquitto/conf.d/custom.conf
Here I already changed the default MQTT listener to port 1885. Now we need to add an additional port for the websocket listener:
# Port to use for the default listener
listener 1885

listener 8885
protocol websockets
Restart the service and check if the listener is in place:
service mosquitto restart

service mosquitto status
Active: active (running)

netstat -tlnp

Active Internet connections (only servers)
Proto Recv-Q Send-Q Local Address           Foreign Address         State       PID/Program name
tcp        0      0 0.0.0.0:22              0.0.0.0:*               LISTEN      581/sshd: /usr/sbin
tcp        0      0 0.0.0.0:1885            0.0.0.0:*               LISTEN      30592/mosquitto
tcp6       0      0 :::8885                 :::*                    LISTEN      30592/mosquitto
tcp6       0      0 :::22                   :::*                    LISTEN      581/sshd: /usr/sbin
tcp6       0      0 :::1885                 :::*                    LISTEN      30592/mosquitto
Testing
Before trying to connect make sure that the port can be accessed from an external client:
ufw allow 8885/tcp
ufw allow 1885/tcp

ufw status

To                         Action      From
--                         ------      ----
1885/tcp                   ALLOW       Anywhere
8885/tcp                   ALLOW       Anywhere
Now you can use any client to connect to both the MQTT and Websocket interface and see if you can subscribe to topics:

Testing the Webfrontend
Run the React code with:
npm start
And open the web frontend inside your web browser http://localhost:3000:

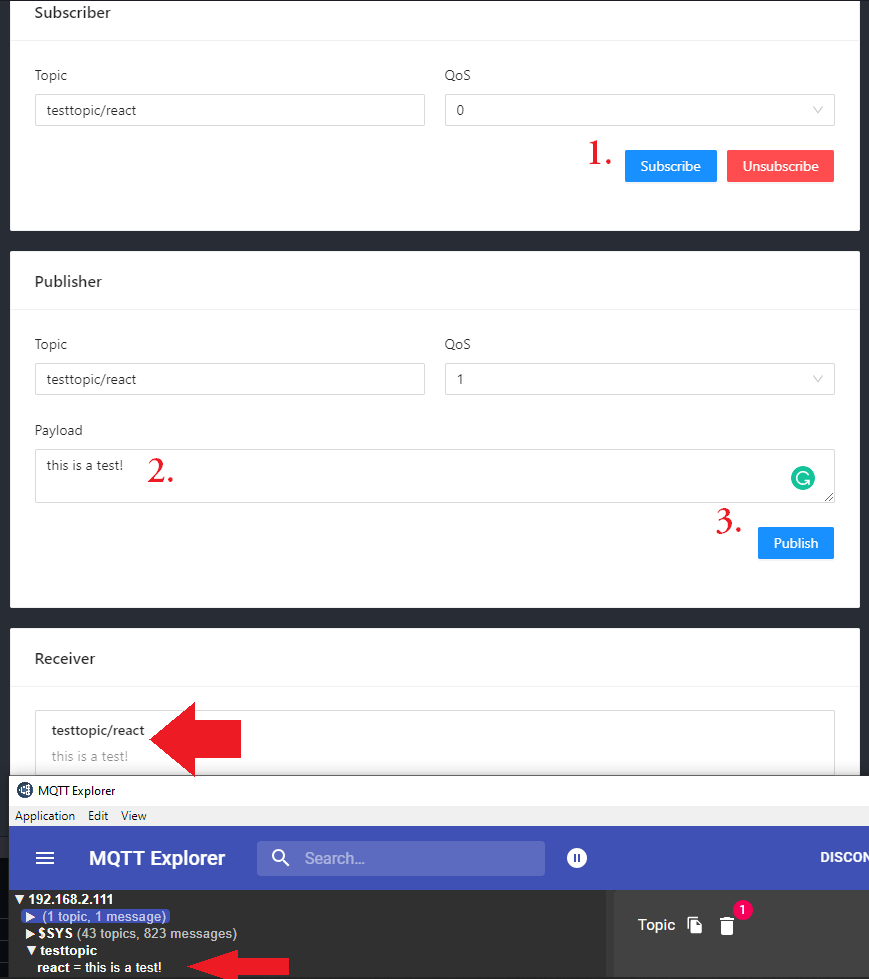
Type in your broker address and login and click on Connect. Now :
- Subscribe to a test topic.
- Write a Message Payload for this topic
- And hit Publish to update the topic.
Now you should receive the update in the Receiver box on the web frontend as well as in any other client you have connected - via MQTT or Websocket!