Hashicorp Nomad Refresher - Installation

Single Server Install
Ubuntu20/Debian11
curl -fsSL https://apt.releases.hashicorp.com/gpg | apt-key add -
apt-add-repository "deb [arch=amd64] https://apt.releases.hashicorp.com $(lsb_release -cs) main"
apt-get update && apt-get install nomad
Verify that Nomad installed successfully:
nomad -v
Nomad v0.12.10
Issue: Using those command left me with an very old version of Nomad - the current version is 1.1.3! So I will have to do a manual install from source instead.
I am going to use a variation of the installation script that Hashicorp provides on Github:
#!/bin/bash
set -x

echo "Running"

NOMAD_VERSION=1.1.3
NOMAD_ZIP=nomad_${NOMAD_VERSION}_linux_amd64.zip
NOMAD_URL=${URL:-https://releases.hashicorp.com/nomad/${NOMAD_VERSION}/${NOMAD_ZIP}}
NOMAD_DIR=/usr/local/bin
NOMAD_PATH=${NOMAD_DIR}/nomad
NOMAD_CONFIG_DIR=/etc/nomad.d
NOMAD_DATA_DIR=/opt/nomad/data
NOMAD_TLS_DIR=/opt/nomad/tls
NOMAD_ENV_VARS=${NOMAD_CONFIG_DIR}/nomad.conf
NOMAD_PROFILE_SCRIPT=/etc/profile.d/nomad.sh

echo "Downloading Nomad ${NOMAD_VERSION}"
[ 200 -ne $(curl --write-out %{http_code} --silent --output /tmp/${NOMAD_ZIP} ${NOMAD_URL}) ] && exit 1

echo "Installing Nomad"
unzip -o /tmp/${NOMAD_ZIP} -d ${NOMAD_DIR}
chmod 0755 ${NOMAD_PATH}
chown ${USER}:${GROUP} ${NOMAD_PATH}
echo "$(${NOMAD_PATH} --version)"

echo "Configuring Nomad ${NOMAD_VERSION}"
mkdir -pm 0755 ${NOMAD_CONFIG_DIR} ${NOMAD_DATA_DIR} ${NOMAD_TLS_DIR}

echo "Start Nomad in -dev mode"
tee ${NOMAD_ENV_VARS} > /dev/null <<ENVVARS
FLAGS=-bind 0.0.0.0 -dev
ENVVARS

echo "Update directory permissions"
chown -R ${USER}:${GROUP} ${NOMAD_CONFIG_DIR} ${NOMAD_DATA_DIR} ${NOMAD_TLS_DIR}
chmod -R 0644 ${NOMAD_CONFIG_DIR}/*

echo "Set Nomad profile script"
tee ${NOMAD_PROFILE_SCRIPT} > /dev/null <<PROFILE
export NOMAD_ADDR=http://127.0.0.1:4646
PROFILE

echo "Complete"
Write the script to file install_nomad.sh and make it executable. Remove the old version of nomad and run the script:
chmod +x install_nomad.sh
apt remove nomad
sh ./install_nomad.sh
And this looks a lot better:
nomad -v
Nomad v1.1.3 (8c0c8140997329136971e66e4c2337dfcf932692)
CentOS8/RHEL8
sudo yum install -y yum-utils
sudo yum-config-manager --add-repo https://rpm.releases.hashicorp.com/RHEL/hashicorp.repo
sudo yum -y install nomad
The installation under RHEL8 went without a hitch.
Configuration
Nomad already comes with a basic setup on my RHEL8 server:
cat /etc/nomad.d/nomad.hcl
## https://www.nomadproject.io/docs/agent/configuration

data_dir = "/opt/nomad/data"
bind_addr = "0.0.0.0"

server {
  enabled = true
  bootstrap_expect = 1
}

client {
  enabled = true
  servers = ["127.0.0.1"]
}

## https://www.nomadproject.io/docs/agent/configuration/index.html#log_level
## [WARN|INFO|DEBUG]
log_level = "INFO"
While my Debian install only has this file:
cat /etc/nomad.d/nomad.conf
FLAGS=-bind 0.0.0.0 -dev
Firewall Config - Open Ports
Nomad requires 3 different ports to work properly on servers and 2 on clients, some on TCP, UDP, or both protocols. Below we document the requirements for each port.
- HTTP API (Default 4646). This is used by clients and servers to serve the HTTP API. TCP only.
- RPC (Default 4647). This is used for internal RPC communication between client agents and servers, and for inter-server traffic. TCP only.
- Serf WAN (Default 4648). This is used by servers to gossip both over the LAN and WAN to other servers. It isn't required that Nomad clients can reach this address. TCP and UDP.
CentOS8/RHEL8
sudo firewall-cmd --permanent --zone=public --add-port=4646/tcp --add-port=4647/tcp  --add-port=4648/tcp  --add-port=4648/udp
sudo firewall-cmd --reload
sudo firewall-cmd --zone=public --list-ports
Ubuntu20/Debian11
ufw allow 4646:4647/tcp
ufw allow 4648
ufw reload
ufw status verbose
Start the DevMode
The RHEL8 installation looks fine - but let's test if the manual installation on Debian actually worked by executing the Nomad Agent DevMode:
nomad agent -dev -bind 0.0.0.0
And you should see the Nomad UI come up on port 4646:
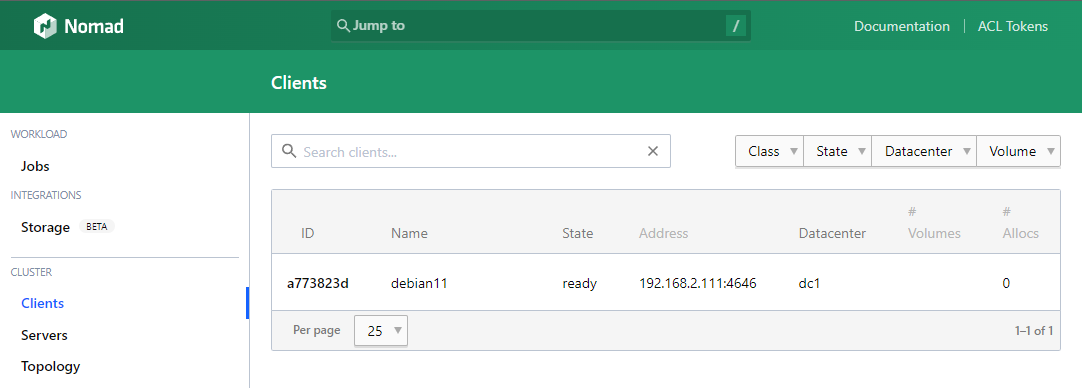
You can also use the Nomad CLI in a secondary terminal:
nomad server members

Name             Address        Port  Status  Leader  Protocol  Build    Datacenter  Region
debian11.global  192.168.2.111  4648  alive   true    2         0.12.10  dc1         global
nomad node status

ID        DC   Name      Class   Drain  Eligibility  Status
f25cd5fe  dc1  debian11  <none>  false  eligible     ready
Everything seems to be working.
Nomad Cluster Installation
In production I want to use a dedicated Nomad master (RHEL8) to control all other servers as Nomad minions (only 1 Debian11 for now). For this I will modify the default configuration to my master server and add the same file to my minion:
sudo nano /etc/nomad.d/nomad.hcl
data_dir = "/opt/nomad/data"
bind_addr = "0.0.0.0"
datacenter = "instaryun"
For the master (RHEL8) I will add a file:
sudo nano /etc/nomad.d/server.hcl
server {
  enabled = true
  bootstrap_expect = 1
}
This enables the server mode and tells Nomad that there will only be one master server for this cluster. And for my minion I create a file:
nano /etc/nomad.d/client.hcl
client {
  enabled = true
  servers = ["192.168.2.110"]
}
This enables the client mode and tells Nomad that the master of this cluster can be reached on the IP 192.168.2.110. To make this a little bit robust we could also nano /etc/hosts and add a name resolution for our master server IP and use that domain name instead of the IP address (that might change during the life cycle of the applications we want to use Nomad for):
192.168.2.110 nomad-master
192.168.2.111 nomad-minion
So now we can use the following client configuration:
client {
  enabled = true
  servers = ["nomad-master"]
}
Start the Service
After the configuration start / enable the service on both the client and the master server:
systemctl enable --now nomad
systemctl status nomad
This worked fine on my master server - but again the manual installed version of Nomad for my minion is acting up. First I got an error that the service was masked:
systemctl unmask nomad
And then I saw that the service file that was linked in was missing. So I copied in the one from my master server and modified it to fit:
nano /lib/systemd/system/nomad.service
[Unit]
Description=Nomad
Documentation=https://nomadproject.io/docs/
Wants=network-online.target
After=network-online.target

# When using Nomad with Consul it is not necessary to start Consul first. These
# lines start Consul before Nomad as an optimization to avoid Nomad logging
# that Consul is unavailable at startup.
#Wants=consul.service
#After=consul.service

[Service]
ExecReload=/bin/kill -HUP $MAINPID
ExecStart=/usr/local/bin/nomad agent -config /etc/nomad.d
KillMode=process
KillSignal=SIGINT
LimitNOFILE=65536
LimitNPROC=infinity
Restart=on-failure
RestartSec=2

## Configure unit start rate limiting. Units which are started more than
## *burst* times within an *interval* time span are not permitted to start any
## more. Use `StartLimitIntervalSec` or `StartLimitInterval` (depending on
## systemd version) to configure the checking interval and `StartLimitBurst`
## to configure how many starts per interval are allowed. The values in the
## commented lines are defaults.

# StartLimitBurst = 5

## StartLimitIntervalSec is used for systemd versions >= 230
# StartLimitIntervalSec = 10s

## StartLimitInterval is used for systemd versions < 230
# StartLimitInterval = 10s

TasksMax=infinity
OOMScoreAdjust=-1000

[Install]
WantedBy=multi-user.target
Ok, one more time, with more feeling:
systemctl enable --now nomad
systemctl status nomad
And it is working! I can also access the Nomad UI on my master server and see both the minion and master entry - success!

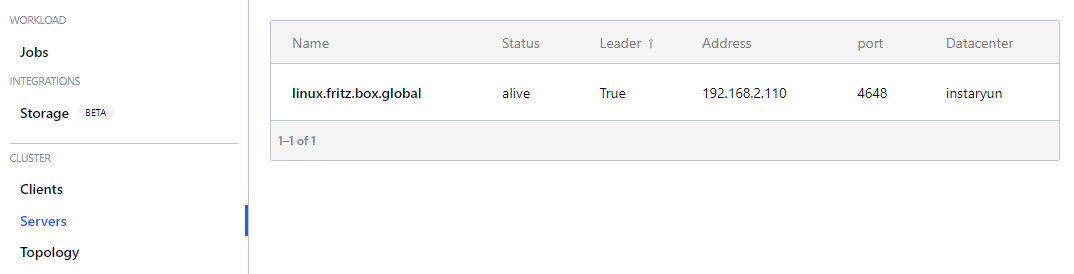
nomad server members

Name                    Address        Port  Status  Leader  Protocol  Build  Datacenter  Region
linux.fritz.box.global  192.168.2.110  4648  alive   true    2         1.1.3  instaryun   global
nomad node status

ID        DC         Name      Class   Drain  Eligibility  Status
3d32b138  instaryun  debian11  <none>  false  eligible     ready
Debugging: If the minion did not show up you can manually join it from your master with
nomad server join nomad-minion. The other way around - you can also tell your client to join a node withnomad node config -update-servers nomad-master. This might become more of an issue when you have more than 1 master server and don't see all your clients in only 1 of them.
Removing Nodes
To remove a minion from our cluster we can set it to be not eligible to receive new workload (or toggle eligibility in the Nomad UI):
nomad node eligibility -disable {node-id}
To actively remove all running jobs from a node we can use the drain command (or click on the drain button in the Nomad UI):
nomad node drain -enable {node-id}
Such nodes will then automatically be removed from the cluster after 24 hrs.