Hashicorp Nomad with Consul II - The Reckoning

Continuation of Hashicorp Nomad Dojo
Consul Service Discovery
When two services need to communicate in a Nomad cluster, they need to know where to find each other and that's called Service Discovery. Because Nomad is purely a cluster manager and scheduler, you will need another piece of software to help you with service discovery: Consul.
Register your Service with Consul
We can now add a service block to our frontend configuration file that tells Consul how to verify that the service is operational. This can be done by using the randomly assigned HTTP port and send an HTTP request on localhost:
job "frontend" {
	datacenters = ["instaryun"]
  type = "service"

	group "frontend" {
    count = 2

    scaling {
      enabled = true
      min     = 2
      max     = 3
    }

		network {
			mode = "host"
			port "http" {
				to = "8080"
			}
		}

    service {
      name = "frontend"
      tags = [
        "frontend",
        "urlprefix-/website"
      ]
      port = "http"

      check {
        name     = "Frontend HTTP Healthcheck"
        path     = "/"
        type     = "http"
        protocol = "http"
        interval = "10s"
        timeout  = "2s"
      }
    }

		task "frontend" {
			driver = "docker"

			config {
				image = "thedojoseries/frontend:latest"
				ports = ["http"]
			}
		}
	}
}
Note I am also adding a tag
urlprefix-/that will be used by the load balancer later on for routing. In the example above there is the/websiteprefix. The web frontend will be available on the corresponding route.
nomad plan frontend.nomad
+ Job: "frontend"
+ Task Group: "frontend" (2 create)
  + Task: "app" (forces create)

Scheduler dry-run:
- All tasks successfully allocated.

Job Modify Index: 0
To submit the job with version verification run:

nomad job run -check-index 0 frontend.nomad
nomad job run -check-index 0 frontend.nomad
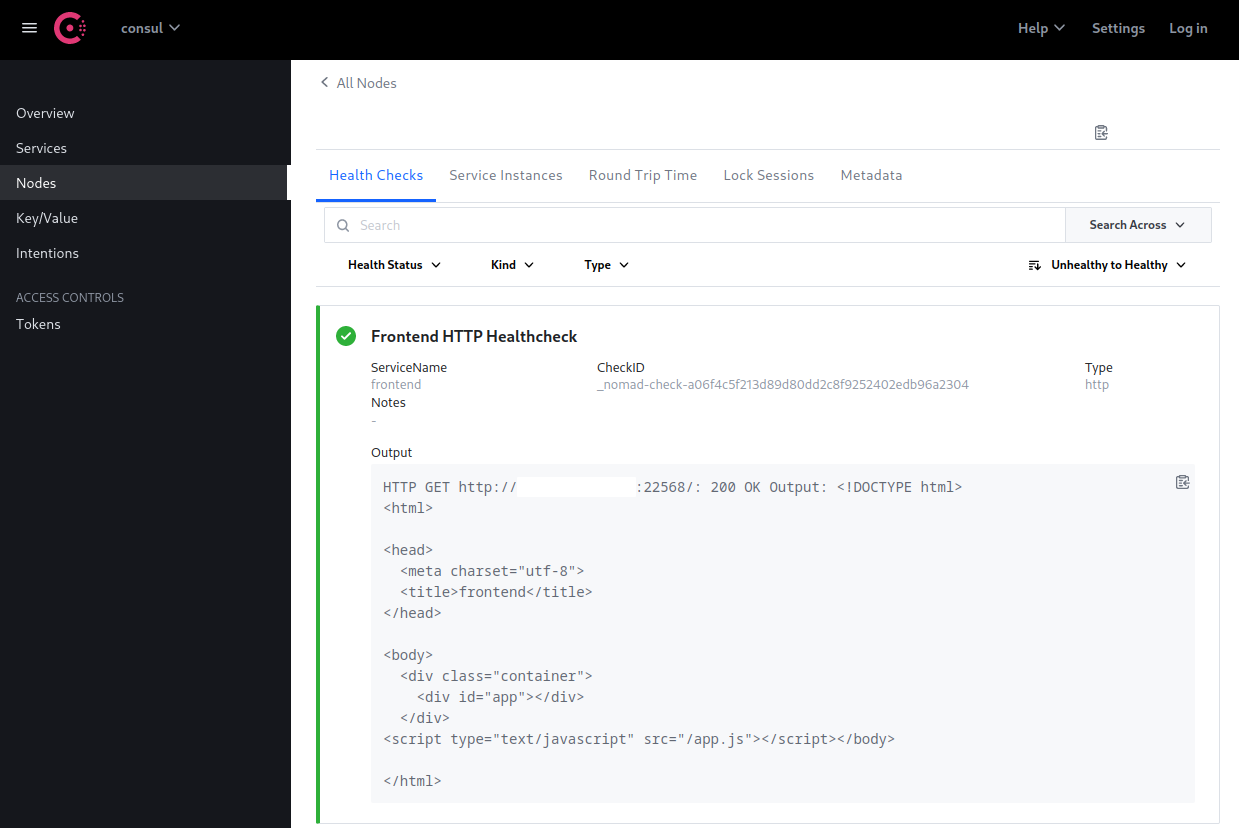
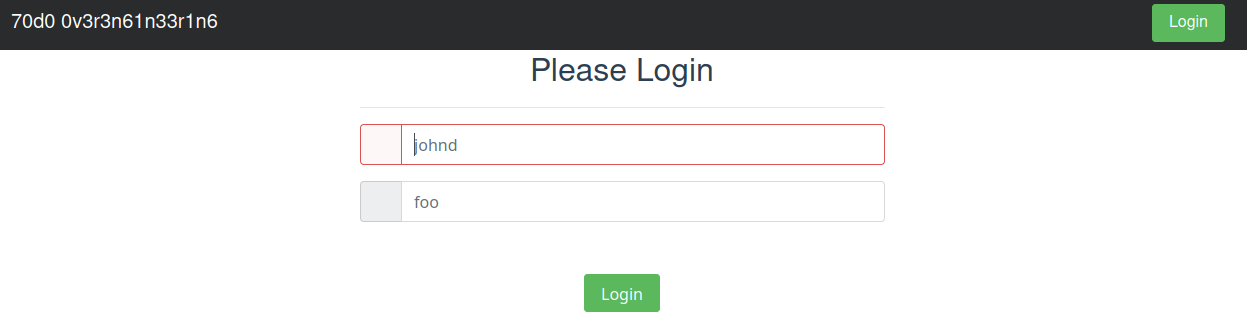
After running the app we can use Consul's UI to see if the Health Check is working:
Or use the REST API to check if our frontend service has been registered by running the following queries on the Nomad Master server:
curl --insecure https://localhost:8501/v1/catalog/services

{
	"consul": [],
	"frontend": ["frontend", "urlprefix-/website"],
	"nomad-client": ["http"]
}
To get the two service ports we can check:
curl --insecure 'https://localhost:8501/v1/health/service/frontend?passing'

[
    {
        ...
            "Address": "my.minion.com",
            "TaggedAddresses": {
                "lan_ipv4": {
                    "Address": "my.minion.com",
                    "Port": 22568
                },
                "wan_ipv4": {
                    "Address": "my.minion.com",
                    "Port": 22568
                }
            },
        ...
            "Address": "my.minion.com",
            "TaggedAddresses": {
                "lan_ipv4": {
                    "Address": "my.minion.com",
                    "Port": 29222
                },
                "wan_ipv4": {
                    "Address": "my.minion.com",
                    "Port": 29222
                }
            },
        ...
    }
]
And here we see that the two service instances run on port 22568 and 29222 - which can be confirmed on our Minion:
docker ps
CONTAINER ID  IMAGE                           PORTS
eec03c397329  thedojoseries/frontend:latest   my.minion.com:29222->8080/tcp
bf06acaf078e  thedojoseries/frontend:latest   my.minion.com:27906->8080/tcp
Adding the Fabio Load Balancer
Define a job called fabio in fabio.nomad:
- Define a group called fabio.
- Define a task called fabio.
- Fabio should be using the Docker driver.
- The image for this container should be fabiolb/fabio.
- Usually, Docker containers run in a network mode called Bridge. In a bridge mode, containers run on a different network stack than the host. Because Fabio needs to be able to communicate easily with Consul, which is running as a process on the host and not as a Docker container, you should configure fabio to run in a network mode called host instead (which will run the container in the same network stack as the host).
- Nomad should allocate 200 MHz of cpu and 128 MB of memory to this task.
- You should allocate two static ports for Fabio:
9999 - Load Balancer&9998 - UI.
- Define a task called fabio.
job "fabio" {
  datacenters = ["instaryun"]
  type = "system"

  group "fabio" {

    network {
      port "http" {
        static = 9998
      }
      port "lb" {
        static = 9999
      }
    }

		task "fabio" {
			driver = "docker"

			config {
				image = "fabiolb/fabio:latest"
        network_mode = "host"
				ports = ["http", "lb"]
			}

      resources {
        cpu    = 200
        memory = 128
		  }
    }
  }
}
nomad plan fabio.nomad
+ Job: "fabio"
+ Task Group: "fabio" (1 create)
  + Task: "fabio" (forces create)

Scheduler dry-run:
- All tasks successfully allocated.

Job Modify Index: 0
To submit the job with version verification run:

nomad job run -check-index 0 fabio.nomad
nomad job run -check-index 0 fabio.nomad
Now check the Fabio log to see if there are any error messages:
nomad status fabio

Allocations
ID        Node ID   Task Group  Version  Desired  Status   Created  Modified
029b5c1c  005f708b  fabio       0        run      running  35s ago  31s ago
nomad alloc logs -stderr 029b5c1c
2022/06/25 09:57:44 [INFO] consul: Connecting to "localhost:8500" in datacenter "consul"
2022/06/25 09:57:44 [INFO] Admin server access mode "rw"
2022/06/25 09:57:44 [INFO] Admin server listening on ":9998"
2022/06/25 09:57:44 [INFO] Waiting for first routing table
2022/06/25 09:57:44 [INFO] consul: Using dynamic routes
2022/06/25 09:57:44 [INFO] consul: Using tag prefix "urlprefix-"
2022/06/25 09:57:44 [INFO] consul: Watching KV path "/fabio/config"
2022/06/25 09:57:44 [INFO] consul: Watching KV path "/fabio/noroute.html"
2022/06/25 09:57:44 [INFO] Config updates
+ route add frontend /login http://my.minion.com:29222/ tags "frontend"
+ route add frontend /login http://my.minion.com:22568/ tags "frontend"
2022/06/25 09:57:44 [INFO] consul: Registered fabio as "fabio"
2022/06/25 09:57:44 [INFO] consul: Registered fabio with id "fabio-mydatacenter-9998"
2022/06/25 09:57:44 [INFO] consul: Registered fabio with address "my.minion.com"
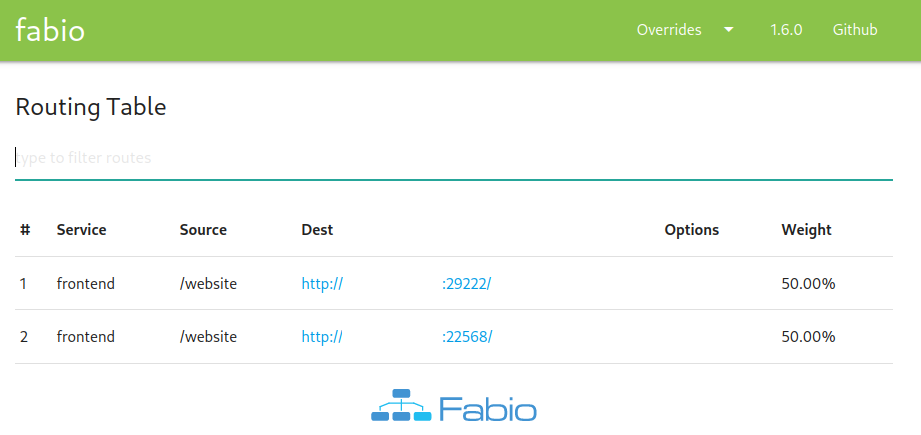
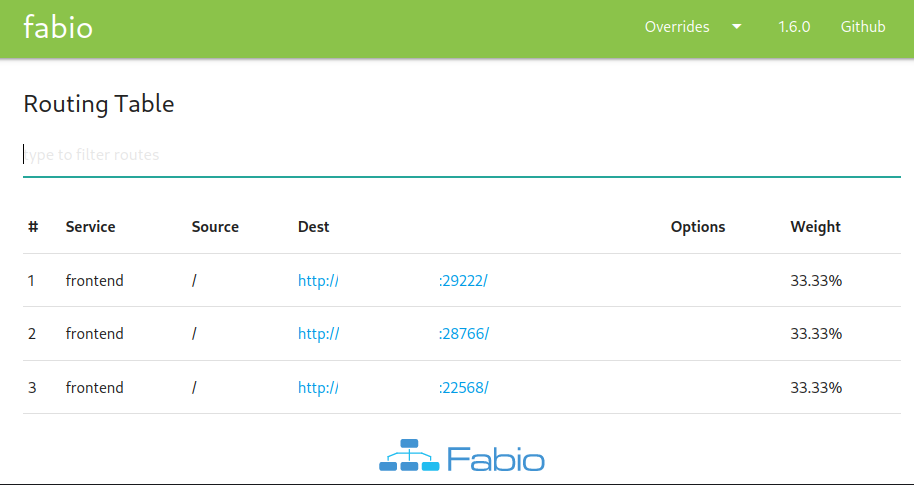
The service is running and it successfully picked up the routes from our frontend containers. We can also check the Fabio UI on Port 9998 on our Minion IP:
Start Load Balancing
The frontend (http) above is available on port 9998 (as defined inside the Nomad job file). The load balancing happens on the port we defined as lb -> default 9999. So I should now be round-robbin'ed between my two frontend container when opening my.minion.com:9999/website.
Problem 1: I did get an error
504inside my browser when I tried to access the URL - the load balancer did not get a reply from the frontend container. Fabio's error log saidNo route for my.minion.com:9999. I had to restart Fabio for it to actually start catching the traffic.
Problem 2: After the restart the route was actually leading somewhere. But this particular container does not like the URL prefix
/websiteI added. I started seeing requests to the root URL that obviously failedGET http://my.minion.com:9999/app.js [HTTP/1.1 404 Not Found 268ms]. So I needed to remove it.
Changing the URL prefix inside frontend.nomad:
+/- Tags {
      + Tags: "urlprefix-/"
        Tags: "frontend"
      - Tags: "urlprefix-/website"
    }
And redeploying the application:
nomad plan frontend.nomad
nomad job run -check-index 27785 frontend.nomad
Now I can cycle the Fabio deployment off/on:
Checking the Fabio UI I can now see that the load balancer is now using the root / for both containers. And I am redirected to the frontend service on my.minion.com:9999/:
Canary Deployment
The update block inside the Nomad job configuration allows us to run a new version of our app next to the older one. Enabling us to slowly switch our cluster to a new version and keeping an eye open for potential issues in the progress:
- max_parallel: Only one instance should be updated at a time.
- min_healthy_time: Minimum time that the allocation needs to remain healthy to be successful.
- healthy_deadline: Maximum time to wait before failing the allocation.
- auto_revert: Revert back to the old version if allocation failed true:false
- auto_promote: A successful allocation should promote the next one true:false
- canary: Number of updated allocations after update is successful.
I can now update the Nomad job file to use the update configuration to deploy version 2 of the frontend container thedojoseries/frontend:2.0:
job "frontend" {
	datacenters = ["instaryun"]
  type = "service"

	group "frontend" {
    count = 2

    scaling {
      enabled = true
      min     = 2
      max     = 3
    }

    update {
      max_parallel = 1
      min_healthy_time = "5s"
      healthy_deadline = "30s"
      auto_revert = false
      auto_promote = false
      canary = 1
    }

		network {
			mode = "host"
			port "http" {
				to = "8080"
			}
		}

    service {
      name = "frontend"
      tags = [
        "frontend",
        "urlprefix-/"
      ]
      port = "http"

      check {
        name     = "Frontend HTTP Healthcheck"
        path     = "/"
        type     = "http"
        protocol = "http"
        interval = "10s"
        timeout  = "2s"
      }
    }

		task "frontend" {
			driver = "docker"

			config {
				image = "thedojoseries/frontend:2.0"
				ports = ["http"]
			}
		}
	}
}
nomad plan frontend.nomad
+/- Job: "frontend"
+/- Task Group: "frontend" (1 canary, 2 ignore)
  +/- Update {
        AutoPromote:      "false"
        AutoRevert:       "false"
    +/- Canary:           "0" => "1"
        HealthCheck:      "checks"
    +/- HealthyDeadline:  "300000000000" => "30000000000"
        MaxParallel:      "1"
    +/- MinHealthyTime:   "10000000000" => "5000000000"
        ProgressDeadline: "600000000000"
      }
  +/- Task: "app" (forces create/destroy update)
    +/- Config {
      +/- image:    "thedojoseries/frontend:latest" => "thedojoseries/frontend:2.0"
          ports[0]: "http"
        }

Scheduler dry-run:
- All tasks successfully allocated.
Re-running the job now stops after deploying one canary allocation using the new frontend:
nomad job run -check-index 27823 frontend.nomad
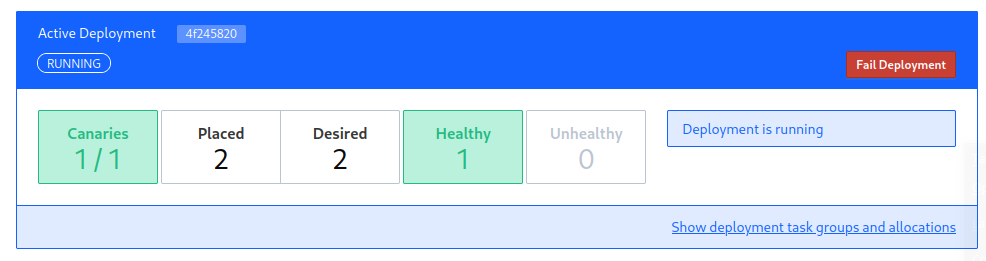
Deployed
Task Group Promoted Desired Canaries Placed Healthy Unhealthy Progress Deadline
frontend false 2 1 1 0 1 2022-06-25T14:40:54+02:00
I can see that the old version is still parallel to the canary:
fd1180eead0e        thedojoseries/frontend:2.0      "docker-entrypoint.s…"   3 minutes ago
d1446f86e3f8        thedojoseries/frontend:latest   "sh -c 'npm start'"      3 hours ago
c2eee382ffe5        thedojoseries/frontend:latest   "sh -c 'npm start'"      3 hours ago
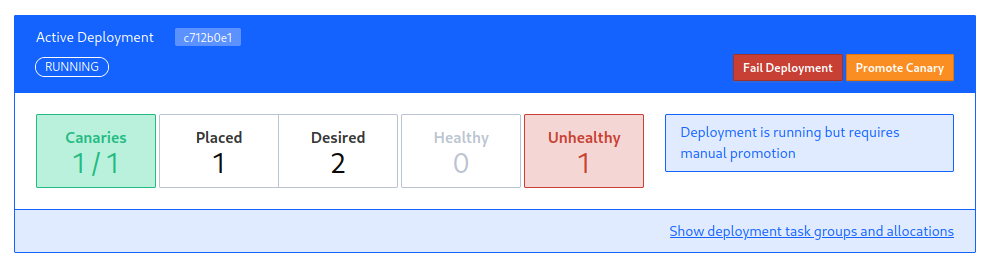
And the Nomad UI tells me that it is waiting for me to confirm that everything worked - but the failed deployment in this list - under "unhealthy" prevents me from doing so. I am not sure why this allocation failed - I assume that I waited to long so that broke the 30s time limit that I set above?
So I made a small change to the job file and re-run it. Fabio picks up the third container:
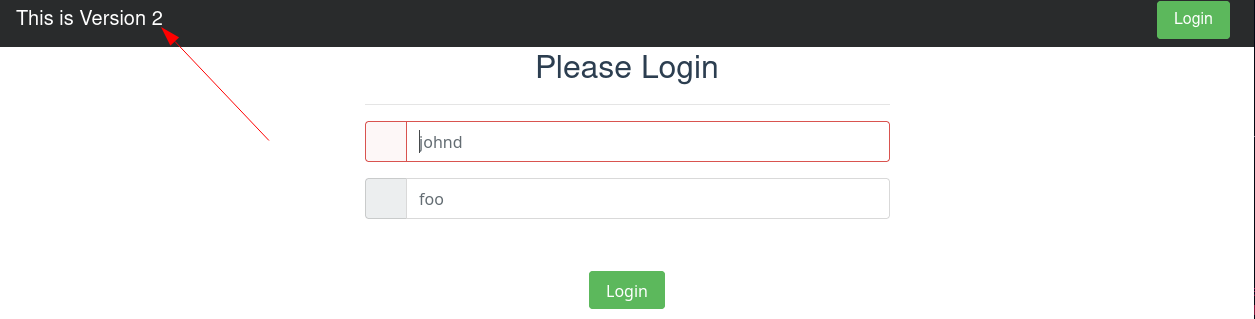
To verify the load balancing is working, refresh the frontend URL until you end up on the canary instance:
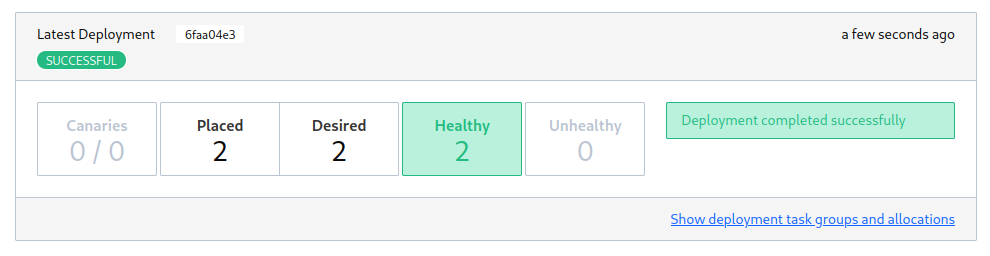
And it seems that this time I was quick enough and can promote the deployment:
This can also be done by running the following command on your Nomad master:
nomad job promote frontend
Now all allocations will be updated:
0a36c884066d        thedojoseries/frontend:2.0    "docker-entrypoint.s…"
d655d75c75a8        thedojoseries/frontend:2.0    "docker-entrypoint.s…"