Hashicorp Dojo Consul Refresher

- Install Consul
- Security
- Configure Consul agents
- Master Configuration
- Start the Consul Service
- Accessing the UI
- Bootstrap the ACL System
- Consul Environment Variables
- Create a Node Policy
- Configuring Nomad for Consul (Only Master Node)
- Accessing the UI (TLS)
- Complete Configuration
Install Consul
The first thing you need to do in order to use Consul is install it:
curl -fsSL https://apt.releases.hashicorp.com/gpg | sudo apt-key add -
sudo apt-add-repository "deb [arch=amd64] https://apt.releases.hashicorp.com $(lsb_release -cs) main"
apt update && apt install consul && consul -v
ERROR
command not found: apt-add-repository->apt install software-properties-common
This will add both a default configuration file /etc/consul.d/consul.hcl and a SystemD service file /usr/lib/systemd/system/consul.service.
Security
All commands in this section can be completed on any system with the Consul binary installed. The outputs and artifacts from these commands should be archived in a secure location for future reference.
Generate the gossip encryption key
Gossip is encrypted with a symmetric key, since gossip between nodes is done over UDP. All agents must have the same encryption key:
consul keygen
qDOPBEr+/oUVeOFQOnVypxwDaHzLrD+lvjo5vCEBbZ0=
NOTE: You will need to add the newly generated key to the encrypt option in the server configuration on all Consul agents. Save your key in a safe location. You will need to reference the key throughout the installation.
Generate TLS certificates for RPC encryption
Consul can use TLS to verify the authenticity of masters and minions. To enable TLS, Consul requires that all agents have certificates signed by a single Certificate Authority (CA).
mkdir /etc/consul.d/tls && cd /etc/consul.d/tls
consul tls ca create
Next create a set of certificates, one for each Consul agent. You will need to select a name for your primary datacenter now, so that the certificates are named properly, as well as a domain for your Consul datacenter.
consul tls cert create -server -dc consul -domain consul
A federated Consul environment requires the server certificate to include the names of all Consul datacenters that are within the federated environment. The -additional-dnsname flag allows you to provide an additional DNS names:
consul tls cert create -server -dc consul -domain consul -additional-dnsname="*.consul"
chown consul:consul ./*
chmod 640 ./*
The directory will now contain the following files:
ls -la /etc/consul.d/tls
-rw-r----- 1 consul consul consul-agent-ca-key.pem
-rw-r----- 1 consul consul consul-agent-ca.pem
-rw-r----- 1 consul consul consul-server-consul-0-key.pem
-rw-r----- 1 consul consul consul-server-consul-0.pem
The Consul minions agents will only need the the CA certificate,
consul-agent-ca.pem, to enable mTLS. Copy this file to/etc/consul.d/tlson all minions.
The recommended approach is leverage the auto encryption mechanism provided by Consul that automatically generates client certificates using the Consul connect service mesh CA without the need for an operator to manually generate certificates for each client.
Configure Consul agents
Consul server agents typically require a superset of configuration required by Consul client agents. You will specify common configuration used by all Consul agents in /etc/consul.d/consul.hcl and server specific configuration in /etc/consul.d/server.hcl.
The APT installation already provided the default consul.hcl let's add the server.hcl and apply the correct permissions to all files:
cd /etc/consul.d
touch server.hcl
chown consul:consul ./*
chmod 640 ./*
General defaults
The consul.hcl contains only the path to the data_dir that was automatically created in /opt/consul during the installation. We can now add the name of our datacenter consul and the gossip encryption key:
datacenter = "consul"
data_dir = "/opt/consul"
encrypt = "qDOPBEr+/oUVeOFQOnVypxwDaHzLrD+lvjo5vCEBbZ0="
TLS encryption
For the TLS configuration we need to add - for the Master Node:
tls {
  defaults {
    ca_file = "/etc/consul.d/tls/consul-agent-ca.pem"
    cert_file = "/etc/consul.d/tls/consul-server-consul-0.pem"
    key_file = "/etc/consul.d/tls/consul-server-consul-0-key.pem"
    verify_incoming = true
    verify_outgoing = true
  }
  internal_rpc {
    verify_server_hostname = true
  }
}
And for the Minions:
# TLS configuration

tls {
  defaults {
    ca_file = "/etc/consul.d/tls/consul-agent-ca.pem"
  }
  internal_rpc {
    verify_server_hostname = true
  }
}

auto_encrypt {
    tls = true
 }
Datacenter auto-join
The retry_join parameter allows you to configure all Consul agents to automatically form a datacenter using a common Consul server accessed via DNS address or IP address. This removes the need to manually join the Consul datacenter nodes together.
WARNING: The
joinorretry_joinis a required parameter for the systemd process to complete successfully and send its notify signal on LAN join.
Replace the retry_join parameter value with the correct Master DNS address, IP address, Loopback address for your environment:
retry_join = ["<One of Consul master public IPs>"]
Enable Consul ACLs
Consul uses Access Control Lists (ACLs) to secure the UI, API, CLI, and Consul catalog including service and agent registration. When securing your datacenter you should configure the ACLs first.
Add the ACL configuration to the consul.hcl configuration file and choose a default policy of allow (allow all traffic unless explicitly denied) or deny (deny all traffic unless explicitly allowed).
acl {
  enabled = true
  default_policy = "allow"
  enable_token_persistence = true
}
Performance stanza
The performance stanza allows tuning the performance of different subsystems in Consul:
performance {
  raft_multiplier = 1
}
For more information on Raft tuning and the raft_multiplier setting, check the server performance documentation.
Master Configuration
The master specific configuration will be placed in /etc/consul.d/server.hcl. On my master node I will enable the web user interface and select the agent as server:
ui_config{
  enabled = true
}

auto_encrypt {
  allow_tls = true
}

server = true
bootstrap_expect=1
Consul agent should bind to all addresses on the local machine and will advertise the private IPv4 address to the rest of the datacenter.
bind_addr = "<One of Consul master public IPs>"
When the value for client_addr is undefined, it defaults to 127.0.0.1, allowing only loopback connections. Optionally, you can specify a bind IP address in your Consul server.hcl configuration file. I will leave it at loopback for now, as I don't want to expose the Consul HTTP user interface:
client_addr = "127.0.0.1"
Consul Service Mesh
Consul service mesh provides service-to-service connection authorization and encryption using mutual Transport Layer Security (TLS). Applications can use sidecar proxies in a service mesh configuration to establish TLS connections for inbound and outbound connections without being aware of Consul service mesh.
Consul service mesh uses the registered service identity (rather than IP addresses) to enforce access control with intentions.
connect {
  enabled = true
}

addresses {
  grpc = "<One of Consul master public IPs>"
}

ports {
  grpc  = 8502
  dns = 8600
  http = 8500
  https = 8501
  serf_lan = 8301
  serf_wan = 8302
  server = 8300
}
- connect.enabled - Controls whether Connect features are enabled on this agent. Should be enabled on all servers in the cluster in order for Connect to function properly.
- addresses.grpc - The address that Consul will bind gRPC API to. Defaults to client_addr but it might be sensitive to have it on localhost/127.0.0.1 for security reasons.
- ports.grpc - The gRPC API port. We recommend using 8502 for grpc by convention as some tooling will work automatically with this. Currently gRPC is only used to expose Envoy xDS API to Envoy proxies.
Start the Consul Service
First verify your configuration on all hosts:
consul validate /etc/consul.d/
Installing Consul through the package manager also added a SystemD service file for us in /lib/systemd/system/consul.service:
[Unit]
Description="HashiCorp Consul - A service mesh solution"
Documentation=https://www.consul.io/
Requires=network-online.target
After=network-online.target
ConditionFileNotEmpty=/etc/consul.d/consul.hcl

[Service]
EnvironmentFile=/etc/consul.d/consul.env
User=consul
Group=consul
ExecStart=/usr/bin/consul agent -config-dir=/etc/consul.d/
ExecReload=/bin/kill --signal HUP $MAINPID
KillMode=process
KillSignal=SIGTERM
Restart=on-failure
LimitNOFILE=65536

[Install]
WantedBy=multi-user.target
Before using this file I will execute Consul manually - this way I will see potential error messages during the start up:
/usr/bin/consul agent -config-dir=/etc/consul.d/

==> Starting Consul agent...
           Version: '1.12.2'
           Node ID: 'nodeid'
         Node name: 'Nomad'
        Datacenter: 'consul' (Segment: '<all>')
            Server: true (Bootstrap: true)
       Client Addr: [masterip] (HTTP: 8500, HTTPS: -1, gRPC: 8502, DNS: 8600)
      Cluster Addr: masterip (LAN: 8301, WAN: 8302)
           Encrypt: Gossip: true, TLS-Outgoing: true, TLS-Incoming: true, Auto-Encrypt-TLS: true
The process is starting without any error messages. But now that I see the log I realize that I did not open any ports yet. Consul requires up to 6 different ports to work properly, some on TCP, UDP, or both protocols:
| Use | Default Ports |
| DNS: | The DNS server (TCP and UDP) 8600 |
| HTTP: | The HTTP API (TCP Only) 8500 |
| HTTPS: | The HTTPs API disabled (8501)* |
| gRPC: | The gRPC API disabled (8502)* |
| LAN Serf: | The Serf LAN port (TCP and UDP) 8301 |
| Wan Serf: | The Serf WAN port (TCP and UDP) 8302 |
| server: | Server RPC address (TCP Only) 8300 |
| Sidecar Proxy Min: | Inclusive min port number to use for automatically assigned sidecar service registrations. 21000 |
| Sidecar Proxy Max: | Inclusive max port number to use for automatically assigned sidecar service registrations. 21255 |
For HTTPS and gRPC the ports specified in the table are recommendations. All ports can be set inside Agent Config. But let's open the defaults for now:
ufw allow 8301,8302,8300,8502/tcp
ufw allow 8301,8302,8502/udp
ufw reload && ufw status
And run the Consul service:
systemctl enable consul
service consul start
ERROR Message:
service consul status
● consul.service - "HashiCorp Consul - A service mesh solution"
     Loaded: loaded (/lib/systemd/system/consul.service; enabled; vendor preset: enabled)
     Active: failed (Result: exit-code) since Fri 2022-06-17 06:29:54 CEST; 4s ago
       Docs: https://www.consul.io/
    Process: 325302 ExecStart=/usr/bin/consul agent -config-dir=/etc/consul.d/ (code=exited, status=1/FAILUR>
   Main PID: 325302 (code=exited, status=1/FAILURE)
        CPU: 93ms

Jun 17 06:29:54 Nomad systemd[1]: consul.service: Main process exited, code=exited, status=1/FAILURE
Jun 17 06:29:54 Nomad systemd[1]: consul.service: Failed with result 'exit-code'.
Jun 17 06:29:54 Nomad systemd[1]: consul.service: Scheduled restart job, restart counter is at 5.
Jun 17 06:29:54 Nomad systemd[1]: Stopped "HashiCorp Consul - A service mesh solution".
Jun 17 06:29:54 Nomad systemd[1]: consul.service: Start request repeated too quickly.
Jun 17 06:29:54 Nomad systemd[1]: consul.service: Failed with result 'exit-code'.
Jun 17 06:29:54 Nomad systemd[1]: Failed to start "HashiCorp Consul - A service mesh solution".
journalctl -xe -u consul

The job identifier is 73920.
consul[325302]: ==> Failed to load cert/key pair: open /etc/consul.d/tls/consul-server-consul-0.pem: permission denied
systemd[1]: consul.service: Main process exited, code=exited, status=1/FAILURE
Subject: Unit process exited
Ok that is strange - I tested to read the file using the consul user. Even when I run chmod 777 on it I am still unable to access it:
su consul -s /bin/bash -c "cat /etc/consul.d/tls/consul-server-consul-0.pem"
cat: /etc/consul.d/tls/consul-server-consul-0.pem: Permission denied
This was an issue with the folder permission - I had to raise it to:
chmod 744 /etc/consul.d/tls
Now it worked!
Accessing the UI
Just as I did with the Nomad web user interface I can now tunnel the Consul HTTP Port (default 8500) to the localhost of my local machine:
ssh -L 8181:localhost:8500 root@[Consul Master public IP] -p [SSH Port]
And access the interface on http://localhost:8181:
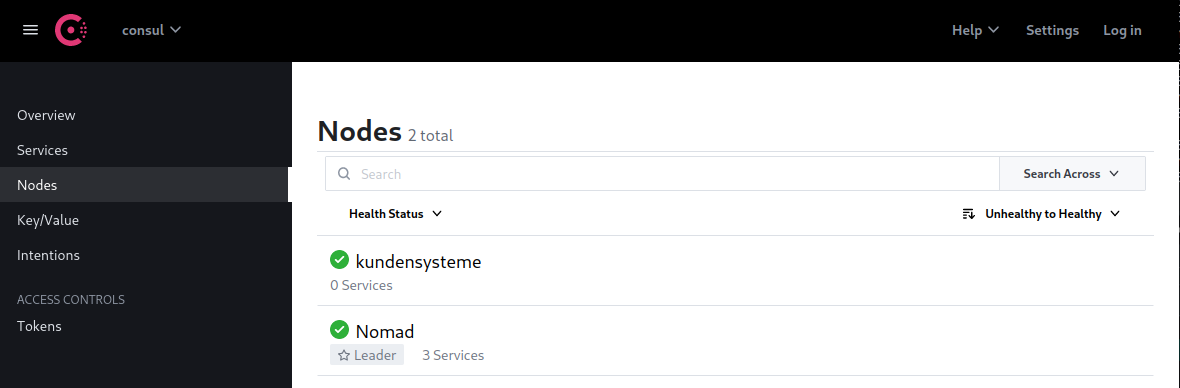
Nomad automatically added my Nomad service and my first active Minion server was also added successfully. But after a while I started getting failing health checks:
Failing serf check: This node has a failing serf node check. The health statuses shown on this page are the statuses as they were known before the node became unreachable.
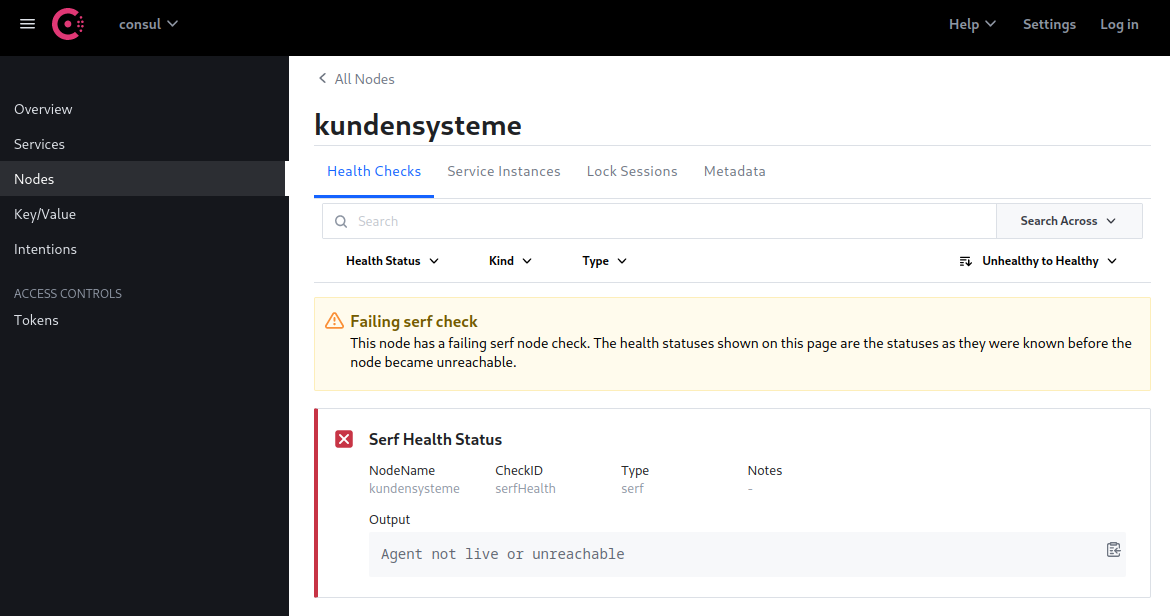
SOLVED: I was missing the auto_encrypt key in my client configuration. Now everything seems to work - here is the entire configuration -> see final configuration files.
Bootstrap the ACL System
Working from one agent generate the Consul bootstrap token, which has unrestricted privileges:
consul acl bootstrap
This will return the Consul bootstrap token. You will need the SecretID for all subsequent Consul API requests (including CLI and UI). Ensure that you save the SecretID.
Consul Environment Variables
Just as with Nomad we now need to use the TLS certificates and ACL tokens when we want to use the Consul CLI. So let's add them to our environment, e.g. in ~/.zshrc:
export CONSUL_CACERT=/etc/consul.d/tls/consul-agent-ca.pem
export CONSUL_CLIENT_CERT=/etc/consul.d/tls/consul-server-consul-0.pem
export CONSUL_CLIENT_KEY=/etc/consul.d/tls/consul-server-consul-0-key.pem
export CONSUL_HTTP_TOKEN="<Token SecretID from previous step>"
export CONSUL_MGMT_TOKEN="<Token SecretID from previous step>"
Try running a CLI Command on the master Node:
consul members
Node           Address           Status  Type    Build   Protocol  DC
Nomad          <Master IP:8301>  alive   server  1.12.2  2         consul
kundensysteme  <Minion IP:8301>  alive   client  1.12.2  2         consul
Create a Node Policy
Create a node policy file node-policy.hcl with write access for nodes related actions and read access for service related actions:
agent_prefix "" {
  policy = "write"
}
node_prefix "" {
  policy = "write"
}
service_prefix "" {
  policy = "read"
}
session_prefix "" {
  policy = "read"
}
Generate the Consul node ACL policy with the newly created policy file:
consul acl policy create \
  -token=${CONSUL_MGMT_TOKEN} \
  -name node-policy \
  -rules @node-policy.hcl
Create the node token with the newly created policy:
consul acl token create \
  -token=${CONSUL_MGMT_TOKEN} \
  -description "node token" \
  -policy-name node-policy
On ALL Consul Servers add the node token:
consul acl set-agent-token \
  -token="<Management Token SecretID>" \
  agent "<Node Token SecretID>"
To increase security for your datacenter, we we will complete the Secure Consul with Access Control Lists (ACLs) in the next step.
Configuring Nomad for Consul (Only Master Node)
After the installation I checked the Consul log and found that there was an error message coming in every 30s:
consul[351769]: 2022-06-18T13:42:31.136+0200 [ERROR] agent.http: Request error: method=PUT url=/v1/agent/service/register from=127.0.0.1:59386 error="Bad request: Invalid service address"
consul[351769]: 2022-06-18T13:43:01.142+0200 [ERROR] agent.http: Request error: method=PUT url=/v1/agent/service/register from=127.0.0.1:59386 error="Bad request: Invalid service address"
consul[351769]: 2022-06-18T13:43:31.160+0200 [ERROR] agent.http: Request error: method=PUT url=/v1/agent/service/register from=127.0.0.1:59386 error="Bad request: Invalid service address"
consul[351769]: 2022-06-18T13:44:01.166+0200 [ERROR] agent.http: Request error: method=PUT url=/v1/agent/service/register from=127.0.0.1:59386 error="Bad request: Invalid service address"
I assumed that this must be the local Nomad service trying to connect and missing the ACL token. There is a Consul block in the Nomad configuration file:
consul {
  address = "127.0.0.1:8500"
  grpc_address = "127.0.0.1:8502"
  ssl = true
  ca_file = "/etc/consul.d/tls/consul-agent-ca.pem"
  cert_file = "/etc/consul.d/tls/consul-server-consul-0.pem"
  key_file = "/etc/consul.d/tls/consul-server-consul-0-key.pem"
  verify_ssl = true
  token = ""
  client_service_name = "nomad-client"
  server_service_name = "nomad"
  auto_advertise      = true
  server_auto_join    = true
  client_auto_join    = true
}
To prevent getting permission errors when trying to read the cert files we need to expand the read rights on those consul certificates. Starting the service back up - seems is in order now. Nomad and Consul are running and the error messages disappeared.
Accessing the UI (TLS)
I was running into the issue that now with TLS encryption enabled and cert verification enforced I was unable to access the Consul UI. Since I keep my HTTP/HTTPS ports closed I will change the Consul Server configuration (only on the master node that supplies my UI) to skip the verification step for HTTPS:
# TLS configuration
tls {
  defaults {
    ca_file = "/etc/consul.d/tls/consul-agent-ca.pem"
    cert_file = "/etc/consul.d/tls/consul-server-consul-0.pem"
    key_file = "/etc/consul.d/tls/consul-server-consul-0-key.pem"
    verify_incoming = true
    verify_outgoing = true
  }
  internal_rpc {
    verify_server_hostname = true
  }
  https {
    verify_incoming = false
  }
}
Now I only need to forward the HTTPS port (default 8501) to my machine and am able to access the UI again on https://localhost:8181:
ssh -L 8181:localhost:8501 root@[Consul Master public IP] -p [SSH Port]
Complete Configuration
Master Node
consul.hcl
# datacenter
datacenter = "consul"

# data_dir
data_dir = "/opt/consul"

# bootstrap_expect
bootstrap_expect=1

# encrypt
encrypt = "[Gossip Encryption Key]"

# retry_join
retry_join = ["[My Master Address]"]

# TLS configuration
tls {
  defaults {
    ca_file = "/etc/consul.d/tls/consul-agent-ca.pem"
    cert_file = "/etc/consul.d/tls/consul-server-consul-0.pem"
    key_file = "/etc/consul.d/tls/consul-server-consul-0-key.pem"
    verify_incoming = true
    verify_outgoing = true
  }
  internal_rpc {
    verify_server_hostname = true
  }
  https {
    verify_incoming = false
  }
}

# ACL configuration
acl {
  enabled = true
  default_policy = "allow"
  enable_token_persistence = true
}

# Performance
performance {
  raft_multiplier = 1
}
server.hcl
# client_addr
client_addr = "127.0.0.1"

# ui
ui_config{
  enabled = true
}

auto_encrypt {
  allow_tls = true
}

# server
server = true

# Bind addr
bind_addr = "[My Master Address]"

# Service mesh
# connect {
#   enabled = true
# }

# addresses {
#   grpc = "[My Master Address]"
# }

ports {
  grpc  = 8502
  dns = -1
  http = -1
  https = 8501
  serf_lan = 8301
  serf_wan = 8302
  server = 8300
}
Minion Node
consul.hcl
# datacenter
datacenter = "consul"

# data_dir
data_dir = "/opt/consul"

# client_addr
client_addr = "127.0.0.1"


# server
server = false
bind_addr = "[My Minion Address]"
ports {
  grpc  = 8502
  dns = 8600
  http = 8500
  https = 8501
  serf_lan = 8301
  serf_wan = 8302
  server = 8300
}

# encrypt
encrypt = "[Gossip Encryption Key]"

# retry_join
retry_join = ["[My Master Address]"]


# TLS configuration
tls {
  defaults {
    ca_file = "/etc/consul.d/tls/consul-agent-ca.pem"
    # cert_file = "/etc/consul.d/tls/consul-server-consul-0.pem"
    # key_file = "/etc/consul.d/tls/consul-server-consul-0-key.pem"
  }
  internal_rpc {
    verify_server_hostname = true
  }
}
auto_encrypt {
    tls = true
 }

# ACL configuration
acl {
  enabled = true
  default_policy = "allow"
  enable_token_persistence = true
}

# Performance
performance {
  raft_multiplier = 1
}