Hashicorp Nomad Refresher - Security

- Secure Access to the Nomad GUI
- Gossip Encryption
- mTLS Transport Encryptions
Secure Access to the Nomad GUI
SSH Tunnel
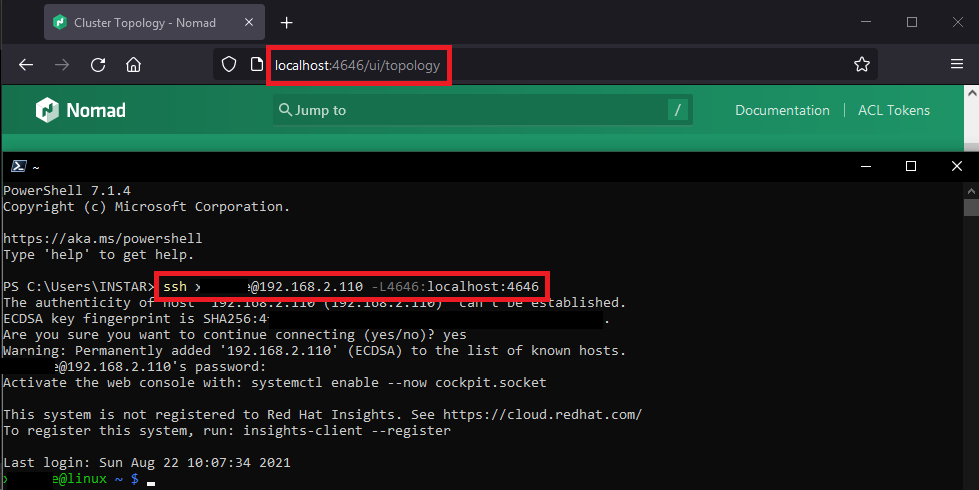
In the previous step I opened the port 4646 on both my master and minion server which gave me access to the Nomad UI. Another - and much more secure - way to access the UI is to tunnel the HTTP port through SSH. On my Windows PC I simply have to type in the following command:
ssh myuser@192.168.2.110 -L4646:localhost:4646
And now I am able to access the UI via localhost instead of the IP address of my RHEL8 Nomad master server:
We can now close the corresponding ports on our servers:
firewall-cmd --remove-port=4646/tcp
firewall-cmd --reload
firewall-cmd --list-ports
ufw delete allow 4646:4647/tcp
ufw allow 4647/tcp
ufw reload
ufw status verbose
Gossip Encryption
Nomad server's gossip protocol that is used to communicate membership and liveness information can be encrypted with symmetric keys. Enabling gossip encryption requires you to set an encryption key when starting the Nomad server.
Create an encryption key to encrypt the communication between Nomad agents (alternatively, you can also use openssl rand -base64 32):
nomad operator keygen

4kRkFQfcc3LU0BazP1ca+z==
This key has to be added to the Nomad server configuration to enable the Gossip encryption:
nano /etc/nomad.d/server.hcl
server {
  enabled = true
  bootstrap_expect = 1
  encrypt = "4kRkFQfcc3LU0BazP1ca+z=="
}
You can perform a rolling restart of the Nomad process on each of your server nodes to enable encryption. Restart your servers one at a time in order to maintain a quorum of nodes on one side or the other of this soft partition.
Once all of the nodes have been restarted all gossip traffic will be encrypted between all of your server nodes.
systemctl restart nomad
systemctl status nomad
mTLS Transport Encryptions
The first step to configuring TLS for Nomad is generating certificates. In order to prevent unauthorized cluster access, Nomad requires all certificates be signed by the same Certificate Authority (CA). This should be a private CA and not a public one like Let's Encrypt as any certificate signed by this CA will be allowed to communicate with the cluster.
Installing CFSSL
You can generate a private CA certificate and key with Cloudflare cfssl. Download the latest release with wget:
wget https://github.com/cloudflare/cfssl/releases/download/v1.6.0/cfssl_1.6.0_linux_amd64 -O cfssl
wget https://github.com/cloudflare/cfssl/releases/download/v1.6.0/cfssljson_1.6.0_linux_amd64 -O cfssljson

chmod +x cfssljson cfssl
mv cfssl* /usr/local/bin
Verify that it is working:
cfssl version

Version: 1.6.0
Runtime: go1.12.12
cfssljson -version

Version: 1.6.0
Runtime: go1.12.12
Generating the TLS Keys
Generate the CA's private key and certificate:
mkdir nomad_certs && cd nomad_certs
cfssl print-defaults csr | cfssl gencert -initca - | cfssljson -bare nomad-ca
Nomad certificates are signed with their region and role such as:
client.global.nomadfor a client node in the global regionserver.us-west.nomadfor a server node in the us-west region
To create certificates for the client and server in the cluster use the following configuration file as cfssl.json to increase the default certificate expiration time:
{
  "signing": {
    "default": {
      "expiry": "87600h",
      "usages": ["signing", "key encipherment", "server auth", "client auth"]
    }
  }
}
Generate a certificate for the Nomad server
echo '{}' | cfssl gencert -ca=nomad-ca.pem -ca-key=nomad-ca-key.pem -config=cfssl.json \
    -hostname="server.global.nomad,localhost,127.0.0.1" - | cfssljson -bare server
Generate a certificate for the Nomad client
echo '{}' | cfssl gencert -ca=nomad-ca.pem -ca-key=nomad-ca-key.pem -config=cfssl.json \
    -hostname="client.global.nomad,localhost,127.0.0.1" - | cfssljson -bare client
Generate a certificate for the CLI
echo '{}' | cfssl gencert -ca=nomad-ca.pem -ca-key=nomad-ca-key.pem -profile=client \
    - | cfssljson -bare cli
You should now have the following files:
cfssl.json- cfssl configuration.nomad-ca.csr- CA signing request.nomad-ca-key.pem- CA private key. Keep safe.nomad-ca.pem- CA public certificate.cli.csr- Nomad CLI certificate signing request.cli-key.pem- Nomad CLI private key.cli.pem- Nomad CLI certificate.client.csr- Nomad client node certificate signing request for the global region.client-key.pem - Nomad client node private key for the global region.client.pem- Nomad client node public certificate for the global region.server.csr- Nomad server node certificate signing request for the global region.server-key.pem - Nomad server node private key for the global region.server.pem- Nomad server node public certificate for the global region.
Each Nomad node should have:
Master Server Configuration
- The appropriate key
server-key.pem - And certificate
server.pemfile - In addition each node needs the CA's public certificate (
nomad-ca.pem).
mkdir /etc/nomad.d/certs
sudo cp server-key.pem /etc/nomad.d/certs
sudo cp server.pem /etc/nomad.d/certs
sudo cp nomad-ca.pem /etc/nomad.d/certs
Minion Server Configuration
- The appropriate key
client-key.pem - And certificate
client.pemfile - In addition each node needs the CA's public certificate (
nomad-ca.pem).
Create the same directory and choose you favourite way to copy in the client certs from your master server:
mkdir /etc/nomad.d/certs
Configuring Nomad
Now we need to add the certificates to our server config:
Master Server
nano /etc/nomad.d/server.hcl
# Require TLS
tls {
  http = true
  rpc  = true

  ca_file   = "/etc/nomad.d/certs/nomad-ca.pem"
  cert_file = "/etc/nomad.d/certs/server.pem"
  key_file  = "/etc/nomad.d/certs/server-key.pem"

  verify_server_hostname = true
  verify_https_client    = true
}
These two settings are important for ensuring all of Nomad's mTLS security properties are met. If verify_server_hostname is set to false the node's certificate will be checked to ensure it is signed by the same CA, but its role and region will not be verified. This means any service with a certificate signed by same CA as Nomad can act as a client or server of any region.
verify_https_client requires HTTP API clients to present a certificate signed by the same CA as Nomad's certificate. It may be disabled to allow HTTP API clients (e.g. Nomad CLI, Consul, or curl) to communicate with the HTTPS API without presenting a client-side certificate. If verify_https_client is enabled only HTTP API clients presenting a certificate signed by the same CA as Nomad's certificate are allowed to access Nomad.
Minion Server
The Nomad client configuration is similar to the server configuration. The biggest difference is in the certificate and key used for configuration:
nano /etc/nomad.d/client.hcl
tls {
  http = true
  rpc  = true

  ca_file   = "/etc/nomad.d/certs/nomad-ca.pem"
  cert_file = "/etc/nomad.d/certs/client.pem"
  key_file  = "/etc/nomad.d/certs/client-key.pem"

  verify_server_hostname = true
  verify_https_client    = true
}
Once all of the nodes have been configured restart the Nomad service everywhere:
systemctl restart nomad
systemctl status nomad
System Environment
Try to send a CLI command with TLS encryption:
cd ~/nomad_certs

nomad server members -ca-cert=nomad-ca.pem -client-cert=cli.pem -client-key=cli-key.pem -addr=https://127.0.0.1:4646

Name                    Address        Port  Status  Leader  Protocol  Build  Datacenter  Region
linux.fritz.box.global  192.168.2.110  4648  alive   true    2         1.1.3  instaryun   global
This process can be cumbersome to type each time, so the Nomad CLI also searches environment variables for default values. Use the following commands to set environment variables in your shell (nano ~/.bash_profile or nano ~/.zshrc).
- NOMAD_ADDR is the URL of the Nomad agent and sets the default for
-addr:
export NOMAD_ADDR=https://127.0.0.1:4646
- NOMAD_CACERT is the location of your CA certificate and sets the default for
-ca-cert:
export NOMAD_CACERT=~/nomad_certs/nomad-ca.pem
- NOMAD_CLIENT_CERT is the location of your CLI certificate and sets the default for
-client-cert:
export NOMAD_CLIENT_CERT=~/nomad_certs/cli.pem
- NOMAD_CLIENT_KEY is the location of your CLI key and sets the default for
-client-key:
export NOMAD_CLIENT_KEY=~/nomad_certs/cli-key.pem
After these environment variables are correctly configured and the configuration file source ~/.bash_profile or source ~/.zshrc, the CLI will respond as expected:
nomad server members

Name                    Address        Port  Status  Leader  Protocol  Build  Datacenter  Region
linux.fritz.box.global  192.168.2.110  4648  alive   true    2         1.1.3  instaryun   global
Repeat those steps with all your servers.
Browser Configuration
When I try to connect to the Nomad UI I am now forced to use HTTPS:
Client sent an HTTP request to an HTTPS server.
And when I try to use HTTPS it refuses my certificate:
ERR_BAD_SSL_CLIENT_AUTH_CERT
I can now use the CLI certificate to generate an .pfx file that I will have to import to my browser to be allowed back onto the Nomad UI. Make sure you are inside the directory where you generated the certificates and run the following OpenSSL command:
openssl pkcs12 -inkey cli-key.pem -in cli.pem -export -out nomad.pfx

Enter Export Password:
Verifying - Enter Export Password:
You can add a password here or leave it empty. Then download the certificate and import it into your web browser - e.g. Google Chromium:
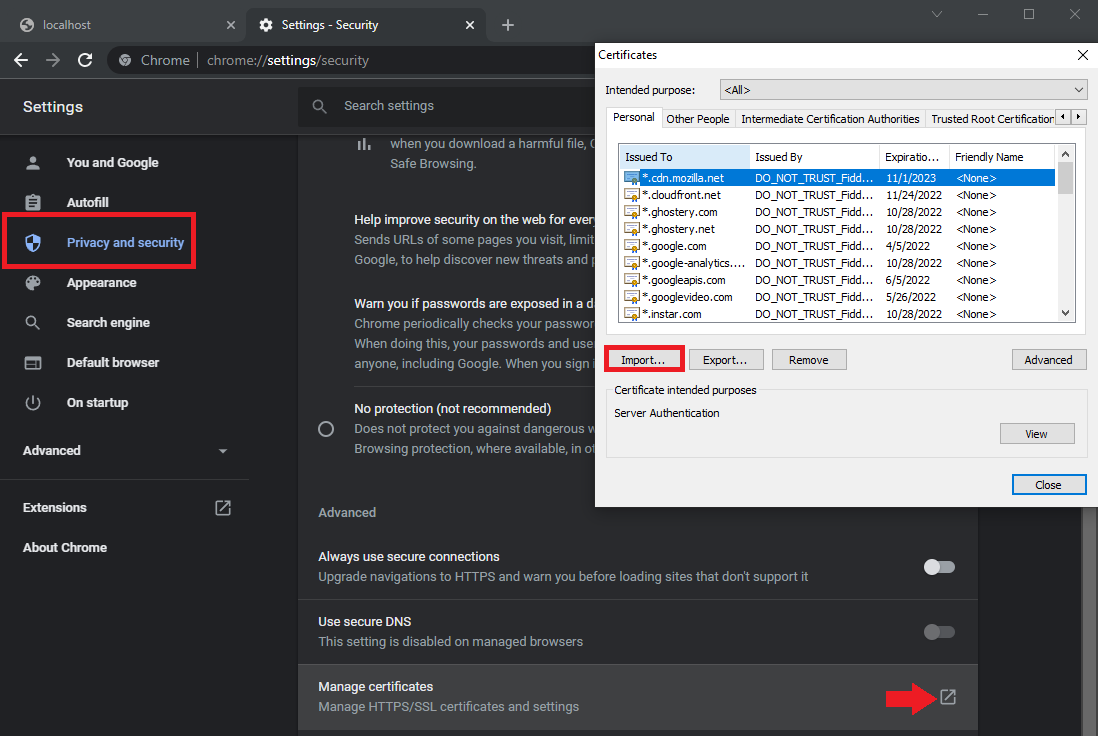
Refresh the Nomad WebUI and accept the certificate - and you should be back on!