Hashicorp Nomad Refresher

- Installation
- Single Server Dev Environment
- Update the Application Version
- Nomad Web Interface
- Cleaning Up
Installation
Installation of Hashicorp Nomad on Debian Bullseye - other options here:
curl -fsSL https://apt.releases.hashicorp.com/gpg | sudo apt-key add -
sudo apt-add-repository "deb [arch=amd64] https://apt.releases.hashicorp.com $(lsb_release -cs) main"
ERROR:
zsh: command not found: apt-add-repository=>apt install software-properties-common
apt update && apt install nomad
To verify Nomad was installed correctly, try the nomad command:
nomad --version
Nomad v1.3.1 (2b054e38e91af964d1235faa98c286ca3f527e56)
Single Server Dev Environment
Run an Agent in Dev Mode
To run the Nomad Agent in Server/Minion mode (single server) use the following command:
nomad agent -dev -bind 0.0.0.0 -log-level INFO
Verify the Node status in a second terminal:
nomad node status

ID        DC   Name  Class   Drain  Eligibility  Status
39904696  dc1  Mike  <none>  false  eligible     ready
nomad server members

Name         Address     Port  Status  Leader  Raft Version  Build  Datacenter  Region
Mike.global  172.21.0.1  4648  alive   true    3             1.3.1  dc1         global
Generate and Run a Sample Job
nomad job init

Example job file written to example.nomad
This example job file declares a single task named redis, which uses the Docker driver to run the a Redis container. Register the example job now by running the job with the nomad job run command:
nomad job run example.nomad

Deployed
Task Group  Desired  Placed  Healthy  Unhealthy  Progress Deadline
cache       1        1       1        0          2022-06-03T14:31:11+02:00
Use the nomad job status command to inspect the status of your job:
nomad job status example

ID            = example
Name          = example
Submit Date   = 2022-06-03T14:20:55+02:00
Type          = service
Priority      = 50
Datacenters   = dc1
Namespace     = default
Status        = running
Periodic      = false
Parameterized = false

...

Allocations
ID        Node ID   Task Group  Version  Desired  Status   Created    Modified
a31e4ff7  39904696  cache       0        run      running  2m17s ago  2m ago
When Nomad runs a job it creates allocations based on the task groups within the job. To inspect an allocation, use the nomad alloc status command. Replace the allocation ID in the command with the allocation ID you received when running nomad job status example in the preceding step
nomad alloc status a31e4ff7

ID                  = a31e4ff7-86bf-d408-c1a4-bca717c2ab8d
Eval ID             = c13d695b
Name                = example.cache[0]
Node ID             = 39904696
Node Name           = Mike
Job ID              = example
Job Version         = 0
Client Status       = running
Client Description  = Tasks are running
Desired Status      = run
Desired Description = <none>
Created             = 7m22s ago
Modified            = 7m5s ago
Deployment ID       = b992ce48
Deployment Health   = healthy

Allocation Addresses
Label  Dynamic  Address
*db    yes      127.0.0.1:20763 -> 6379

Task "redis" is "running"
Task Resources
CPU        Memory           Disk     Addresses
3/500 MHz  6.8 MiB/256 MiB  300 MiB

Task Events:
Started At     = 2022-06-03T12:21:01Z
Finished At    = N/A
Total Restarts = 0
Last Restart   = N/A

Recent Events:
Time                       Type        Description
2022-06-03T14:21:01+02:00  Started     Task started by client
2022-06-03T14:20:55+02:00  Driver      Downloading image
2022-06-03T14:20:55+02:00  Task Setup  Building Task Directory
2022-06-03T14:20:55+02:00  Received    Task received by client
Run the nomad alloc logs command to fetch the logs from the redis task in your allocation, again substituting your allocation ID into the proper place in the command:
nomad alloc logs a31e4ff7 redis

1:C 03 Jun 12:21:01.821 # Warning: no config file specified, using the default config. In order to specify a config file use redis-server /path/to/redis.conf
                _._
           _.-``__ ''-._
      _.-``    `.  `_.  ''-._           Redis 3.2.12 (00000000/0) 64 bit
  .-`` .-```.  ```\/    _.,_ ''-._
 (    '      ,       .-`  | `,    )     Running in standalone mode
 |`-._`-...-` __...-.``-._|'` _.-'|     Port: 6379
 |    `-._   `._    /     _.-'    |     PID: 1
  `-._    `-._  `-./  _.-'    _.-'
 |`-._`-._    `-.__.-'    _.-'_.-'|
 |    `-._`-._        _.-'_.-'    |           http://redis.io
  `-._    `-._`-.__.-'_.-'    _.-'
 |`-._`-._    `-.__.-'    _.-'_.-'|
 |    `-._`-._        _.-'_.-'    |
  `-._    `-._`-.__.-'_.-'    _.-'
      `-._    `-.__.-'    _.-'
          `-._        _.-'
              `-.__.-'

1:M 03 Jun 12:21:01.830 # Server started, Redis version 3.2.12
Update the Application Version
Edit the example.nomad file and change the Docker image from redis:3.2 to redis:7-bullseye. This is located around line 305 in example.nomad:
task "redis" {
    # The "driver" parameter specifies the task driver that should be used to
    # run the task.
    driver = "docker"

    # The "config" stanza specifies the driver configuration, which is passed
    # directly to the driver to start the task. The details of configurations
    # are specific to each driver, so please see specific driver
    # documentation for more information.
    config {
      // image = "redis:3.2"
      image = "redis:7-bullseye"

      ports = ["db"]
  }
You can run nomad job plan again to see what happens if you submit this change:
nomad job plan example.nomad

+/- Job: "example"
+/- Task Group: "cache" (1 create/destroy update, 2 ignore)
  +/- Task: "redis" (forces create/destroy update)
    +/- Config {
      +/- image:    "redis:3.2" => "redis:7-bullseye"
          ports[0]: "db"
        }

Scheduler dry-run:
- All tasks successfully allocated.

Job Modify Index: 43
To submit the job with version verification run:

nomad job run -check-index 43 example.nomad

When running the job with the check-index flag, the job will only be run if the
job modify index given matches the server-side version. If the index has
changed, another user has modified the job and the plan's results are
potentially invalid.
Once ready, use nomad job run command emitted in the plan output to push the updated specification:
nomad job run -check-index 43 example.nomad

==> 2022-06-04T06:20:05+02:00: Monitoring evaluation "da995f0d"
    2022-06-04T06:20:05+02:00: Evaluation triggered by job "example"
    2022-06-04T06:20:05+02:00: Evaluation within deployment: "c6fcfc8a"
    2022-06-04T06:20:05+02:00: Allocation "dae260fa" created: node "f05c2587", group "cache"
    2022-06-04T06:20:05+02:00: Evaluation status changed: "pending" -> "complete"
==> 2022-06-04T06:20:05+02:00: Evaluation "da995f0d" finished with status "complete"
==> 2022-06-04T06:20:05+02:00: Monitoring deployment "c6fcfc8a"
  ✓ Deployment "c6fcfc8a" successful
nomad job status example


...

Allocations
ID        Node ID   Task Group  Version  Desired  Status   Created    Modified
dae260fa  f05c2587  cache       0        run      running  2m36s ago  2m19s ago
nomad alloc logs dae260fa redis

1:C 04 Jun 2022 04:20:13.065 # oO0OoO0OoO0Oo Redis is starting oO0OoO0OoO0Oo
1:C 04 Jun 2022 04:20:13.067 # Redis version=7.0.0, bits=64, commit=00000000, modified=0, pid=1, just started
1:C 04 Jun 2022 04:20:13.067 # Warning: no config file specified, using the default config. In order to specify a config file use redis-server /path/to/redis.conf
1:M 04 Jun 2022 04:20:13.068 * monotonic clock: POSIX clock_gettime
1:M 04 Jun 2022 04:20:13.068 * Running mode=standalone, port=6379.
1:M 04 Jun 2022 04:20:13.068 # Server initialized
1:M 04 Jun 2022 04:20:13.069 # WARNING overcommit_memory is set to 0! Background save may fail under low memory condition. To fix this issue add 'vm.overcommit_memory = 1' to /etc/sysctl.conf and then reboot or run the command 'sysctl vm.overcommit_memory=1' for this to take effect.
1:M 04 Jun 2022 04:20:13.070 * The AOF directory appendonlydir doesn't exist
1:M 04 Jun 2022 04:20:13.070 * Ready to accept connections
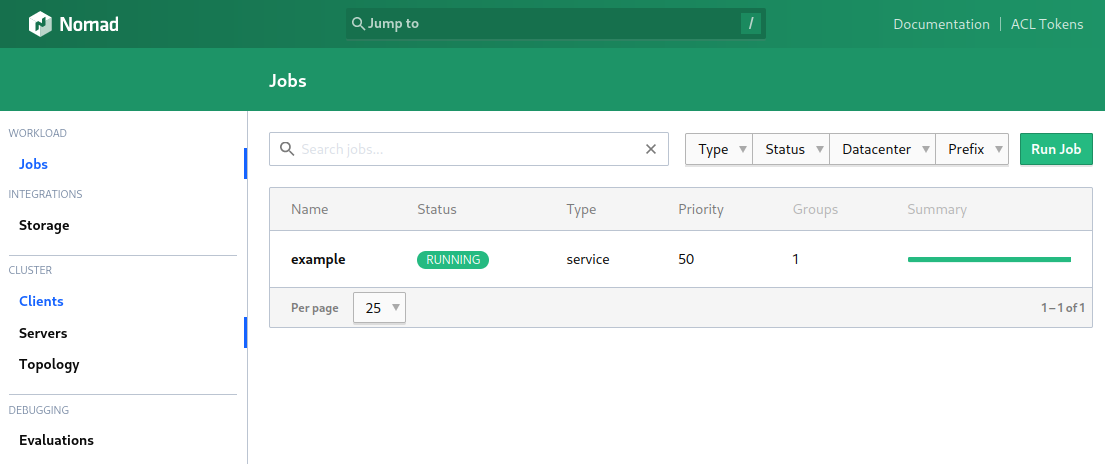
Nomad Web Interface
Nomad provides a web interface that allows you to keep an eye on all running services. This interface can be accessed on localhost:4646. But since I am working on a remote server I will forward this port to my local machine instead.
Forward the Service through SSH (optional)
If you don't want the Nomad UI to be accessible from the internet you can use SSH to tunnel the service into your local network:
ssh -L local_port:destination_server_ip:remote_port ssh_server_hostname
-
ssh– Starts the SSH client program on the local machine and establishes a secure connection to the remote SSH server. -
-L local_port:destination_server_ip:remote_port– The local port on the local client is being forwarded to the port of the destination remote server that is running the Nomad UI. -
ssh_server_hostname– This element of the syntax represents the hostname or IP address of the remote SSH server. This can also be directly the Nomad server.
A practical example of an SSH port forwarding command would take the following form:
ssh –L 8080:nomad.server.com:4646 root@ssh.server.com -p ssh.port
In the example above, all traffic sent to port 8080 on your local machine is being forwarded to port 4646 on the remote server located at nomad.server.com. If the SSH Server is the same as the remote server - in our case the Nomad server - use localhost instead:
ssh –L 8080:localhost:4646 root@nomad.server.com -p ssh.port
To run this command in the background use the
-fand-Nflag to not execute a remote command.
There will now be a service listening on Port 8080 on your local machine ready to forward your web browser request to the Nomad server:
netstat -tlnp

Proto  Local Address   Foreign Address  PID/Program
tcp    127.0.0.1:8080  0.0.0.0:*        19918/ssh
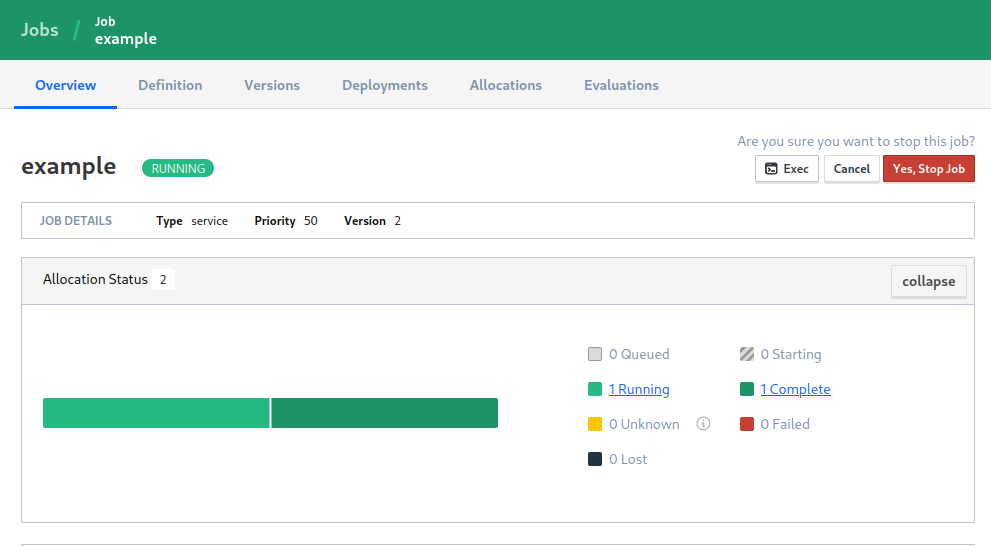
Cleaning Up
To stop the job run the following command - or simply click the button in the web interface:
nomad job stop example
And quit the dev agent by Ctrl+C out of the running process.