spaCy NER on Arch Linux

- Part I - Tesseract OCR on Arch Linux
- Part II - spaCy NER on Arch Linux
- Part III - spaCy NER Predictions
spaCy is an open-source software library for advanced natural language processing, written in the programming languages Python.
spaCy also supports deep learning workflows that allow connecting statistical models trained by popular machine learning libraries like TensorFlow, PyTorch or MXNet through its own machine learning library Thinc. Using Thinc as its backend, spaCy features convolutional neural network models for part-of-speech tagging, dependency parsing, text categorization and named entity recognition (NER).
Project Setup
I am going to re-use the virtual environment created for Tesseract earlier:
mkdir -p /opt/Python/pyOCR
python -m venv .env
You can re-enter the environment with:
source .env/bin/activate
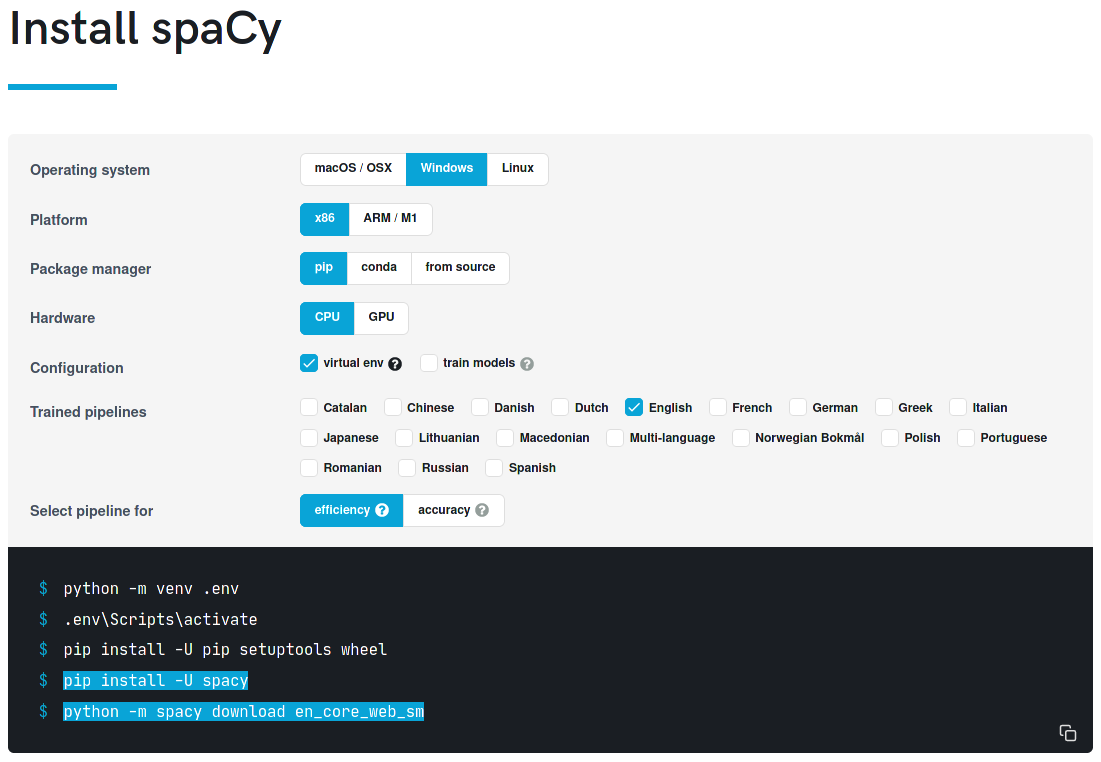
pip install -U spacy
python -m spacy download en_core_web_sm
Data Preprocessing
Data Formating
Tou use the data I extracted from my name card collection in spaCy I first need to re-format it. I first start by creating a TSV (Tab-separated) file from the CSV (Comma-separated) data. In LibreOffice you can simply open the CSV file, select that it is Comma separated and then save it with the {Tab} as delimiter option - in MS Office there is an option called "Text (tab delimited) that does the same. But there are also Online Converters available. This will change the format from:
card_46.jpg,Mike,B-NAME
card_46.jpg,Polinowski,I-NAME
card_46.jpg,Business,B-DES
card_46.jpg,Card,I-DES
card_46.jpg,Designer,I-DES
Into this:
card_46.jpg	Mike	B-NAME
card_46.jpg	Polinowski	I-NAME
card_46.jpg	Business	B-DES
card_46.jpg	Card	I-DES
card_46.jpg	Designer	I-DES
Create a new Jupyter notebook "03_Data_Preprocessing":
jupyter notebook
Data Extraction
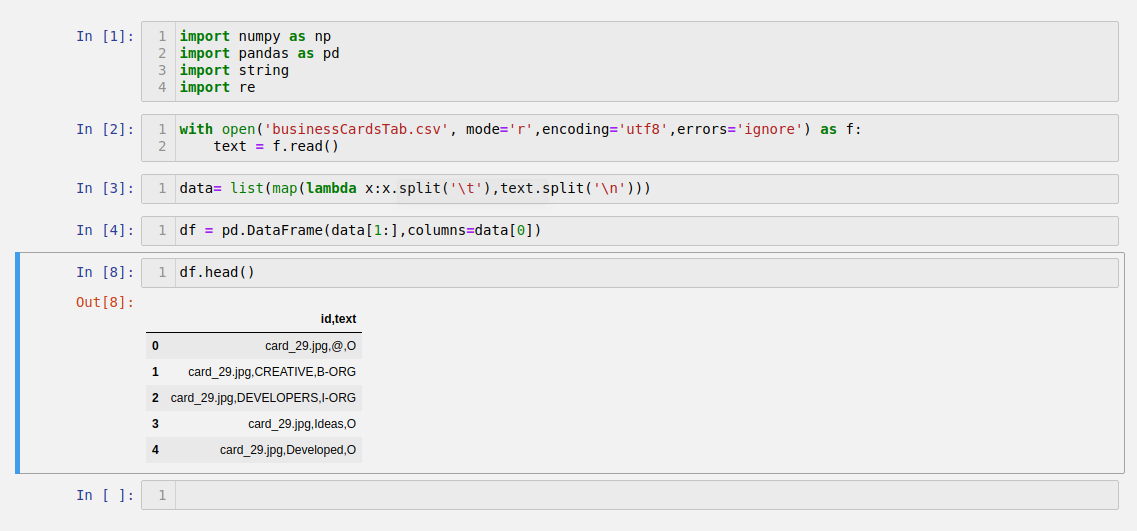
I can now open and read the TSV file and start working with it in Pandas:
import numpy as np
import pandas as pd
import string
import re

with open('businessCardsTab.csv', mode='r',encoding='utf8',errors='ignore') as f:
    text = f.read()
Run a print(text) to verify that everything is working. You can also read the RAW input by running just text - here you can see that every tab is symbolized by a \t and a new line by \n
Mike\tB-NAME\ncard_46.jpg\tPolinowski\tI-NAME\ncard_46.jpg\tBusiness\tB-DES\ncard_46.jpg\tCard\tI-DES\ncard_46.jpg\tDesigner\tI-DES\n
Now I can clean up the text using those delimiters:
text.split('\n')
['\ufeffid\ttext\ttag',
...
  'card_46.jpg\tMike\tB-NAME',
  'card_46.jpg\tPolinowski\tI-NAME',
  'card_46.jpg\tBusiness\tB-DES',
  'card_46.jpg\tCard\tI-DES',
  'card_46.jpg\tDesigner\tI-DES',
 ...]
data = list(map(lambda x:x.split('\t'),text.split('\n')))
Print data to verify:
[['\ufeffid', 'text', 'ttag'],
...
  ['card_46.jpg', 'Mike', 'B-NAME'],
  ['card_46.jpg', 'Polinowski', 'I-NAME'],
  ['card_46.jpg', 'Business', 'B-DES'],
  ['card_46.jpg', 'Card', 'I-DES'],
  ['card_46.jpg', 'Designer', 'I-DES'],
 ...]
Write data into a Pandas dataframe:
df = pd.DataFrame(data[1:],columns=data[0])
Take data from line 1 to end of file and use the first element 0 as column headers:
Text Cleaning
Removing white spaces and punctuation characters using the String library:
string.whitespace
' \t\n\r\x0b\x0c'
I can remove all of the above as provided by whitespace. But we I need to retain a few of the special characters provided by punctuation - e.g. the forward-slash, underscore, the @ symbol, etc.:
string.punctuation
'!"#$%&\'()*+,-./:;<=>?@[\\]^_`{|}~'
So I can define:
whitespace = string.whitespace
punctuation = '!#$%&\'()*+:;<=>?[\\]^`{|}~'
Now we can search for these within our data and replace every occurrence with an nothing '':
tableWhitespace = str.maketrans('','',whitespace)
tablePunctuation = str.maketrans('','',punctuation)

def cleanText(txt):
    text = str(txt)
    text = text.lower()
    removeWhitespace = text.translate(tableWhitespace)
    removePunctuation = removeWhitespace.translate(tablePunctuation)

    return str(removePunctuation)
We can apply the cleanText function on our text dataframe:
df['text'] = df['text'].apply(cleanText)
Additionally we can drop all missing values:
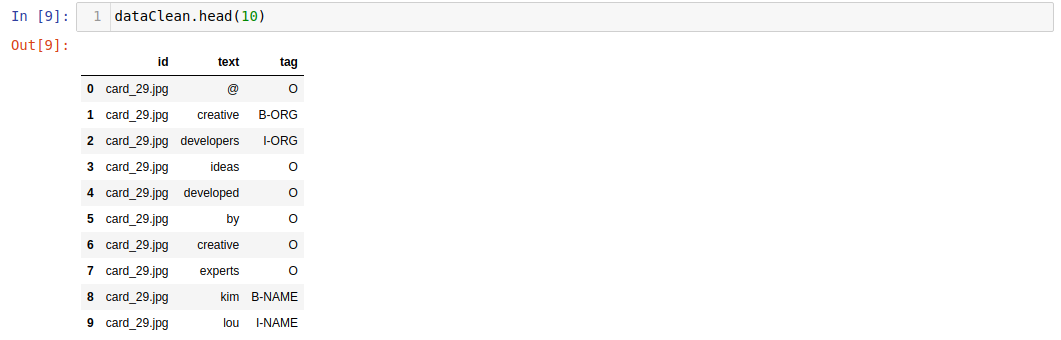
dataClean = df.query("text != '' ")
dataClean.dropna(inplace=True)
Verify that the cleaning worked with dataClean.head(10):
spaCy
The spaCy Data Format
Group Entities
We now need to prepare our data so that we can train our spaCy model with it. For this we first group every card into an entity by id - where id is the JPG name:
group = dataClean.groupby(by='id')
Verify that it was successful by printing:
group.groups.keys()
dict_keys(['card_01.jpg', 'card_02.jpg', 'card_03.jpg', 'card_04.jpg', 'card_05.jpg', 'card_06.jpg', 'card_07.jpg', 'card_08.jpg', 'card_09.jpg', 'card_10.jpg', 'card_11.jpg', 'card_12.jpg', 'card_13.jpg', 'card_14.jpg', 'card_16.jpg', 'card_17.jpg', 'card_18.jpg', 'card_20.jpg', 'card_22.jpg', 'card_25.jpg', 'card_26.jpg', 'card_27.jpg', 'card_28.jpg', 'card_29.jpg', 'card_31.jpg', 'card_32.jpg', 'card_33.jpg', 'card_34.jpg', 'card_35.jpg', 'card_36.jpg', 'card_37.jpg', 'card_38.jpg', 'card_39.jpg', 'card_41.jpg', 'card_43.jpg', 'card_44.jpg', 'card_45.jpg', 'card_46.jpg', 'card_50.jpg', 'card_52.jpg', 'card_57.jpg', 'card_58.jpg', 'card_59.jpg', 'card_60.jpg', 'card_62.jpg', 'card_63.jpg', 'card_65.jpg', 'card_66.jpg', 'card_67.jpg', 'card_68.jpg', 'card_69.jpg', 'card_70.jpg', 'card_71.jpg', 'card_72.jpg', 'card_79.jpg'])
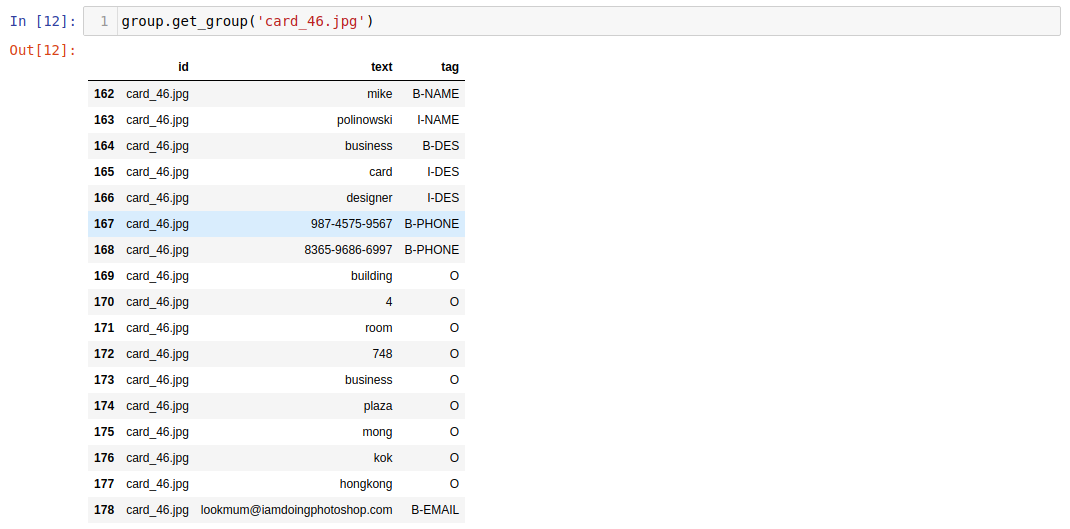
To get all the information from one name card, e.g. card_46.jpg, run:
group.get_group('card_46.jpg')
For the training we will need the values for text and tag:
group.get_group('card_46.jpg')[['text', 'tag']].values
array([['mike', 'B-NAME'],
       ['polinowski', 'I-NAME'],
       ['business', 'B-DES'],
       ['card', 'I-DES'],
       ['designer', 'I-DES'],
       ['987-4575-9567', 'B-PHONE'],
       ['8365-9686-6997', 'B-PHONE'],
       ['building', 'O'],
       ['4', 'O'],
       ['room', 'O'],
       ['748', 'O'],
       ['business', 'O'],
       ['plaza', 'O'],
       ['mong', 'O'],
       ['kok', 'O'],
       ['hongkong', 'O'],
       ['lookmum@iamdoingphotoshop.com', 'B-EMAIL']], dtype=object)
We can write this array into a variable:
grouparray = group.get_group('card_46.jpg')[['text', 'tag']].values
content = ''
annotations = {'entities': []}
start = 0
end = 0

for text, tag in grouparray:
  print(text,tag)
mike B-NAME
polinowski I-NAME
business B-DES
card I-DES
designer I-DES
987-4575-9567 B-PHONE
8365-9686-6997 B-PHONE
building O
4 O
room O
748 O
business O
plaza O
mong O
kok O
hongkong O
lookmum@iamdoingphotoshop.com B-EMAIL
Remove all O Tags
We can write this result into a string and strip all lines that are tagged with O:
grouparray = group.get_group('card_46.jpg')[['text', 'tag']].values
content = ''
annotations = {'entities': []}
start = 0
end = 0

for text, tag in grouparray:
  text = str(text)
  stringLength = len(text) + 1 # 1 x space after each word

  start = end
  end = start + stringLength

  if tag != 'O':
    annot = (start,end-1,tag)
    annotations['entities'].append(annot)

  content = content + text + ' '
This now took our content:
content
'mike polinowski business card designer 987-4575-9567 8365-9686-6997 building 4 room 748 business plaza mong kok hongkong lookmum@iamdoingphotoshop.com '
And turned it into this annotation that allows us to target the information we need:
annotations
{'entities': [(0, 4, 'B-NAME'),
  (5, 15, 'I-NAME'),
  (16, 24, 'B-DES'),
  (25, 29, 'I-DES'),
  (30, 38, 'I-DES'),
  (39, 52, 'B-PHONE'),
  (53, 67, 'B-PHONE'),
  (121, 150, 'B-EMAIL')]}
List of Entities
To be able to create these for all our cards we need to create a variable that holds all our name cards by id - this is what we already had above:
cards = group.groups.keys()
We can use this to wrap our code into a FOR loop over all cards and append all content + annotations for each card to an list cardData which is then concatenated into the allCardsData list:
allCardsData = []
for card in cards:
  cardData = []
  grouparray = group.get_group(card)[['text', 'tag']].values
  content = ''
  annotations = {'entities': []}
  start = 0
  end = 0

  for text, tag in grouparray:
    text = str(text)
    stringLength = len(text) + 1 # 1 x space after each word

    start = end
    end = start + stringLength

    if tag != 'O':
      annot = (start,end-1,tag)
      annotations['entities'].append(annot)

    content = content + text + ' '

  cardData = (content, annotations)
  allCardsData.append(cardData)
Run allCardsData to get a complete list for all entities (name card content + annotations). This is now the so called spaCy Format - the way the spaCy library consumes it's trainings data in.
Data Splitting - Test & Training
We can use the random library to make a random selection of entities to split them into a stack for trainings and test data:
import random
random.shuffle(allCardsData)
Currently I have a stack of 55 cards in total - you can check your stack with len(allCardsData). I will now split this stack into 90:10 ratio:
TrainData = allCardsData[:50]
TestData = allCardsData[50:]
Create a directory data inside the apps work directory and save this data inside your folder using the pickle library:
import pickle
pickle.dump(TrainData,open('./data/TrainData.pickle',mode='wb'))
pickle.dump(TestData,open('./data/TestData.pickle',mode='wb'))
Spacy Base Configuration
Go to Training Pipelines & Models and generate/download your spaCy configuration template:
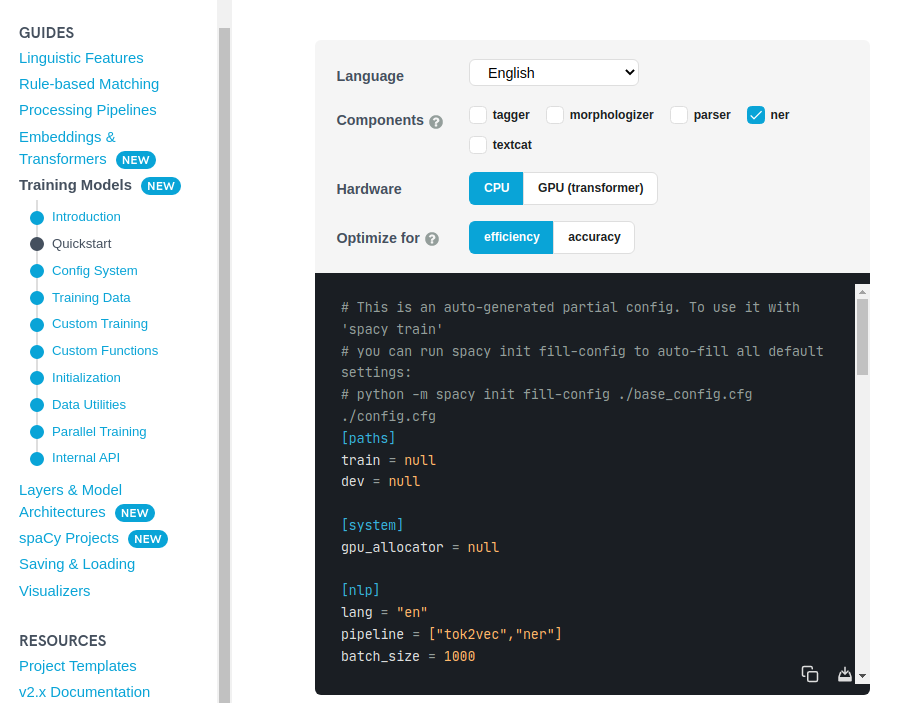
After saving the starter config to a file base_config.cfg, use the init fill-config command to fill in the remaining defaults. Training configs should always be complete and without hidden defaults, to keep your experiments reproducible:
python -m spacy init fill-config ./base_config.cfg ./config.cfg
✔ Auto-filled config with all values
✔ Saved config
config.cfg
Data Preprocessing
Here’s an example of creating a .spacy file from our NER annotations - modified to use the pickle files created above:
import spacy
from spacy.tokens import DocBin
import pickle

nlp = spacy.blank("en")

training_data = pickle.load(open('./data/TrainData.pickle', 'rb'))
testing_data = pickle.load(open('./data/TestData.pickle', 'rb'))

# Create training data file in spaCy format
db = DocBin()
for text, annotations in training_data:
    doc = nlp(text)
    ents = []
    for start, end, label in annotations['entities']:
        span = doc.char_span(start, end, label=label)
        ents.append(span)
    doc.ents = ents
    db.add(doc)
db.to_disk("./data/train.spacy")

# Create testing data file in spaCy format
db_test = DocBin()
for text, annotations in testing_data:
    doc = nlp(text)
    ents = []
    for start, end, label in annotations['entities']:
        span = doc.char_span(start, end, label=label)
        ents.append(span)
    doc.ents = ents
    db.add(doc)
db_test.to_disk("./data/test.spacy")
Run the Python script from the terminal:
python ./preprocess.py
And the spaCy files will be created in your data directory:
ll ./data ✔
total 40
1394 Dec 12 21:06 TestData.pickle
106 Dec 13 12:48 test.spacy
12070 Dec 12 21:06 TrainData.pickle
9545 Dec 13 12:48 train.spacy
NER Model Training
Start by creating an output directory for the model training:
mkdir ./output
Now I can add my data and run a training with the configuration file:
python -m spacy train ./config.cfg  --output ./output --paths.train ./data/train.spacy --paths.dev ./data/test.spacy

ℹ Saving to output directory: output
ℹ Using CPU

=========================== Initializing pipeline ===========================
[2021-12-13 12:55:39,208] [INFO] Set up nlp object from config
[2021-12-13 12:55:39,214] [INFO] Pipeline: ['tok2vec', 'ner']
[2021-12-13 12:55:39,217] [INFO] Created vocabulary
[2021-12-13 12:55:39,218] [INFO] Finished initializing nlp object
[2021-12-13 12:55:39,321] [INFO] Initialized pipeline components: ['tok2vec', 'ner']
✔ Initialized pipeline

============================= Training pipeline =============================
ℹ Pipeline: ['tok2vec', 'ner']
ℹ Initial learn rate: 0.001
E    #       LOSS TOK2VEC  LOSS NER  ENTS_F  ENTS_P  ENTS_R  SCORE
---  ------  ------------  --------  ------  ------  ------  ------
  0       0          0.00     69.86    0.00    0.00    0.00    0.00
 22     200        199.17   4224.89    0.00    0.00    0.00    0.00
 50     400         87.29    138.64    0.00    0.00    0.00    0.00
 84     600         41.00     68.52    0.00    0.00    0.00    0.00
125     800         53.87     82.38    0.00    0.00    0.00    0.00
175    1000         76.95    104.00    0.00    0.00    0.00    0.00
240    1200         95.89    121.85    0.00    0.00    0.00    0.00
310    1400         65.92    113.03    0.00    0.00    0.00    0.00
410    1600         76.39    146.28    0.00    0.00    0.00    0.00
✔ Saved pipeline to output directory
output/model-last
The models were successfully created inside the output directory!
ll ./output
total 16

4096 Dec 13 12:55 model-best
4096 Dec 13 12:55 model-last