OpenCV Face Detection and Privacy
Prepare OpenCV
Create and activate a virtual work environment:
python -m venv .env
source .env/bin/activate
python -m pip install --upgrade pip
Add a file dependencies.txt with all project pip dependencies:
opencv-python
numpy
imutils
Install all dependencies with:
pip install -r dependencies.txt
OpenCV Face Detection
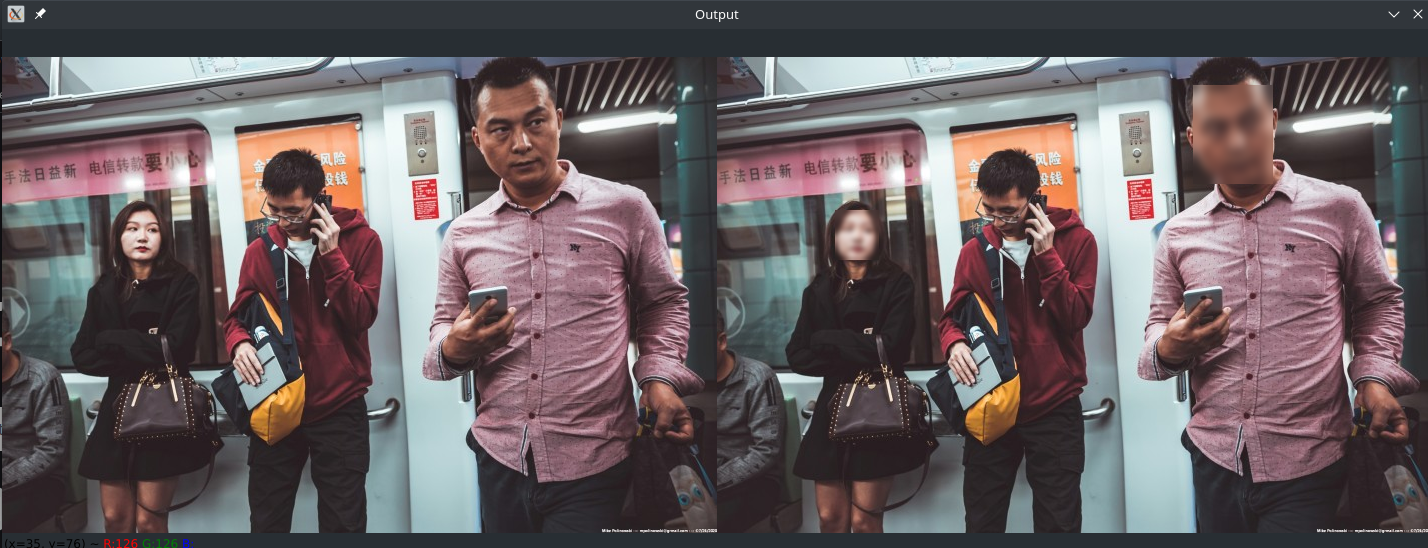
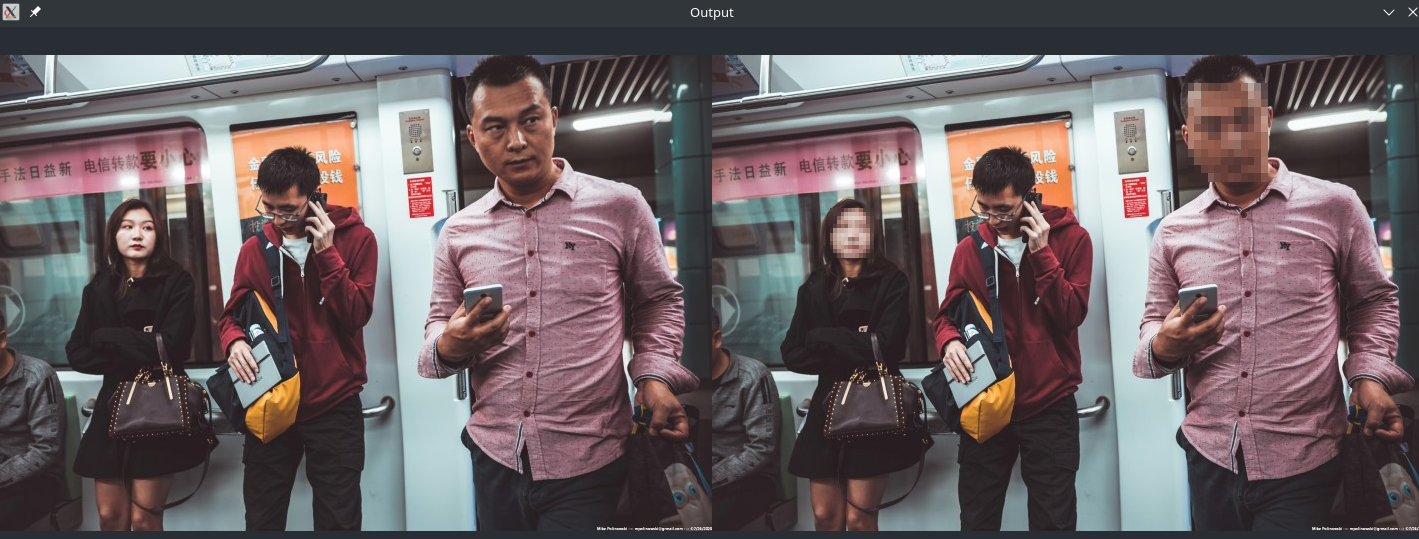
Based on Blur and anonymize faces with OpenCV and Python by Adrian Rosebrock. Detect faces in images and either add a gaussian blur or pixelate them.
Structure
This project uses the res10_300x300_ssd_iter_140000_fp16.caffemodel from @spmallick | Learn OpenCV. Download the model and deploy.prototxt file from Github.
├── blur_face.py
├── blur_face_video.py
├── dependencies.txt
├── face_detector
│   ├── deploy.prototxt
│   └── res10_300x300_ssd_iter_140000_fp16.caffemodel
├── processed
│   └── face_blur.jpg
├── pyimagesearch
│   ├── face_blurring.py
└── resources
    └── metro.jpg
Privacy Masks
The scripts blur_face.py and blur_face_video.py help us to detect faces and then perform face blurring in images and video streams. The pyimagesearch/face_blurring.py script provides two helper functions:
anonymize_face_simple: Applies a simple Gaussian blur on the face ROIanonymize_face_pixelate: Creates a pixelated overlay on the ROI
Gaussian Blur
anonymize_face_simple
import numpy as np
import cv2

def anonymize_face_simple(image, factor=3.0):
	# automatically determine the size of the blurring kernel based
	# on the spatial dimensions of the input image
	(h, w) = image.shape[:2]
	kW = int(w / factor)
	kH = int(h / factor)
	# ensure the width of the kernel is odd
	if kW % 2 == 0:
		kW -= 1
	# ensure the height of the kernel is odd
	if kH % 2 == 0:
		kH -= 1
	# apply a Gaussian blur to the input image using our computed
	# kernel size
	return cv2.GaussianBlur(image, (kW, kH), 0)
The helper function calculates the blurring kernel’s width and height as a function of the input image dimensions. Gaussian Kernel Size: [height width] - height and width should be odd. The number represents the number of neighboring pixels a central pixel is averaged with. If the pixel is white and surrounded by red pixels, it will take on a reddish tint after being averaged with them - the image looses it contours and will start to look blurry:
- Larger kernel size -> pixels are averaged with more of their surrounding -> resulting in more blur
- Smaller kernel size -> pixels are averaged with less of their surrounding -> resulting in less blur
Increasing the factor will therefore increase the amount of blur applied to the face.
The helper function increases the amount of blur applied the bigger the ROI becomes - making sure that the face remain unrecognizable even when working with huge image files.
Pixelation
anonymize_face_pixelate
def anonymize_face_pixelate(image, blocks=3):
	# divide the input image into NxN blocks
	(h, w) = image.shape[:2]
	xSteps = np.linspace(0, w, blocks + 1, dtype="int")
	ySteps = np.linspace(0, h, blocks + 1, dtype="int")
	# loop over the blocks in both the x and y direction
	for i in range(1, len(ySteps)):
		for j in range(1, len(xSteps)):
			# compute the starting and ending (x, y)-coordinates
			# for the current block
			startX = xSteps[j - 1]
			startY = ySteps[i - 1]
			endX = xSteps[j]
			endY = ySteps[i]
			# extract the ROI using NumPy array slicing, compute the
			# mean of the ROI, and then draw a rectangle with the
			# mean RGB values over the ROI in the original image
			roi = image[startY:endY, startX:endX]
			(B, G, R) = [int(x) for x in cv2.mean(roi)[:3]]
			cv2.rectangle(image, (startX, startY), (endX, endY),
				(B, G, R), -1)
	# return the pixelated blurred image
	return image
The helper script takes the input image and divides it into blocks and computes the mean RGB pixel intensities for the ROI.
Applying Privacy Masks to Images
Command Line Arguments
blur_face.py
I want to be able to use command line flags to control the application - instead of hard-coding values in. To parse these flags I need to import the library argparse and define the parameter I want to use:
# Parse the arguments
ap = argparse.ArgumentParser()
ap.add_argument("-i", "--image", required=True, help="path to image")
ap.add_argument("-f", "--face", required=True, help="path to detector model")
ap.add_argument("-m", "--method", type=str, default="simple", choices=["simple", "pixelated"], help="face blurring method")
ap.add_argument("-b", "--blocks", type=int, default=12, help="number of pixel blocks for pixelate")
ap.add_argument("-c", "--confidence", type=float, default=0.5, help="minimum probability of positive detection")
args = vars(ap.parse_args())
--image: Relative path to the image I want to mask.--face: Relative Path to your face detector model directory.--method: Use gaussian blur or pixelate.--blocks: Number of blocks used to pixelate. Smaller numbers make the ROI less recognizable.--confidence: Lower confidence will catch more faces but might result in false positives.
Usage:
python blur_face.py --image resources/metro.jpg --face face_detector --method simplepython blur_face.py --image resources/metro.jpg --face face_detector --method pixelated
Detect Faces
# Load serialized face detector from disk
print("[INFO] loading face detector model")
prototxtPath = os.path.sep.join([args["face"], "deploy.prototxt"])
weightsPath = os.path.sep.join([args["face"], "res10_300x300_ssd_iter_140000_fp16.caffemodel"])
net = cv2.dnn.readNet(prototxtPath, weightsPath)

# Copy resource image and get dimensions
source_image = cv2.imread(args["image"])
image = source_image.copy()
(h, w) = image.shape[:2]

# Get blob from image
blob = cv2.dnn.blobFromImage(source_image, 1.0, (300, 300), (104.0, 177.0, 123.0))

# Get face detections from blob
print("[INFO] computing face detections")
net.setInput(blob)
detections = net.forward()
The neural network expects expects a blob from our input image:
blob = cv2.dnn.blobFromImage(image, scalefactor=1.0, size, mean, swapRB=True)
A blob is just a image with the same spatial dimensions (i.e., width and height), same depth (number of channels), that have all be preprocessed in the same manner.
image: This is the input image we want to preprocess before passing it through our deep neural network for classification.scalefactor: After we perform mean subtraction we can optionally scale our images by some factor. This value defaults to1.0(i.e., no scaling).size: Here we supply the spatial size that the Convolutional Neural Network expects. You usually get this value from the name of the model you are importing - above it is300x300.mean: These are our mean subtraction values. They can be a 3-tuple of the RGB means or they can be a single value in which case the supplied value is subtracted from every channel of the image. If you’re performing mean subtraction, ensure you supply the 3-tuple in(R, G, B)order, especially when utilizing the default behavior of swapRB=True .swapRB: OpenCV assumes images are in BGR channel order; however, themeanvalue assumes we are using RGB order. To resolve this discrepancy we can swap the R and B channels in image by setting this value toTrue. By default OpenCV performs this channel swapping for us.
# Loop over detections
for i in range(0, detections.shape[2]):
    # extract confidence from detections
    confidence = detections[0, 0, i, 2]
    # filter by min confidence
    if confidence > args["confidence"]:
        # compute bounding box for
        # passing detections
        box = detections[0, 0, i, 3:7] * np.array([w, h, w, h])
        (startX, startY, endX, endY) = box.astype("int")
        # extract face ROI
        face = source_image[startY:endY, startX:endX]
        # select blur method
        if args["method"] == "simple":
            face = anonymize_face_simple(face, factor=3.0)
        else:
            face = anonymize_face_pixelate(face, blocks=args["blocks"])

        # store blurred face in output image
        source_image[startY:endY, startX:endX] = face
This part loops over all detected ROI's and - if they pass the confidence level - apply either the gaussian blur or pixelate them.
Handling RTSP Livestreams
To use RTSP streams instead of a static image I will need another CLI argument for the live stream URL:
# Parse the arguments
ap = argparse.ArgumentParser()
ap.add_argument("-u", "--url", help="RTSP streaming URL", default="rtsp://admin:instar@192.168.2.19/livestream/13")
ap.add_argument("-f", "--face", required=True, help="path to detector model")
ap.add_argument("-m", "--method", type=str, default="simple", choices=["simple", "pixelated"], help="face blurring "
                                                                                                    "method")
ap.add_argument("-b", "--blocks", type=int, default=20, help="number of pixel blocks for pixelate")
ap.add_argument("-c", "--confidence", type=float, default=0.5, help="minimum probability of positive detection")
args = vars(ap.parse_args())
Load the detection model as before:
# load our serialized face detector model from disk
print("[INFO] loading face detector model...")
prototxtPath = os.path.sep.join([args["face"], "deploy.prototxt"])
weightsPath = os.path.sep.join([args["face"],
                                "res10_300x300_ssd_iter_140000_fp16.caffemodel"])
net = cv2.dnn.readNet(prototxtPath, weightsPath)
And then use the imutils library to grab the video stream:
# Get video stream from IP camera
print("[INFO] starting video stream")
vs = VideoStream(args["url"]).start()
The detection part is pretty much the same. With one exception that I now need to read single frames out of the stream and loop the detection over it:
# Loop over the frames from the video stream
while True:
    # grab the frame from the threaded video stream and resize it
    # to have a maximum width of 1080 pixels
    frame = vs.read()
    frame = imutils.resize(frame, width=1080)
    # grab the dimensions of the frame and then construct a blob
    # from it
    (h, w) = frame.shape[:2]
    blob = cv2.dnn.blobFromImage(frame, 1.0, (300, 300), (104.0, 177.0, 123.0))
    # pass the blob through the network and obtain the face detections
    net.setInput(blob)
    detections = net.forward()
    # loop over the detections
    for i in range(0, detections.shape[2]):
        # extract the confidence (i.e., probability) associated with
        # the detection
        confidence = detections[0, 0, i, 2]
        # filter out weak detections by ensuring the confidence is
        # greater than the minimum confidence
        if confidence > args["confidence"]:
            # compute the (x, y)-coordinates of the bounding box for
            # the object
            box = detections[0, 0, i, 3:7] * np.array([w, h, w, h])
            (startX, startY, endX, endY) = box.astype("int")
            # extract the face ROI
            face = frame[startY:endY, startX:endX]
            # check to see if we are applying the "simple" face
            # blurring method
            if args["method"] == "simple":
                face = anonymize_face_simple(face, factor=3.0)
            # otherwise, we must be applying the "pixelated" face
            # anonymization method
            else:
                face = anonymize_face_pixelate(face,
                                               blocks=args["blocks"])
            # store the blurred face in the output image
            frame[startY:endY, startX:endX] = face

        # show the output frame
        cv2.imshow("Frame", frame)
USAGE
python blur_face_video.py --url 'rtsp://admin:instar@192.168.2.19/livestream/12' --face face_detector --method simplepython blur_face_video.py --url 'rtsp://admin:instar@192.168.2.19/livestream/11' --face face_detector --method pixelated
![]()