Keras for Tensorflow - Convolutional Neural Networks

Keras is built on top of TensorFlow 2 and provides an API designed for human beings. Keras follows best practices for reducing cognitive load: it offers consistent & simple APIs, it minimizes the number of user actions required for common use cases, and it provides clear & actionable error messages.
See also:
- Keras for Tensorflow - An (Re)Introduction 2023
- Keras for Tensorflow - Artificial Neural Networks
- Keras for Tensorflow - Convolutional Neural Networks
- Keras for Tensorflow - VGG16 Network Architecture
- Keras for Tensorflow - Recurrent Neural Networks
Convolution
Convolutional Neural Networks are ideal for Computer Vision tasks. During the convolution step the image is processed by a filter that can be defined by to parameters pooling and stride.
Convolution: A function derived from two given functions by integration that expresses the shape of one modified by the other.
Let's take a 4x4 feature matrix and apply a convolutional transformation with max. Pooling filter with a 2x2 kernel and a Stride of 2:
| 1 | 1 | 2 | 4 |
| 5 | 6 | 7 | 8 |
| 3 | 2 | 1 | 0 |
| 1 | 2 | 3 | 4 |
The filter will extract 2x2 blocks and pools the features by discarding everything but the maximum. Afterwards the stride of 2 moves the filter over a new section of our feature matrix and the process starts anew. We end up with a 2x2 matrix where only the max values have been extracted from the original image input =>
| 6 | 8 |
| 3 | 4 |
If we want to keep the input size we can set padding='valid' - with this parameter the output matrix would still be of size 4x4.
Convolutional Layers
Keras offers Convolutinal Layers that we can use to turn our Artificial Neural Network (ANN) into a Convolutional Neural Network (CNN). A 2D convolution layer can be used for the spatial convolution over images. This layer creates a convolution kernel that is convolved with the layer input to produce a tensor of outputs.
Pooling Layers
Keras offer Pooling Layers, e.g. the MaxPooling2D layer downsamples the input along its spatial dimensions (height and width) by taking the maximum value over an input window (of size defined by pool_size) for each channel of the input. The window is shifted by strides along each dimension.
The pooling layer serves to progressively reduce the spatial size of the representation, to reduce the number of parameters and amount of computation in the network, and hence to also control overfitting.
The intuition is that the exact location of a feature is less important than its rough location relative to other features.
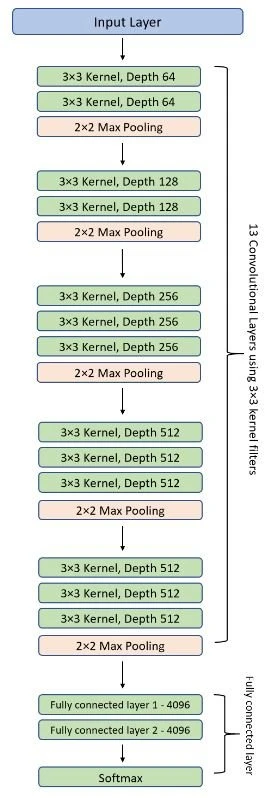
An example convolutional neural network is the VGG16 Architecture. The number 16 in the name VGG refers to the fact that it is 16 layers deep neural network (VGGnet). Pooling layers keep reducing the x and y dimension of the input image while adding depth to it by the use of filters (Image Source):
CNN Image Classifier
Loading the Dataset
Convolutional Neural Networks are of particular use when working with images. As an example we can use the MNIST Fashion dataset. The dataset can be downloaded with Keras:
from keras.datasets import fashion_mnist

# using the fashion mnist dataset
(x_train, y_train), (x_test, y_test) = fashion_mnist.load_data()
print(x_train.shape)
print(x_test.shape)
The training set contains 60k and the validation set 10k images with a size of 28x28 pixels:
(60000, 28, 28)
(10000, 28, 28)
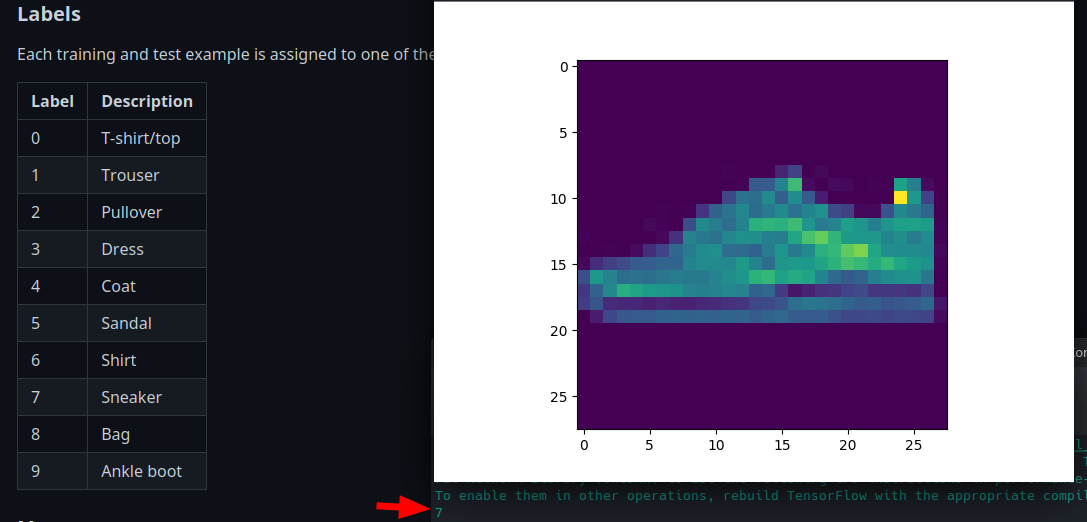
Taking a look at an example images shows us a shoe with the label 7 - which corresponds to sneaker:
print(y_train[666])
plt.imshow(x_train[666])
plt.show()
Preprocessing the Data
Start by normalizing the data:
# data pre-processing
## reshape training images
x_train = x_train.reshape(60000, 28, 28, 1)
x_test = x_test.reshape(10000, 28, 28, 1)

## normalize training images
x_train = x_train.astype('float32')/255
x_test = x_test.astype('float32')/255
Then categorize the labels - the MNIST Fashion Datasets, as seen above, comes with 10 labels:
| Label | Description |
|---|---|
| 0 | T-shirt/top |
| 1 | Trouser |
| 2 | Pullover |
| 3 | Dress |
| 4 | Coat |
| 5 | Sandal |
| 6 | Shirt |
| 7 | Sneaker |
| 8 | Bag |
| 9 | Ankle boot |
# vectorize labels for the 10 categories from 0-9
y_train = to_categorical(y_train, 10)
y_test = to_categorical(y_test, 10)
print(y_train.shape)
Now we have 60k labels of 10 classes: (60000, 10).
Building the Model
This time the model contains a convolutional and maxpooling layer:
# building the model
model = Sequential()
## convolutional layer + pooling
model.add(Conv2D(32, kernel_size=(3, 3), padding='same', activation='relu', input_shape=(28, 28, 1)))
model.add(MaxPooling2D(pool_size=(2, 2)))
## randomly drop 25% of neurons to prevent overfitting
model.add(Dropout(0.25))
## flatten before dense layer
model.add(Flatten())
model.add(Dense(128, activation='relu'))
model.add(Dropout(0.25))
# output layer assigns probability of 10 classes
model.add(Dense(10, activation='softmax'))

model.compile(optimizer='adam', loss='categorical_crossentropy', metrics=['accuracy'])
model.summary()
Model: "sequential"
_________________________________________________________________
 Layer (type)                Output Shape              Param #
=================================================================
 conv2d (Conv2D)              (None, 28, 28, 32)        320

 max_pooling2d (MaxPooling2D) (None, 14, 14, 32)        0

 dropout (Dropout)            (None, 14, 14, 32)        0

 flatten (Flatten)            (None, 6272)              0

 dense (Dense)                (None, 128)               802944

 dropout_1 (Dropout)          (None, 128)               0

 dense_1 (Dense)              (None, 10)                1290

=================================================================
Total params: 804,554
Trainable params: 804,554
Non-trainable params: 0
Model Training
To store the training progress we can use the ModelCheckpoint function that will hold on to the weights of our best training epoch:
from keras.callbacks import ModelCheckpoint
checkpoint_filepath = '/checkpoint/model.weights.best.hdf5'
model_checkpoint_callback = ModelCheckpoint(
      filepath=checkpoint_filepath,
      save_weights_only=True,
      monitor='val_accuracy',
      mode='max',
      save_best_only=True)
And now we can run the training:
model.fit(x_train, y_train, batch_size=128, epochs=10, callbacks=[model_checkpoint_callback])
And after 10 epochs I end up with an accuracy of 93%:
Epoch 10/10
469/469 [==============================] - 2s 5ms/step - loss: 0.1826 - accuracy: 0.9312
Validate Training
Use the test dataset to validate your fitted models performance
# validation run
val_loss, val_score = model.evaluate(x_test, y_test)
print(val_loss, val_score)
I am getting an accuracy of 91.6%:
0.2373863011598587 0.9168000221252441
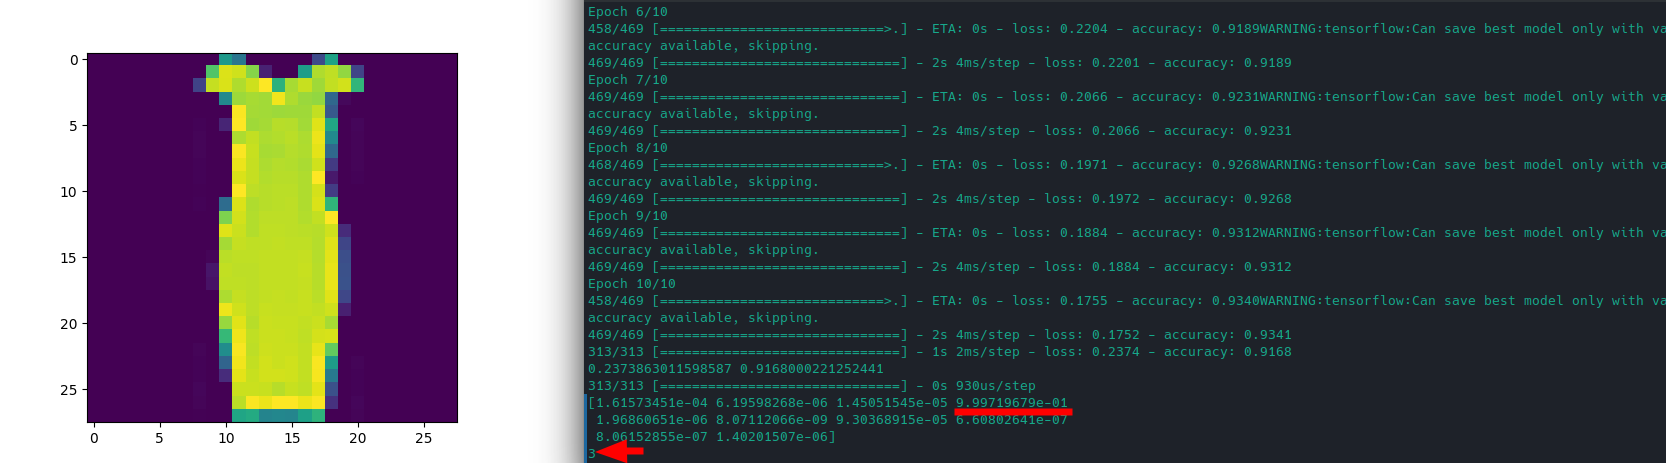
And to check out a prediction:
# run prediction
pred = model.predict(x_test)
## show prediction probabilities
pred_max = np.argmax(pred, axis=1)
print(pred[666])
print(pred_max[666])

## show corresponding image
## reshaping data 28x28
## to be able to show the image
x = x_test[666].reshape(28, 28)
plt.imshow(x)
plt.show()
The highest probability is for the class with label 3 -> which is a dress:
[1.61573451e-04 6.19598268e-06 1.45051545e-05 9.99719679e-01
 1.96860651e-06 8.07112066e-09 9.30368915e-05 6.60802641e-07
 8.06152855e-07 1.40201507e-06]