Computer Vision Annotation Tool (CVAT)
CVAT was designed to provide users with a set of convenient instruments for annotating digital images and videos. CVAT supports supervised machine learning tasks pertaining to object detection, image classification, image segmentation and 3D data annotation. It allows users to annotate images with multiple tools (boxes, polygons, cuboids, circles, skeletons, etc).
Installation (Docker)
In the previous note I already started the CVAT containers with a simple
docker-compose up -dwhich used the defaultdocker-compose.ymlfile to start the services. They have to be brought down first before continuing with adocker-compose downfrom inside the already existing cvat directory.
Otherwise start by downloading the CVAT source code as follows:
git clone https://github.com/opencv/cvat
cd cvat
Installing Nuclio
You have to install nuctl command line tool to build and deploy serverless functions. Download version 1.13.0. It is important that the version you download matches the version in docker-compose.serverless.yml:
wget https://github.com/nuclio/nuclio/releases/download/1.13.0/nuctl-1.13.0-linux-amd64
After downloading nuclio, give it a proper permission and add a softlink:
sudo chmod +x nuctl-1.13.0-linux-amd64
sudo ln -sf $(pwd)/nuctl-1.13.0-linux-amd64 /usr/local/bin/nuctl
Verify that the installation worked:
nuctl version

Client version:
"Label: 1.13.0, Git commit: c4422eb772781fb50fbf017698aae96199d81388, OS: linux, Arch: amd64, Go version: go1.21.7"
Start CVAT
To start cvat with auto annotation tool you need to run the following command from the cvat root directory:
export CVAT_HOST=your-ip-address
docker-compose -f docker-compose.yml -f components/serverless/docker-compose.serverless.yml up -d
To stop the containers, simply run:
docker-compose -f docker-compose.yml -f components/serverless/docker-compose.serverless.yml down
The CVAT UI is now available on your-ip-address with port 8080.
Deploy AI Models with Nuclio
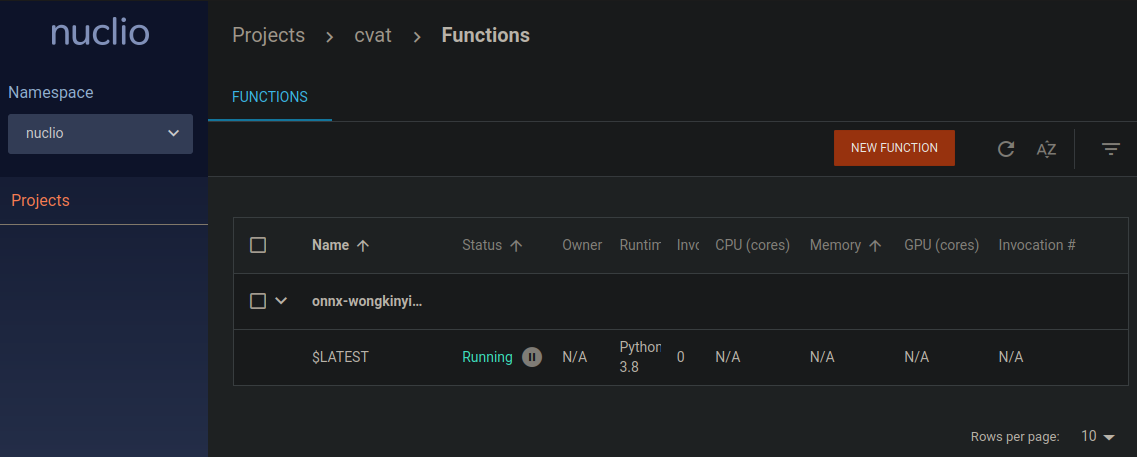
Create cvat project inside nuclio dashboard where you will deploy new serverless functions and deploy a couple of DL models. Commands below should be run only after CVAT has been installed using docker-compose because it runs nuclio dashboard which manages all serverless functions:
nuctl create project cvat
You can verify that the cvat project was created by visiting the Nuclio dashboard localhost:8070 on the host system:

There are a couple of models available in the cvat repository located in the serverless directory. The official documentation gives us a few examples like:
Make sure that the ./serverless/common directory exists inside the cvat folder before running:
- YOLOv7(CPU)
nuctl deploy --project-name cvat \
  --path serverless/onnx/WongKinYiu/yolov7/nuclio/ \
  --volume ./serverless/common:/opt/nuclio/common \
  --platform local
- Segment Anything (CPU)
nuctl deploy --project-name cvat \
  --path serverless/pytorch/facebookresearch/sam/nuclio \
  --volume ./serverless/common:/opt/nuclio/common \
  --platform local
- YOLOv3 (CPU)
nuctl deploy --project-name cvat \
  --path serverless/openvino/omz/public/yolo-v3-tf/nuclio \
  --volume ./serverless/common:/opt/nuclio/common \
  --platform local
- Mask RCNN (GPU)
nuctl deploy --project-name cvat \
  --path serverless/tensorflow/matterport/mask_rcnn/nuclio \
  --platform local --base-image tensorflow/tensorflow:1.15.5-gpu-py3 \
  --desc "GPU based implementation of Mask RCNN on Python 3, Keras, and TensorFlow." \
  --image cvat/tf.matterport.mask_rcnn_gpu \
  --triggers '{"myHttpTrigger": {"maxWorkers": 1}}' \
  --resource-limit nvidia.com/gpu=1
For example running the YOLOv7 command adds the following function:
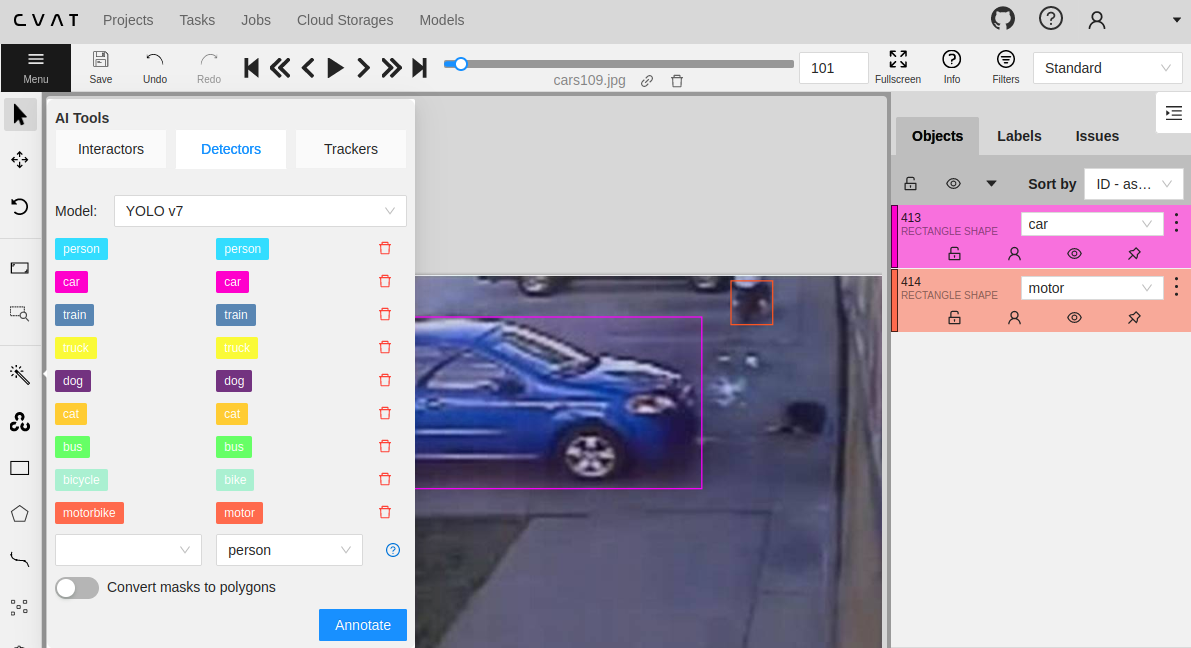
And the model is also listed in the CVAT UI with all the supported classes:

The model is now listed under AI Tools and I can map the classes the model was trained with to my current class labels. And clicking on Annotate automatically generates the bounding boxes - that might need a little bit refinement but will save you a ton of time <3: