OpenCV Image Operations
Setup OpenCV
Create and activate a virtual work environment:
python -m venv .env
source .env/bin/activate
python -m pip install --upgrade pip
Add a file dependencies.txt with all project pip dependencies:
opencv-python
numpy
Install all dependencies with:
pip install -r dependencies.txt
Image Operations
Basic Procedures
Read pixel values:
import cv2

image = cv2.imread('resources/test-image.jpg')

# Read pixel value
pixel = image[100, 100]
print(pixel)
The BGR values of the pixel in position 100x100 are [99 104 159]. To return only the red value you can specify the location inside the BGR array - red = 2 - which returns 159:
redValue = image[100, 100, 2]
print(redValue)
To change the colour value of a pixel:
whitePixel = image[100, 100] = [255, 255, 255]
print(whitePixel)
Print image properties:
print(image.shape)
print(image.dtype)
print(image.size)
- Shape (height, width, channels: colours + alpha) -
(476, 715, 3) - Data Type -
uint8 - Size (height*width*channels) -
1021020
Region of Interest
Setting a ROI - cv2.selectROI(windowName, image, showCrosshair, fromCenter):
roi = cv2.selectROI("ROI Selector", image)
# Crop image from x/y position of top left corner of selector to bottom right x/y position
cropped_image = image[int(roi[1]): int(roi[1]) + int(roi[3]), int(roi[0]): int(roi[0]) + int(roi[2])]
crop_resized = cv2.resize(cropped_image, (600, 600))
cv2.imshow("Region of Interest", crop_resized)
cv2.imwrite("processed/cropped_image.jpg", crop_resized)

cv2.waitKey(5000)
cv2.destroyAllWindows()
print(roi)
Manually select a region of interest and have it cropped and saved:
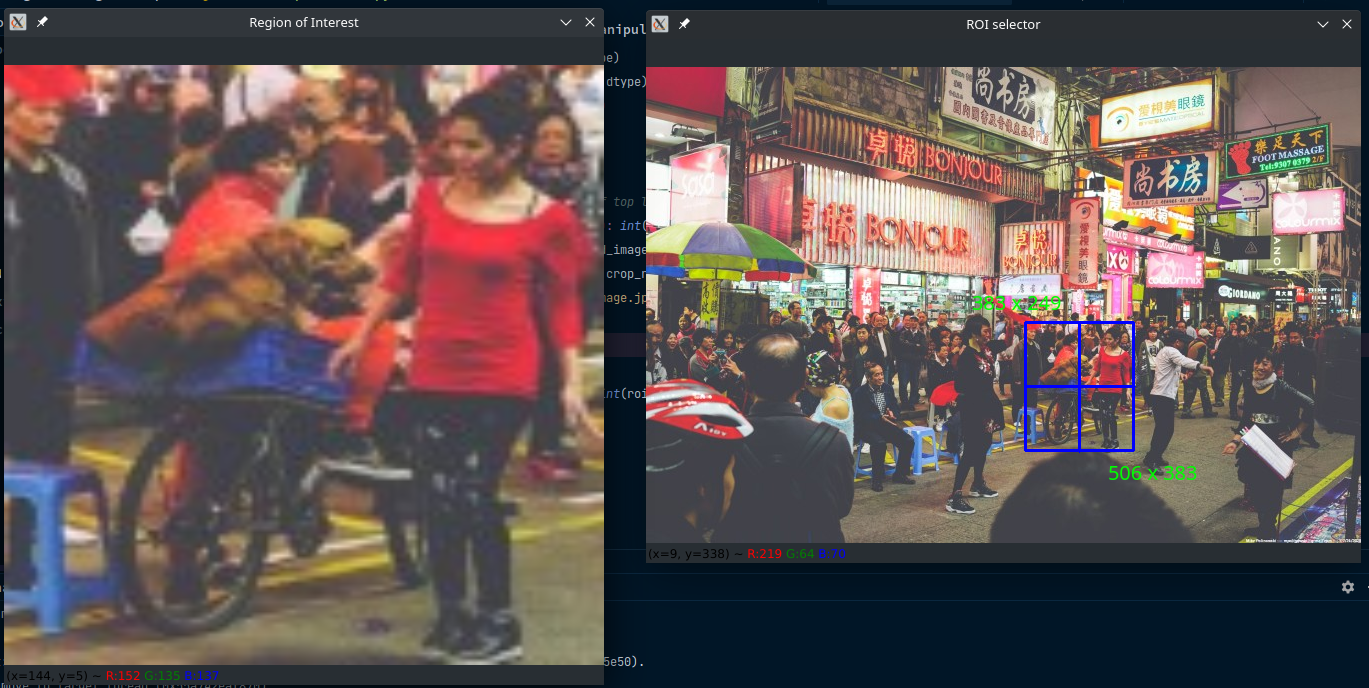
The image is cropped around the crosshair:
image[int(roi[1]): int(roi[1]) + int(roi[3]), int(roi[0]): int(roi[0]) + int(roi[2])]
If you print(roi) you get (383, 249, 123, 134). Where 383x249 are the x and y coordinates of the starting point of the region of interest (top, left corner) and 123x134 is the distance from this starting point at the bottom, right corner 506x383:
- 383 + 123 = 506
- 249 + 134 = 383
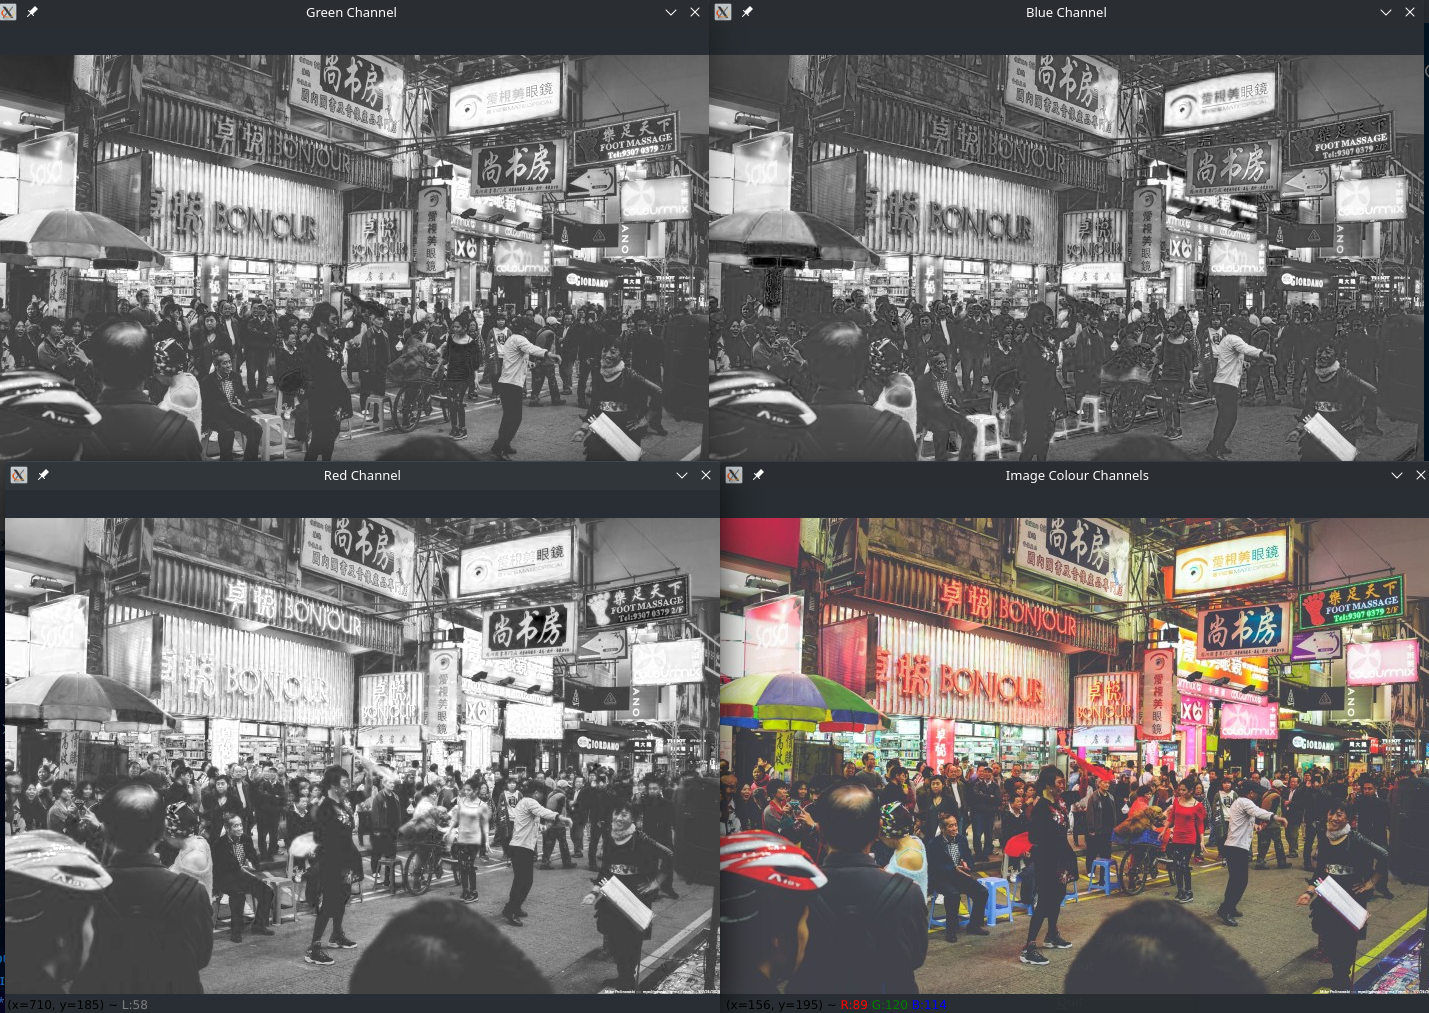
Image Splitting and Joining
Splitting the image into color channels:
b, g, r = cv2.split(image)

cv2.imshow("Blue Channel", b)
cv2.imshow("Green Channel", g)
cv2.imshow("Red Channel", r)

cv2.waitKey(5000)
cv2.destroyAllWindows()
You can re-merge them into one image and end up with the original colour image:
image_color_channels = cv2.merge((b, g, r))
cv2.imshow("All Colour Channels", image_color_channels)
Changing the Colourspace (RGB, BGR, HSV, LUV, LAB, etc.)
image_luv = cv2.cvtColor(image, cv2.COLOR_RGB2LUV)
cv2.imshow("LUV Colour Space", image_luv)
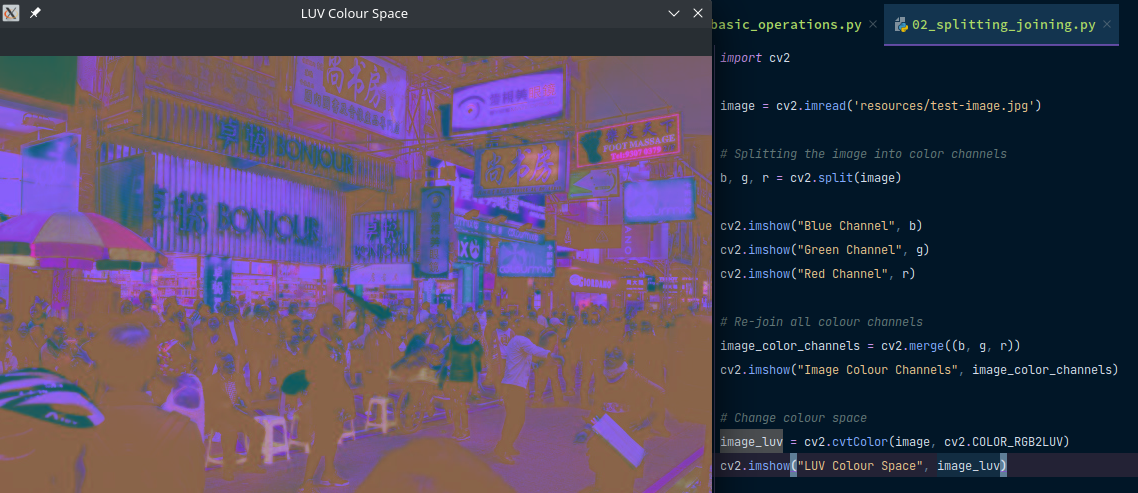
Image Blending
Alpha-blending two independent images img1 and img2:
cv2.addWeighted(img1,alpha,img2,beta,gamma)
dst = α.img1 + ß.img2 + γ
- alpha/ beta: Weight of the first and second array element
- gamma: Scalar added to each sum (usually makes resulting image darker)
import cv2

background = cv2.imread('resources/test-image.jpg')
foreground = cv2.imread('processed/red_channel.jpg')

blurred_background = cv2.GaussianBlur(background, (1,1), 0)

blended_image = cv2.addWeighted(blurred_background, 0.2, foreground, 0.8, 0.0)
cv2.imshow("Blended Image", blended_image)

cv2.waitKey(5000)
cv2.destroyAllWindows()
Apply Filters
filter2D() function is used to change the pixel intensity value of an image based on the surrounding pixel intensity values. This method can enhance or remove certain features of an image to create a new image.
resulting_image = cv2.filter2D(src, ddepth, kernel)
- src: The source image matrix on which to apply the fitler.
- ddepth: It is the desirable depth of destination image.
-1represents that the resulting image will have same depth as the source image. - kernel: Kernel is the filter matrix applied on the image.
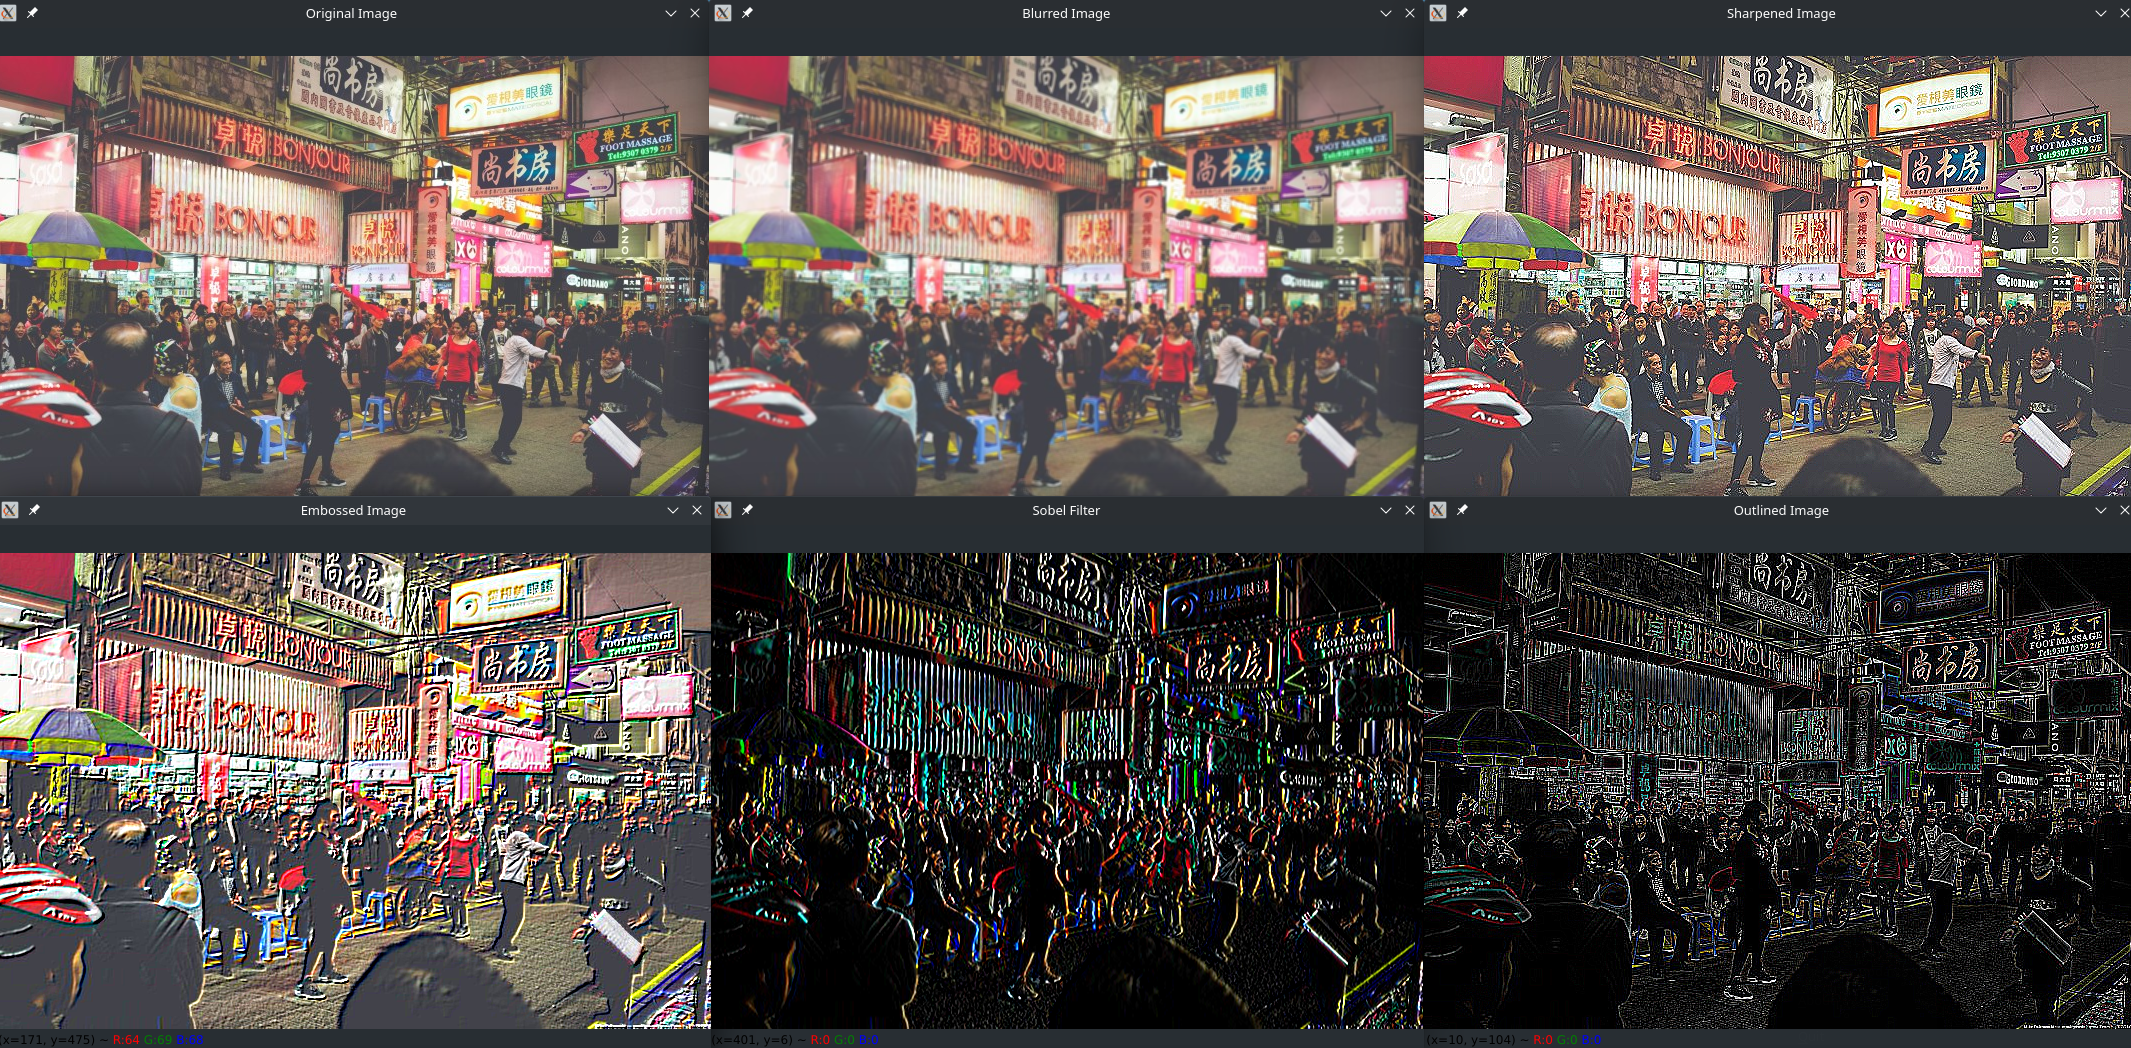
Sharpening
import cv2
import numpy as np

image = cv2.imread('resources/test-image.jpg')

# Sharpening
kernel = np.array([
    [0, -1, 0],
    [-1, 5, -1],
    [0, -1, 0]
])

sharpened_image = cv2.filter2D(image, -1, kernel)

cv2.imshow("Original Image", image)
cv2.imshow("Sharpened Image", sharpened_image)
cv2.imwrite("processed/sharpened_image.jpg", sharpened_image)
Bluring
kernel = np.array([
    [1, 1, 1],
    [1, 1, 1],
    [1, 1, 1]
]) / 9

blurred_image = cv2.filter2D(image, -1, kernel)

cv2.imshow("Blurred Image", blurred_image)
cv2.imwrite("processed/blurred_image.jpg", blurred_image)
Outline Edge Detection
kernel = np.array([
    [-1, -1, -1],
    [-1, 8, -1],
    [-1, -1, -1]
])

outlined_image = cv2.filter2D(image, -1, kernel)

cv2.imshow("Outlined Image", outlined_image)
cv2.imwrite("processed/outlined_image.jpg", outlined_image)
Embossing
kernel = np.array([
    [-2, -1, 0],
    [-1, 1, 1],
    [0, 1, 2]
])

embossed_image = cv2.filter2D(image, -1, kernel)

cv2.imshow("Embossed Image", embossed_image)
cv2.imwrite("processed/embossed_image.jpg", embossed_image)
Image Thresholding
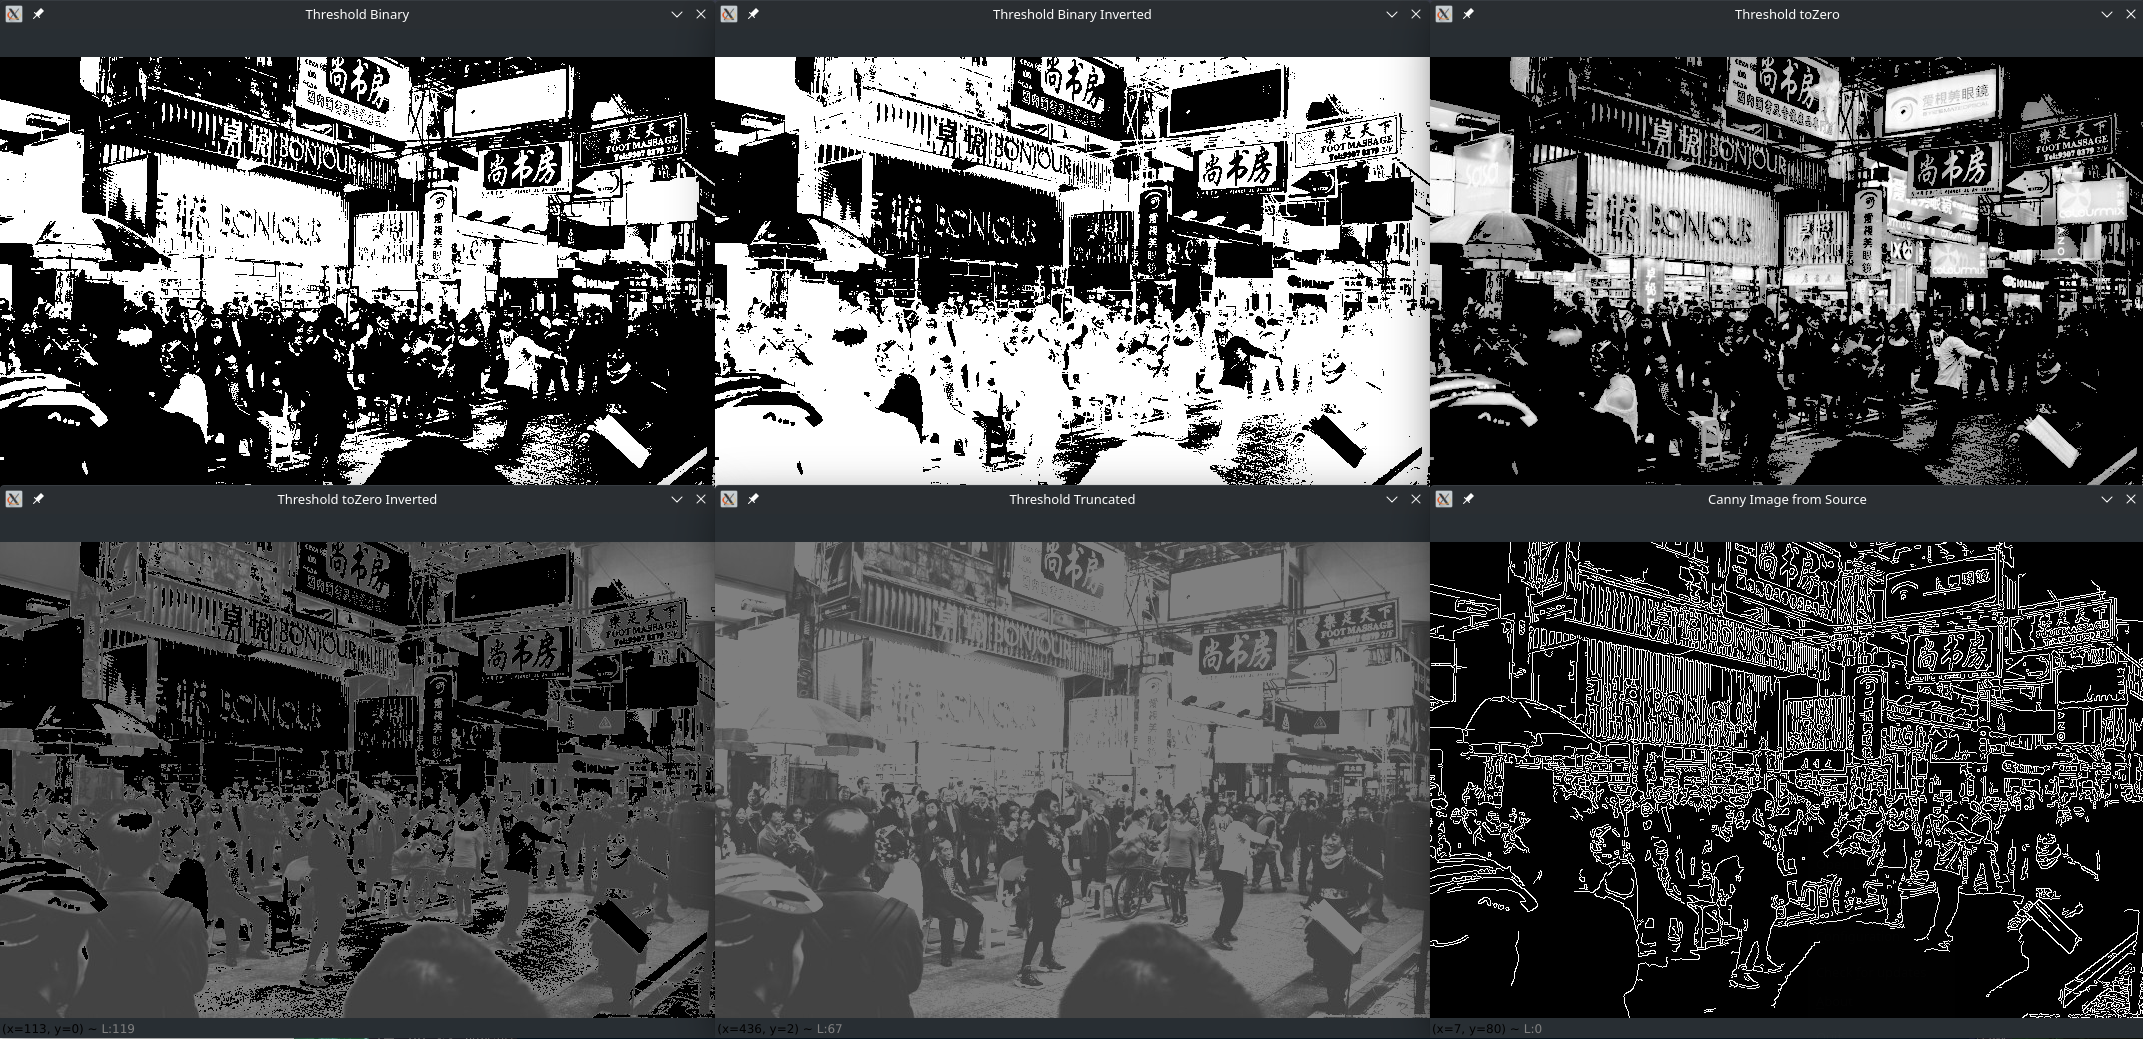
For every pixel, the same threshold value is applied. If the pixel value is smaller than the threshold, it is set to 0, otherwise it is set to a maximum value. The first argument is the source image, which should be a grayscale image. The second argument is the threshold value which is used to classify the pixel values. The third argument is the maximum value which is assigned to pixel values exceeding the threshold. OpenCV provides different types of thresholding which is given by the fourth parameter of the function. Basic thresholding as described above is done by using the type cv.THRESH_BINARY:
th, dst = cv2.threshold(image, thresh, maxValue, cv2.THRESH_BINARY)
All simple thresholding types are:
- cv.THRESH_BINARY
- cv.THRESH_BINARY_INV
- cv.THRESH_TRUNC
- cv.THRESH_TOZERO
- cv.THRESH_TOZERO_INV
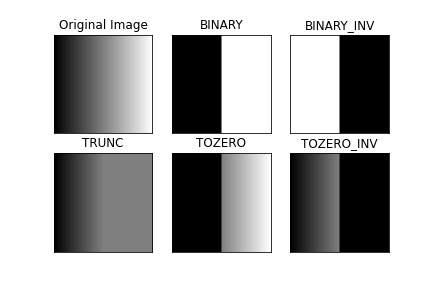
import cv2

image = cv2.imread('resources/test-image.jpg', cv2.IMREAD_GRAYSCALE)

# Set threshold and maxValue
thresh = 127
maxValue = 255

ret, thresh_binary = cv2.threshold(image, thresh, maxValue, cv2.THRESH_BINARY)
cv2.imshow("Threshold Binary", thresh_binary)

ret, thresh_binary_inv = cv2.threshold(image, thresh, maxValue, cv2.THRESH_BINARY_INV)
cv2.imshow("Threshold Binary Inverted", thresh_binary_inv)

ret, thresh_trunc = cv2.threshold(image, thresh, maxValue, cv2.THRESH_TRUNC)
cv2.imshow("Threshold Truncated", thresh_trunc)

ret, thresh_tozero = cv2.threshold(image, thresh, maxValue, cv2.THRESH_TOZERO)
cv2.imshow("Threshold toZero", thresh_tozero)

ret, thresh_tozero_inv = cv2.threshold(image, thresh, maxValue, cv2.THRESH_TOZERO_INV)
cv2.imshow("Threshold toZero Inverted", thresh_tozero_inv)
Canny Edge Detection
Canny( detected_edges, detected_edges, lowThreshold, lowThreshold*ratio, kernel_size )
canny_image_src = cv2.Canny(image, 85, 255)
canny_image = cv2.Canny(thresh_binary, 85, 255)

cv2.imshow("Canny Image from Source", canny_image_src)
cv2.imshow("Canny Image", canny_image)