OpenCV Crash Course Part II
Murtaza's Workshop - Robotics and AI: We are going learn everything required to get started with OpenCV in Python. We will be using Python since it is one of the most popular programming languages. And it has opened numerous job opportunities in various sectors. We will start from the installation process right up to creating exciting projects such as detecting colors , shapes humans and even vehicle number plates. So If you are a beginner don't worry this course is for you. We will skip all the boring theory stuff and focus on the practical implementation. So you can get the computer vision skill set you have always wanted in your CV. By the end of the course you will become familiar with the core principle of opencv and apply different techniques to solve real world problems using computer vision.
- Perspective Transformation
- Color Detection
- Contours and Shape Detection
- Face Detection
- License Plate Detection
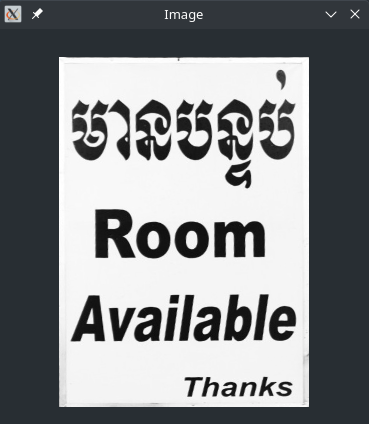
Perspective Transformation
Get the corner points of the object you need to de-warp by hovering over them in MS Paint or Gimp:

Write down the coordinates for the upper-left, upper-right, lower-left and lower-right point in that order.
img = cv2.imread('resources/sign.jpg')

width, height = 250, 350
# upper-left, upper-right, lower-left and lower-right point
pts1 = np.float32([[920, 227], [1216, 244], [873, 780], [1182, 809]])
pts2 = np.float32([[0, 0], [width, 0], [0, height], [width, height]])

matrix = cv2.getPerspectiveTransform(pts1, pts2)

imgOutput = cv2.warpPerspective(img, matrix, (width,height))


cv2.imshow('Image', imgOutput)
cv2.waitKey(10000)
Color Detection
from time import time, sleep
path = 'resources/songhua-river.jpg'
# Create a hue slider that helps us
# find the correct colour to select
def empty(a):
    pass
cv2.namedWindow('TrackBars') # Create the Window
cv2.resizeWindow('TrackBars', 640, 240) # Give it a size
cv2.createTrackbar('Hue Min', 'TrackBars', 0, 179, empty) # Add a slider for min Hue 0-179
cv2.createTrackbar('Hue Max', 'TrackBars', 179, 179, empty) # Add a slider for max Hue 179
cv2.createTrackbar('Sat Min', 'TrackBars', 0, 255, empty) # Add a slider for min Saturation 0-255
cv2.createTrackbar('Sat Max', 'TrackBars', 255, 255, empty) # Add a slider for max Saturation 255
cv2.createTrackbar('Val Min', 'TrackBars', 0, 255, empty) # Add a slider for min Value 0-255
cv2.createTrackbar('Val Max', 'TrackBars', 255, 255, empty) # Add a slider for max Value 255

while True: # Run loop to continuously update from trackbars
    img = cv2.imread(path)
    imgHSV = cv2.cvtColor(img, cv2.COLOR_BGR2HSV)
    h_min = cv2.getTrackbarPos('Hue Min', 'TrackBars')
    h_max = cv2.getTrackbarPos('Hue Max', 'TrackBars')
    s_min = cv2.getTrackbarPos('Sat Min', 'TrackBars')
    s_max = cv2.getTrackbarPos('Sat Max', 'TrackBars')
    v_min = cv2.getTrackbarPos('Val Min', 'TrackBars')
    v_max = cv2.getTrackbarPos('Val Max', 'TrackBars')

    print(h_min, h_max, s_min, s_max, v_min, v_max)

    lower = np.array([h_min, s_min, v_min])
    upper = np.array([h_max, s_max, v_max])
    mask = cv2.inRange(imgHSV, lower, upper)

    cv2.imshow('Original', img)
    cv2.imshow('HSV', imgHSV)
    cv2.imshow('Mask', mask)
    cv2.waitKey(1000)
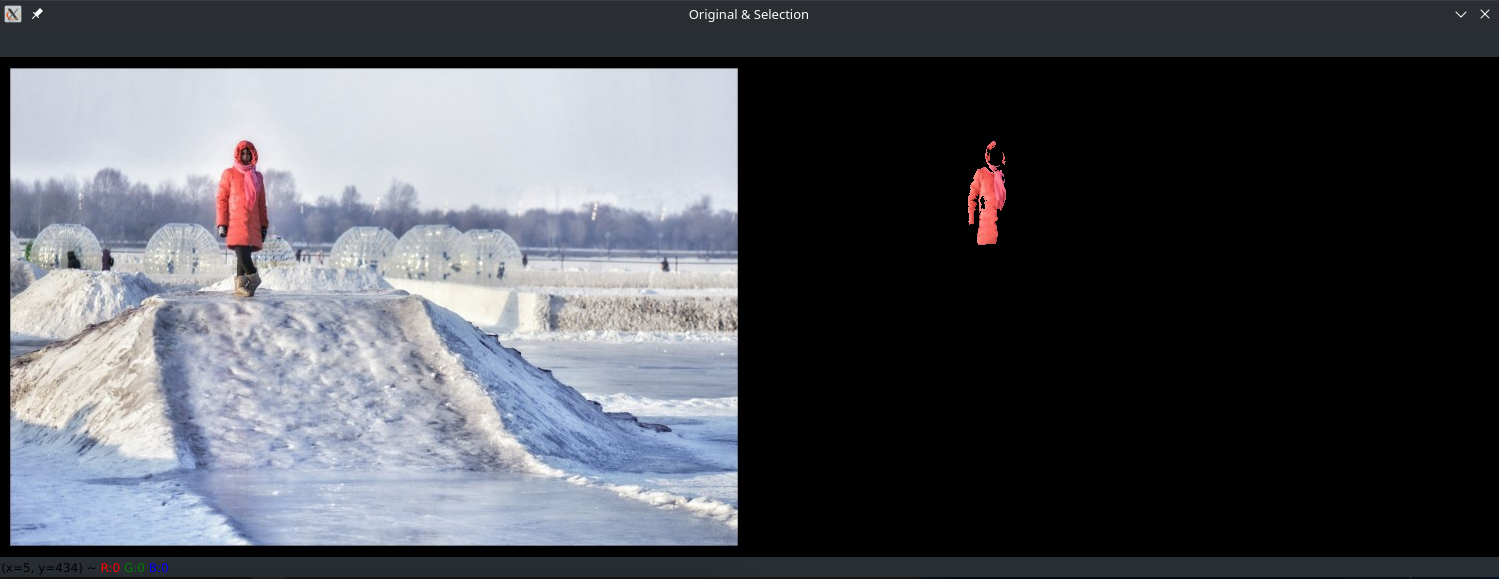
Adjust the sliders until only the colour you wanted is selected (white) and the rest of the image is masked:
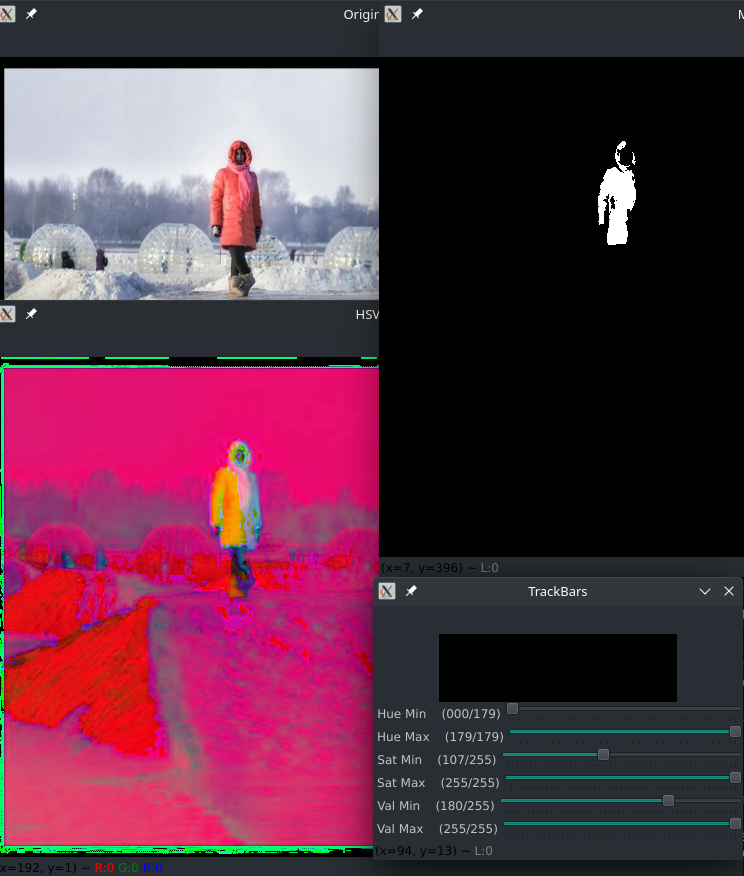
Here the optimal settings are 0 179 107 255 180 255 which we can use as default values for out TrackBars. Now all we have to do is to apply the layer mask to our image:
from time import time, sleep
path = 'resources/songhua-river.jpg'
# Create a hue slider that helps us
# find the correct colour to select
def empty(a):
    pass
cv2.namedWindow('TrackBars') # Create the Window
cv2.resizeWindow('TrackBars', 640, 240) # Give it a size
cv2.createTrackbar('Hue Min', 'TrackBars', 0, 179, empty) # Add a slider for min Hue 0-179
cv2.createTrackbar('Hue Max', 'TrackBars', 179, 179, empty) # Add a slider for max Hue 179
cv2.createTrackbar('Sat Min', 'TrackBars', 107, 255, empty) # Add a slider for min Saturation 0-255
cv2.createTrackbar('Sat Max', 'TrackBars', 255, 255, empty) # Add a slider for max Saturation 255
cv2.createTrackbar('Val Min', 'TrackBars', 180, 255, empty) # Add a slider for min Value 0-255
cv2.createTrackbar('Val Max', 'TrackBars', 255, 255, empty) # Add a slider for max Value 255

while True: # Run loop to continuously update from trackbars
    img = cv2.imread(path)
    imgHSV = cv2.cvtColor(img, cv2.COLOR_BGR2HSV)
    h_min = cv2.getTrackbarPos('Hue Min', 'TrackBars')
    h_max = cv2.getTrackbarPos('Hue Max', 'TrackBars')
    s_min = cv2.getTrackbarPos('Sat Min', 'TrackBars')
    s_max = cv2.getTrackbarPos('Sat Max', 'TrackBars')
    v_min = cv2.getTrackbarPos('Val Min', 'TrackBars')
    v_max = cv2.getTrackbarPos('Val Max', 'TrackBars')

    print(h_min, h_max, s_min, s_max, v_min, v_max)

    lower = np.array([h_min, s_min, v_min])
    upper = np.array([h_max, s_max, v_max])
    mask = cv2.inRange(imgHSV, lower, upper) # Create a selection mask based on thresholds
    imgSelection = cv2.bitwise_and(img, img, mask=mask) # Apply layer mask to image

    imgHor = np.hstack((img, imgSelection))

    cv2.imshow('Original & Selection', imgHor)
    cv2.imshow('Mask', mask)
    cv2.waitKey(1000)
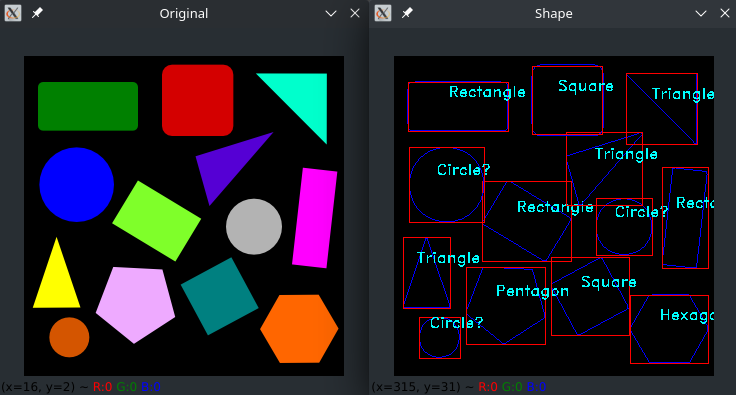
Contours and Shape Detection
def getContours(img): # Retrieve contours from detected shapes
    contours, hierachy = cv2.findContours(img, cv2.RETR_EXTERNAL, cv2.CHAIN_APPROX_NONE)
    for cnt in contours:
        area = cv2.contourArea(cnt) # Get areas for all contours
        # print(area) # Print calculated areas
        if area > 400: # Set threshold to exclude noise
            cv2.drawContours(imgBlack, cnt, -1, (255, 0, 0), 1)  # Draw those areas onto the image
            peri = cv2.arcLength(cnt, True) # Get contour perimeter
            approx = cv2.approxPolyDP(cnt, 0.02*peri, True) # Approximate polygonal curve
            # print(len(approx)) # Print the number corner points of each contour
            objCorners = len(approx)
            x, y, w, h = cv2.boundingRect(approx) # Get coordinates from curve

            if objCorners == 3:
                objectType = "Triangle" # Define object based on corner count

            elif objCorners == 4:
                aspectRatio = w/float(h) # Check if w/h=1 => square
                if 0.95 < aspectRatio < 1.05: objectType = "Square"
                else: objectType = "Rectangle"

            elif objCorners == 5:
                objectType = "Pentagon"

            elif objCorners == 6:
                objectType = "Hexagon"

            elif objCorners == 7:
                objectType = "Heptagon"

            elif objCorners > 7:
                objectType = "Circle?"

            else: objectType = "Unknown"

            cv2.rectangle(imgBlack, (x, y), (x+w, y+h), (0, 0, 255, 1)) # Print bounding box
            cv2.putText(imgBlack, objectType,
                        (x+(w//2)-10, y+(h//2)-10), # Put objectType in Center
                        cv2.QT_FONT_NORMAL, 0.5, (255, 255, 0), 1)

# Contours and Shape detection
path = 'resources/objects_dark.png'
# path = 'resources/objects_light.png'
img = cv2.imread(path)
imgBlack = np.zeros_like(img)
# imgWhite = np.ones_like(img)

imgGray = cv2.cvtColor(img, cv2.COLOR_BGR2GRAY)
imgBlur = cv2.GaussianBlur(imgGray, (7, 7), 1)
imgEdge = cv2.Canny(imgBlur, 50, 50)

getContours(imgEdge)

cv2.imshow("Shape", imgBlack)
cv2.imshow("Original", img)
cv2.waitKey(15000)
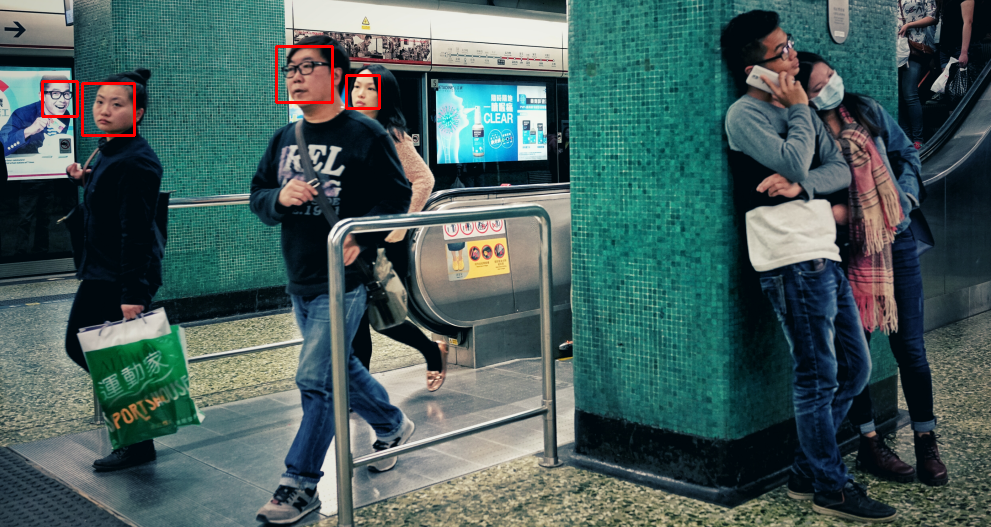
Face Detection
Object Detection using Haar feature-based cascade classifiers is an effective object detection method proposed by Paul Viola and Michael Jones in their paper, "Rapid Object Detection using a Boosted Cascade of Simple Features" in 2001. It is a machine learning based approach where a cascade function is trained from a lot of positive and negative images. It is then used to detect objects in other images.
Here we will work with face detection. Initially, the algorithm needs a lot of positive images (images of faces) and negative images (images without faces) to train the classifier.
OpenCV provides a training method (see Cascade Classifier Training) or pretrained models, that can be read using the cv::CascadeClassifier::load method. The pretrained models are located in the data folder in the OpenCV installation or can be found here.
The following code example will use pretrained Haar cascade models to detect faces and eyes in an image. First, a cv::CascadeClassifier is created and the necessary XML file is loaded using the cv::CascadeClassifier::load method. Afterwards, the detection is done using the cv::CascadeClassifier::detectMultiScale method, which returns boundary rectangles for the detected faces or eyes.
Download the pre-trained you want to use from Github:
cd resources
wget https://raw.githubusercontent.com/opencv/opencv/3.4/data/haarcascades/haarcascade_frontalface_default.xml
import cv2
import numpy as np

# Face Detection
faceCascade = cv2.CascadeClassifier('resources/haarcascade_frontalface_default.xml')
imagePath = 'resources/hongkong-metro.png'
img = cv2.imread(imagePath)
imgGray = cv2.cvtColor(img, cv2.COLOR_BGR2GRAY) # Create grayscale image

faces = faceCascade.detectMultiScale(imgGray, 1.1, 4) # Detect all faces in image

for (x, y, w, h) in faces:
    cv2.rectangle(img, (x, y), (x+w, y+h), (0, 0, 255), 2)

cv2.imshow("Face Detection", img)
cv2.waitKey(5000)
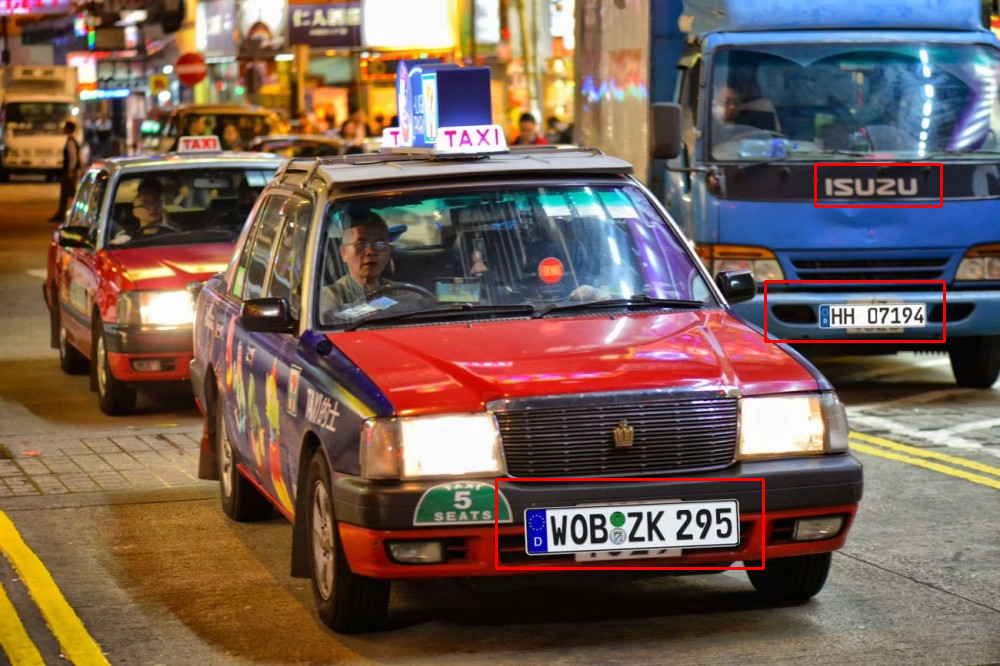
License Plate Detection
cd resources
wget https://raw.githubusercontent.com/opencv/opencv/3.4/data/haarcascades/haarcascade_russian_plate_number.xml
import cv2

# License Plate Detection
lpCascade = cv2.CascadeClassifier('resources/haarcascade_russian_plate_number.xml')
imagePath = 'resources/HK_Taxi.jpg'
img = cv2.imread(imagePath)
imgGray = cv2.cvtColor(img, cv2.COLOR_BGR2GRAY) # Create grayscale image

plates = lpCascade.detectMultiScale(imgGray, 1.1, 4) # Detect all faces in image

for (x, y, w, h) in plates:
    cv2.rectangle(img, (x, y), (x+w, y+h), (0, 0, 255), 2)

cv2.imshow("License Plate Detection", img)
cv2.waitKey(5000)